
 how can i move the object with two hands when the two hands is moving?
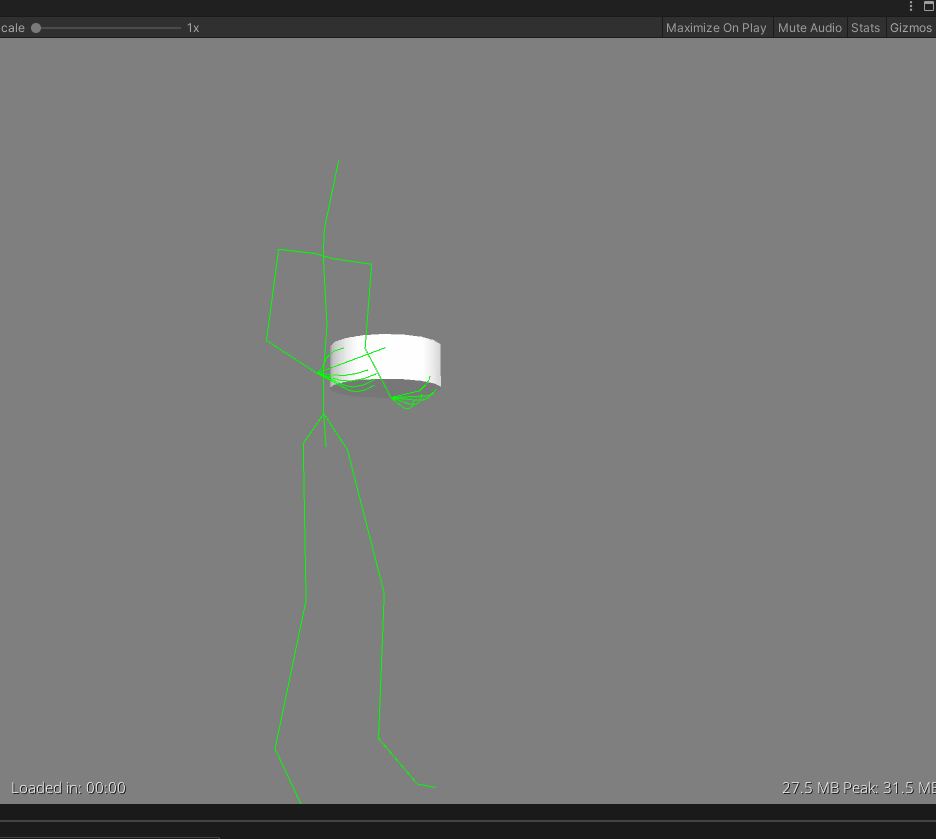
TakeTheCake.gifI want take a cake with two hands. i let the cake as a child of right hand,but when the two hands moving,the left hand will not on the cake.
can i pin the two hands on the cake,or can left hand move follow the right hand when right hand’s position changed?

Hi,
thank you very much for your support request.
Yes this is possible:
1) Setup IK for your character using the IK Setup Wizard (in config mode).
2) Stay in config mode and select the IK handles of the hands.
3) Open the constraints tab and scroll to the child-of constraint. Disable the IK Pinning Mode.
4) Return to pose mode.
5) Select the IK handle of the left hand.
6) In the "Channels" section of the pose editor, set the cake as parent.
8) Save key frames for your changes (Key Selected --> Key All) or "S" shortcut.
More information about the child-of constraint can be found in this video tutorial:
https://www.soxware.com/umotion-manual/ProLesson3.html
Please let me know in case you have any follow-up questions.
PS: Your UMotion version is quite dated. Please update to the latest version from the asset store.
Best regards,
Peter

when finishing animation how to make it a fbx again?
after i put my skeleton into a scene then use umotion to make a animation how do i make the animated scene into a fbx?
If need more information please ask!!!
Hi,
thank you very much for your support request.
Here is how to export to FBX:
1) Click on the button with the "Gear"-Icon in the Clip Editor
2) Change the "File Format" to "FBX"
3) Select the FBX file you want to export your animation to as "Destination File".
4) Close the settings
5) Click on File --> Export --> Current Clip
More information:
https://www.soxware.com/umotion-manual/ImportExport.html
https://www.soxware.com/umotion-manual/ProjectSettings.html
Please let me know in case you have any follow-up questions.
Best regards,
Peter

IK Interaction
Is possible to make the player to interact with a model using IK? So its not an animation but that if you move a bone manually it moves the rest, something like a ragdoll. What i want is the player to grab one arm and move it so the rest of the body follows.
Hi Nicolas,
thank you very much for your support request.
You can use UMotion's IK features only during edit-time (while authoring your animations). The results are then baked into the final animation clip. Here is more information about how to setup IK in UMotion: https://www.soxware.com/umotion-manual/ProLesson2.html
If you want that the IK adapts to runtime changes, you need a runtime IK solution (e.g. Unity's Animation Rigging package or IK assets from the asset store).
Please let me know in case you have any follow-up questions.
Best regards,
Peter
start recording
Ok i have moved my limbs (in a punching position) but how do i start record that position?
and how to record the starting stance/animation?
If need more information please ask!!!
Hi,
thank you very much for your support request.
You can create key frames manually by selecting the bones you want to create keys for and either by pressing the "S" shortcut key or by clicking on the "Key Selected" button in the Pose Editor.
If you want UMotion to automatically create the key frames for you, you can set the "Auto Key" to "Generate" in the Pose Editor. That way every time you manipulate a bone, a key frame is automatically generated for you.
More information can be found in the Quick Start Video Tutorial: https://www.soxware.com/umotion-manual/QuickStart.html
Please let me know in case you have any follow-up questions.
Best regards,
Peter

Hips IK
I can't get them to work. Refering to the Inverse cinematics video doesn't make it better, because this one shows only how to setup arms. WHy, if the IK setup wizard manages those already? And from my knowledge the hips have to be setup differently. In Unity's animation rigging package tfor hips there is also a different solver.
When having open the IK setup wizard and I add a new IK constrain then what to setup to get the IK working?
Can someone please list me in short a step by step process?
Hi Adajos,
thank you very much for your support request.
By pinning the feet, you can decouple the legs from the hips movement (feet are going to stay in place while manipulating the hips). If that's already enough for you, then that's what you get out of the box from the regular (humanoid) IK setup wizard. Here is how to pin the fee to the ground:
- Select the IK Handle of the foot
- In the channels section of the pose editor tick "IK Pinned".
- Create a key frame ("S" shortcut while having the IK Handle selected)
The above should be sufficient for most regular animating purposes. If for some specific reason you also want to decouple the upper body from the hips, you need to setup an IK chain for the spine. Take a look at this step-by-step description: https://support.soxware.com/communities/1/topics/957-hips?redirect_to_reply=2559#comment-1612
Please let me know in case you have any follow-up questions.
Best regards,
Peter
FBX Export Deleting Curve Data
So I'm working with some root motion animations and I export them to FBX via UMotion Pro. On the FBX file I have setup curves for feet ik and gravity for the animation I'm working on. The problem is, if I want to edit the animation in UMotion, when I re-export the clip (from UMotion) it deletes all of my curves on the fbx. Is there anyway to prevent this?
Hi,
thank you very much for your support request.
By creating a Custom Property constraint in "Animator Parameter" mode, you can tell UMotion to include an additional curve into the exported FBX file. That way you can add custom curves like a gravity or an ik curve etc. to the exported FBX animation.
I'm writing this out of my head, but I think UMotion is even capable of importing your existing custom curves. You just need to make sure that you've created the related custom property constraints (in "Animator Parameter" mode) with the same/correct name (as defined in the FBX import settings) before importing the animation.
If you now how to code: Another method would be to extend UMotion with a custom export button that first copies the existing custom curves of the FBX file, then performs the regular UMotion export and then writes the previously saved custom curves back into the FBX. Take a look at the UMotion API if you want to go this route.
Please let me know in case you have any follow-up questions.
Best regards,
Peter

 Error when selecting an object to animate
When I choose an object (any object) to animate, I get this error:
Can't add script behaviour 'UMotionLock' because it is an editor script. To attach a script it needs to be outside the 'Editor' folder.
UMotionLock.ΉΊΉΊΉΊΉΊΉΉΉΉΉΊΊΉΉΉΉΉΉΊΉΊΊΉΉΉΊΊΊΊΉΊΊΊΉΉΉΉΉΊΉΉΊΊΊ() at line:193

ΉΊΊΊΊΉΊΊΉΉΊΉΉΉΉΉΉΊΉΉΉΊΊΉΊΉΉΉΉΊΊΊΊΉΊΉΉΊΊΊΉΊΉΊΉΉΉ.ΊΊΊΊΊΊΊΊΊΊΊΉΉΊΉΊΉΊΉΊΊΊΊΉΊΊΉΊΉΉΉΉΊΉΊΉΊΉΉΉΉΊΊΉΉΉΉ() at line:275

ΉΊΊΊΊΉΊΊΉΉΊΉΉΉΉΉΉΊΉΉΉΊΊΉΊΉΉΉΉΊΊΊΊΉΊΉΉΊΊΊΉΊΉΊΉΉΉ.ΊΊΊΉΉΉΉΉΉΊΊΊΊΊΊΊΊΊΉΉΊΉΊΊΉΉΉΉΊΊΉΉΉΊΉΊΊΉΊΉΉΊΊΊΉΊΉ() at line:220

ΉΊΉΉΊΊΉΊΉΉΉΊΉΊΊΉΉΊΉΉΊΊΉΊΊΉΉΉΊΊΉΊΉΊΉΉΉΉΉΊΉΊΊΊΊΉΉ.ΉΉΉΊΉΉΊΉΊΊΉΊΊΉΊΉΊΉΉΉΉΊΊΉΊΉΊΉΉΊΊΊΉΊΉΉΊΉΊΉΊΊΉΊΊΉΊ() at line:1473

ΉΊΉΉΊΊΉΊΉΉΉΊΉΊΊΉΉΊΉΉΊΊΉΊΊΉΉΉΊΊΉΊΉΊΉΉΉΉΉΊΉΊΊΊΊΉΉ.ΊΊΊΊΊΊΊΊΉΊΊΊΉΊΊΉΊΊΊΉΊΉΊΊΉΊΊΉΉΊΊΊΊΉΉΊΉΊΊΊΊΉΊΉΉΉΉ() at line:1444

ΉΊΉΉΊΊΉΊΉΉΉΊΉΊΊΉΉΊΉΉΊΊΉΊΊΉΉΉΊΊΉΊΉΊΉΉΉΉΉΊΉΊΊΊΊΉΉ.ΉΊΊΉΉΊΉΊΊΉΉΉΉΊΊΊΉΊΊΊΉΊΊΊΊΊΉΊΊΉΉΊΊΉΉΊΉΊΊΊΊΉΉΊΉΊΉ() at line:468

ΉΊΉΉΊΊΉΊΉΉΉΊΉΊΊΉΉΊΉΉΊΊΉΊΊΉΉΉΊΊΉΊΉΊΉΉΉΉΉΊΉΊΊΊΊΉΉ.ΉΊΊΉΉΊΉΊΊΉΉΉΉΊΊΊΉΊΊΊΉΊΊΊΊΊΉΊΊΉΉΊΊΉΉΊΉΊΊΊΊΉΉΊΉΊΉ() at line:265

ΉΉΉΉΉΊΊΊΉΊΉΊΊΉΊΉΊΉΊΊΊΉΉΉΉΉΊΉΊΊΊΊΊΉΊΊΉΉΉΊΊΉΊΉΉΉΊ.OnGUI() at line:364

GUIUtility.ProcessEvent()
[Exception] NullReferenceException: Object reference not set to an instance of an object
UMotionLock.ΉΊΉΊΉΊΉΊΉΉΉΉΉΊΊΉΉΉΉΉΉΊΉΊΊΉΉΉΊΊΊΊΉΊΊΊΉΉΉΉΉΊΉΉΊΊΊ() at line:194

ΉΊΊΊΊΉΊΊΉΉΊΉΉΉΉΉΉΊΉΉΉΊΊΉΊΉΉΉΉΊΊΊΊΉΊΉΉΊΊΊΉΊΉΊΉΉΉ.ΊΊΊΊΊΊΊΊΊΊΊΉΉΊΉΊΉΊΉΊΊΊΊΉΊΊΉΊΉΉΉΉΊΉΊΉΊΉΉΉΉΊΊΉΉΉΉ() at line:275

ΉΊΊΊΊΉΊΊΉΉΊΉΉΉΉΉΉΊΉΉΉΊΊΉΊΉΉΉΉΊΊΊΊΉΊΉΉΊΊΊΉΊΉΊΉΉΉ.ΊΊΊΉΉΉΉΉΉΊΊΊΊΊΊΊΊΊΉΉΊΉΊΊΉΉΉΉΊΊΉΉΉΊΉΊΊΉΊΉΉΊΊΊΉΊΉ() at line:220

ΉΊΉΉΊΊΉΊΉΉΉΊΉΊΊΉΉΊΉΉΊΊΉΊΊΉΉΉΊΊΉΊΉΊΉΉΉΉΉΊΉΊΊΊΊΉΉ.ΉΉΉΊΉΉΊΉΊΊΉΊΊΉΊΉΊΉΉΉΉΊΊΉΊΉΊΉΉΊΊΊΉΊΉΉΊΉΊΉΊΊΉΊΊΉΊ() at line:1473

ΉΊΉΉΊΊΉΊΉΉΉΊΉΊΊΉΉΊΉΉΊΊΉΊΊΉΉΉΊΊΉΊΉΊΉΉΉΉΉΊΉΊΊΊΊΉΉ.ΊΊΊΊΊΊΊΊΉΊΊΊΉΊΊΉΊΊΊΉΊΉΊΊΉΊΊΉΉΊΊΊΊΉΉΊΉΊΊΊΊΉΊΉΉΉΉ() at line:1444

ΉΊΉΉΊΊΉΊΉΉΉΊΉΊΊΉΉΊΉΉΊΊΉΊΊΉΉΉΊΊΉΊΉΊΉΉΉΉΉΊΉΊΊΊΊΉΉ.ΉΊΊΉΉΊΉΊΊΉΉΉΉΊΊΊΉΊΊΊΉΊΊΊΊΊΉΊΊΉΉΊΊΉΉΊΉΊΊΊΊΉΉΊΉΊΉ() at line:468

ΉΊΉΉΊΊΉΊΉΉΉΊΉΊΊΉΉΊΉΉΊΊΉΊΊΉΉΉΊΊΉΊΉΊΉΉΉΉΉΊΉΊΊΊΊΉΉ.ΉΊΊΉΉΊΉΊΊΉΉΉΉΊΊΊΉΊΊΊΉΊΊΊΊΊΉΊΊΉΉΊΊΉΉΊΉΊΊΊΊΉΉΊΉΊΉ() at line:265

ΉΉΉΉΉΊΊΊΉΊΉΊΊΉΊΉΊΉΊΊΊΉΉΉΉΉΊΉΊΊΊΊΊΉΊΊΉΉΉΊΊΉΊΉΉΉΊ.OnGUI() at line:364

HostView.InvokeOnGUI() at <434908727417408abd02bbd1a0835ef8>:0

DockArea.DrawView() at <434908727417408abd02bbd1a0835ef8>:0

DockArea.OldOnGUI() at <434908727417408abd02bbd1a0835ef8>:0

IMGUIContainer.DoOnGUI() at <7f21349c9161407ba80a85ddaed7fabb>:0

IMGUIContainer.HandleIMGUIEvent() at <7f21349c9161407ba80a85ddaed7fabb>:0

IMGUIContainer.HandleIMGUIEvent() at <7f21349c9161407ba80a85ddaed7fabb>:0

IMGUIContainer.HandleIMGUIEvent() at <7f21349c9161407ba80a85ddaed7fabb>:0

IMGUIContainer.SendEventToIMGUIRaw() at <7f21349c9161407ba80a85ddaed7fabb>:0

IMGUIContainer.SendEventToIMGUI() at <7f21349c9161407ba80a85ddaed7fabb>:0

IMGUIContainer.HandleEvent() at <7f21349c9161407ba80a85ddaed7fabb>:0

EventDispatchUtilities.PropagateEvent() at <7f21349c9161407ba80a85ddaed7fabb>:0

MouseEventDispatchingStrategy.SendEventToRegularTarget() at <7f21349c9161407ba80a85ddaed7fabb>:0

MouseEventDispatchingStrategy.SendEventToTarget() at <7f21349c9161407ba80a85ddaed7fabb>:0

MouseEventDispatchingStrategy.DispatchEvent() at <7f21349c9161407ba80a85ddaed7fabb>:0

EventDispatcher.ApplyDispatchingStrategies() at <7f21349c9161407ba80a85ddaed7fabb>:0

EventDispatcher.ProcessEvent() at <7f21349c9161407ba80a85ddaed7fabb>:0

EventDispatcher.Dispatch() at <7f21349c9161407ba80a85ddaed7fabb>:0

BaseVisualElementPanel.SendEvent() at <7f21349c9161407ba80a85ddaed7fabb>:0

UIElementsUtility.DoDispatch() at <7f21349c9161407ba80a85ddaed7fabb>:0

UnityEngine.UIElements.UIElementsUtility.UnityEngine.UIElements.IUIElementsUtility.ProcessEvent() at <7f21349c9161407ba80a85ddaed7fabb>:0

UIEventRegistration.ProcessEvent() at <7f21349c9161407ba80a85ddaed7fabb>:0

UIEventRegistration+<>c.<.cctor>b__1_2() at <7f21349c9161407ba80a85ddaed7fabb>:0

GUIUtility.ProcessEvent() at :0
Hi,
thank you very much for your support request.
Please make sure that the UMotionEditor folder has no parent folder named "Editor".
If that doesn't solve your issue, delete your UMotion folders and perform a re-installation.
Please let me know in case you need any further assistance.
Best regards,
Peter

Clarify workflow for editing animations 'in place'
At the moment, I:
1. Start my scene running
2. Watch my character animate to a certain point (that I want to fix)
3. Pause my scene running
4. The 'Pose Editor' says 'Select a GameObject to animate' with 'None (GameObject)'. So I drag my character into the Pose Editor box
5. My paused character's animation resets to frame 0
Is this intentional? Can I jump into UMotion at the exact frame that is currently paused, without it resetting?
Note that after I unpause the 'Pose Editor' resets back to 'None (GameObject)'.
Hi,
thank you very much for your support request.
Is this intentional? Can I jump into UMotion at the exact frame that is currently paused, without it resetting?
Your runtime pose can be a mix of several animations (if e.g. the runtime animator is doing a transition or if you use animation layers to animate separate parts of the character with separate animations). When you assign a character to thePose Editor, UMotion just previews the animation it has currently loaded in the clip editor (and the frame where the frame cursor is currently pointing at in the Clip Editor).
Note that after I unpause the 'Pose Editor' resets back to 'None (GameObject)'.
Yes that's intentional and necessary for the runtime Animator to take over again.
Best regards,
Peter
how to edit a mixamo animation (fbx) with umotion pro?
how do i start editing a mixamo animation (fbx) with umotion pro?
Hi,
thank you very much for your support request.
To edit an existing animation you basically have to do the following:
Create a new UMotion project for your character, then import the animation you want to edit. After editing the animation, you can decide to either export as *.anim or as *.fbx.
Here is the getting started video tutorial to learn the basics of UMotion: https://www.soxware.com/umotion-manual/QuickStart.html
Please let me know in case you have any follow-up questions.
Best regards,
Peter
Animation Blending b/w Two Animations
So basically I want to edit one animation so that it's last key frames are blended into the starting keyframes of another animation
Something like this:
+ (Animation 1)
- (Animation 2)
+++++++++++
-----------------
So that the first animation will slowly change into the second one.
Is there any way to do this using uMotion?
Hi,
thank you very much for your support request.
UMotion currently does not allow you to smoothly blend between two animations and later export them as a single animation. What you can do though, is editing the separate animations in UMotion and export them. Then use Unity's Animator controller or Unity Timeline to realize the transition.
You could also manually do the transition (by editing the curves etc.) but that's more labor intense of course.
Please let me know in case you have any follow-up questions.
Best regards,
Peter
Customer support service by UserEcho
