
 Compress animation that is already imported
Hello, I have previously imported an animation file and as I imported loseless, it has every single keyframe in there.
I do not have the original animation file but is there a way to optimize this?

Hi,
thank you very much for your support request.
UMotion by itself does not feature animation compression, but you can export your animation as FBX and then in the FBX's import settings use Unity's built in animation compression. When exporting to FBX (especially when using humanoid), make sure to select the character's fbx file (or a copy of it) as destination file.
PS: Your UMotion version is already pretty dated. Please update to the latest version from the asset store. Newer versions usually contain several bugfixes.
Best regards,
Peter
Can I delete the original .fbx animations after editing and exporting from Umotion?
Hello. I have downloaded an animation from Mixamo in the FBX format and edited it with Umotion and exported as .anim.
Can I now delete the original FBX animation from Mixamo, or does it need to be present in the Unity project?
Thanks! Amazing product by the way.
Hi,
thank you very much for your support request.
There is no technical dependency on the original FBX animation. You can safely delete it.
Please let me know in case you have any follow-up questions.
Best regards,
Peter

With a generic rig, exportiing Anim from Umotion wont drag to the animator component-Wrong format
I've created a generic rig and annotated a small clip. The object is locked, so I need to click 'Clear' to unblock the character. When returning to the normal inspector and dragging my animation into the Animator field area, it won't drop into the Controller or Avatar area, as if it is in the wrong format. I've tried to overcome this, but there is no way around it. I feel I am missing something. Any idea where I have gone wrong? I would really appriceate your help. Thank you
Hi,
thank you very much for your support request.
The field in the "Animator" component you mentioned expects an Animator Controller, not an animation clip: https://www.youtube.com/watch?v=tveRasxUabo
Drag and drop the animation clip onto the character in Unity's "Hierarchy" window instead. This automatically creates an animator controller and places the animation clip in the controller.
Please let me know in case you have any follow-up questions.
Best regards,
Peter
Humanoid binding warnings
Hello! I get this error below
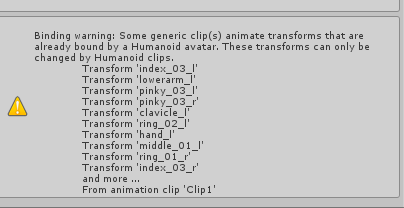
But my clip is exported as Humanoid, everything is set as Humanoid, also the type in clip settings says Humanoid. The Character i place this on is also a Humanoid character..
Is something going wrong with exporting?
Hi,
thank you very much for your support request.
Please check the following:
1) Check your character setup:
- Select the *.fbx file of your character, open the "Rig" tab in the Inspector window. There must be no errors displayed in this window.
- Then click on "Configure..." and make sure that all bones are displayed in green.
2) Check your UMotion setup:
- Create a fresh UMotion project of type humanoid.
- Create an instance of your character's *.FBX file in your scene and assign it to the UMotion pose editor.
- Create keyframes for all bones on frame 0 and e.g. frame 60.
- Export the animation.
- Click on "Clear" in the Pose Editor to release the character.
- Drag and drop the exported animation clip onto your character (in the hierarchy window).
- The animation should play without any warnings.
Please note that modify the character avatar settings (those mentioned in (1)) can invalidate your existing UMotion project and can cause such errors like the one you mentioned. If you alter the settings, always create a fresh UMotion project afterwards (you can then use "Import Clips" to import the entire old UMotion project into the new project file to preserve your animation clips).
Please let me know in case you have any follow-up questions.
Best regards,
Peter
 Built in font no longer valid
Hi!
Upon opening the Clip editor and the Pose editor, i get an error now saying that Arial.ttf is no longer a valid built in font. Please use LegacyRuntime.ttf
ArgumentException: Arial.ttf is no longer a valid built in font. Please use LegacyRuntime.ttf
UnityEngine.Resources.GetBuiltinResource[T] (System.String path) (at <61c05f8d81804e929ff4198c5bcc7a62>:0)
This makes it so there is no editor window rendered :(
Hi,
thank you very much for your support request.
Sounds like your using an old version of UMotion in a newer version of Unity. Please update your UMotion version to the latest version from the asset store.
I just double checked, UMotion V1.29p02 (latest as of time of writing) is working fine in Unity 2022.2.11.
Best regards,
Peter

How do I export the fbx mesh
Trying to export the animation clips with the mesh, however I only get bones and animation. If i use update existing file it fails seeing as there's no existing mesh in the folder. When I use unity to export the mesh into fbx it distorts the mesh. e.g. hands and feet. what's the solution?
Dear Saban,
thank you very much for your support request.
If i use update existing file it fails seeing as there's no existing mesh in the folder.
When exporting from within UMotion, the "Update existing file" export mode is the only method to have mesh and animation data within the same FBX file (UMotion has no FBX mesh exporting capabilities, it can only preserve the mesh that's already in the FBX file). Are you sure you've selected the correct FBX file as destination file?
Let me give you an example: Let's say you animate a character which source file is named "MyCharacter.fbx". With "Update Existing File"-mode you have to select "MyCharacter.fbx" as destination file (or a copy of that file).
Please let me know in case you have any follow-up questions.
Best regards,
Peter

Is there a shortcut to navigate to the previous/next clip in the clip editor?
I checked the preferences window, but I couldn't set a shortcut to select the previous or next clip.
I checked over a hundred short clips, but it felt very tiring to open the clip window and select the next clip to select the next one.
Thank you for your reading.
Hi dorothi,
thank you very much for your support request.
Switching between animation clips is currently only possible by selecting the desired animation clip from the dropdown in the clip editor. There is no shortcut like the one you requested. However, you could use the UMotion API to write a short script that jumps to to the previous or next animation clip when a certain button is pressed: https://www.soxware.com/umotion-manual/UMotionAPI.html
These are the required methods from the API:
ClipEditor.GetSelectedClipName()
ClipEditor.GetAllClipNames()
ClipEditor.SelectClip(string name)
Please let me know in case you have any follow-up questions.
Best regards,
Peter

Curve Smoothing
Hi again, I see some Curve Smoothing requests that was few years ago.
Is it that hard to make simple gaussian filter?
Could I do it my self with uMotion API?
I'm sure this feature is must have. Now I have to export animation to Maya or MotionBuilder to do Butterworth filtering.
But it's only function I need there, for the rest of serious mocap cleaning from MOVE.AI uMotion is good enough!
Looking forward for any support.
Thanks again for great software!
Hi John,
thank you very much for your feature request.
Unfortunately, curve smoothing is currently not supported. I'm sorry.
Could I do it my self with uMotion API?
Unfortunately, no. The UMotion API currently does not provide direct key frame access.
I'm sorry I currently can't give you any promises to if and when such features are going to land in UMotion.
Best regards,
Peter
Animated Properties: Sort and Prioritize
Hi, many thanks for amazing tool. I use it fulltime everyday for mocap cleaning for Humanoid system.
It would be extremely helpful to prioritize main bones chain: Hip, Spine1, Spine2, Neck, Head.
Then Hands IK.
Then Feet IK.
I see that Property Filter is next in your Roadmap, so I'll be happy to have it as soon as possible!
Thanks!
Hi John,
thank you very much for your feature request and thanks for the kind words. Glad to hear that you are enjoying using UMotion.
Your voice is heard and helps me prioritize my (unfortunately quite limited) development resources.
Best regards,
Peter

Bug: Pivots of all objects outside character are broken after animating character
I've attached a video to see the issue clearly.
I fixed this by restarting the unity project.
To replicate, during editing a file's animation, select a random object outside the character GO (such as an axe) while pose mode is on, child it to the GO you're animating in clip editor, I tried to align the axe to the arms of my character (was still learning how to child-of constraint), then viola. I messed up unity's editor.
Customer support service by UserEcho
