
 FBX vs Anim
Hi I'm getting disrepencies from ANIM export to FBX (lossless).
ANIM export everything works great, but I can't get any compression on the files - so its too large.
FBX export has a different pose around.
Image on left, is same model with export in ANIM (frame 1), and image on right is same model using export animation in FBX (frame 1).
I'm a bit stuck here. It's a humanoid rig.


Hi tom,
thank you very much for your support request.
When exporting an *.FBX animation for humanoid, always use "Write Mode" set to "Update Existing File". Then select your character's *.FBX as destination file (so that your animation is directly written into the *.FBX of your character). This ensures max. compatibility with the humanoid avatar of your character.
Please let me know if this solves your issue.
Bets regards,
Peter

About Blendshapes
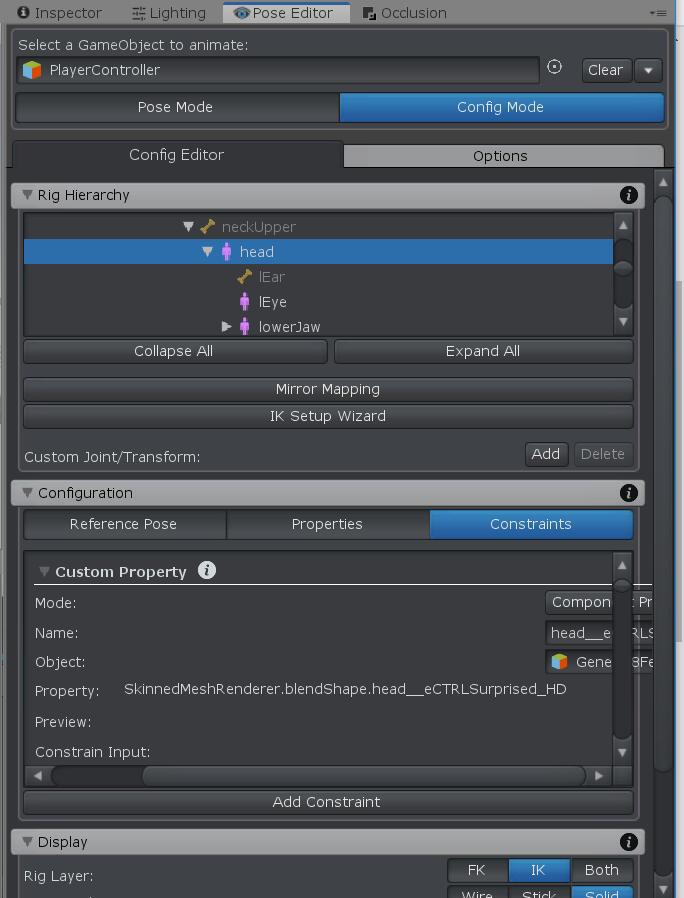
Is there any way to change the default setting for the blendshapes ?
For my character, there are about 100 blendshapes, i want to cancel all of the limits for them, but it makes the inspector very slow.
Also the display of the panel has problem, i can't see the checkbox.
Hi,
thanks for your patience.
I've just release UMotion V1.22 that includes several improvements (like mass apply of a custom property's setting) that should make it easier to handle your situation. This version also includes a fix for the GUI display error that you've shown in your screenshots.
This forum post highlights all the new features: https://forum.unity.com/threads/umotion-animation-editor.490618/page-9#post-5711344
Thank you very much for reporting this and I hope you like the update.
Best regards,
Peter

 On Mac: UnityFbxSdkNative_2_0_0.bundle registered as malware
Hi Peter,
When I'm trying to export as FBX (binary, 2011) on my Mac, it yells at me that UnityFbxSdkNative_2_0_0.bundle is malware. It then really wants to move this file to the bin, and can not continue with the export.
Using .anim export for now, which is fine, but just wanted to let you know.
Best,
Maarten
"However, on another project running UMotion 1.20p07 on Unity 2019.3.7f1 this issue did not occur, also not when I upgraded to 1.22 (still in 2019.3.7f1), and also not when I upgraded Unity to 2019.3.9f1."
Ok if it works in a different project then this doesn't sound like a general problem. Chances are high that something went wrong during installation (of UMotion). Maybe the *.bundle wasn't extracted correctly (or maybe multiple versions of UMotion in the same project).
Best regards,
Peter

export humaniod fbx
hi is it possible with umotion to export fbx animations from the timeline
Hi,
thank you very much for reaching out.
With UMotion you can import any *.anim into UMotion and then export it as *.fbx. So as long as your animation created with Timeline is a *.anim file this will work. It's currently not possible to use Timeline to mix multiple *.anim files and then use UMotion to export the mix as a single *.fbx(this would only work if you find a way to combine the mix of those separate *.anim files into one combined *.anim file; then you could import the combined *.anim into UMotion and export it as *.fbx).
Please let me know in case you have any follow-up questions.
Best regards,
Peter
Import Animation Issue
First thanks for the great tool! However I have a issue I'm puzzling over.
I have some mocap FBX. I want to edit it in Umotion to tweak them.
Each FBX has been exported together with its model. I import the FBX as humanoid rig - everything is fine..
No Umotion:
When I play the animation in Unity straight from the imported FBX on its original model everything looks good - the arms are where I expect.
In UMotion.
I take the same model, make a new UMotion project, drag in the model and set it up in the Pose Editor as per instructions. Then I import the same animation clip from the FBX file into Umotion and play - but now the arms intersect the body and whole body position is different.
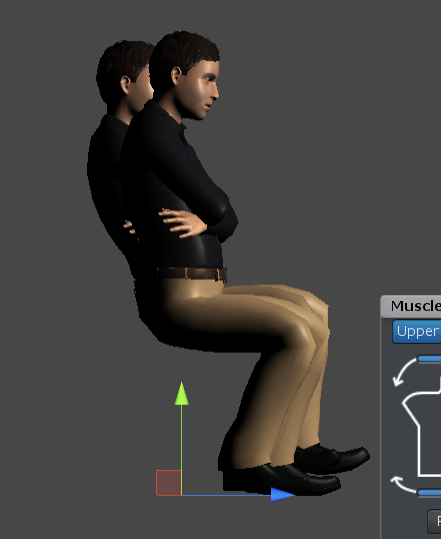
See photos below - I placed two models side by side at same frame in the same scene, one with Animator the other in UMotion, but with same model and animation.
Any tips, settings I need to look at??
Hi Tom,
thank you very much for providing all this very detailed information.
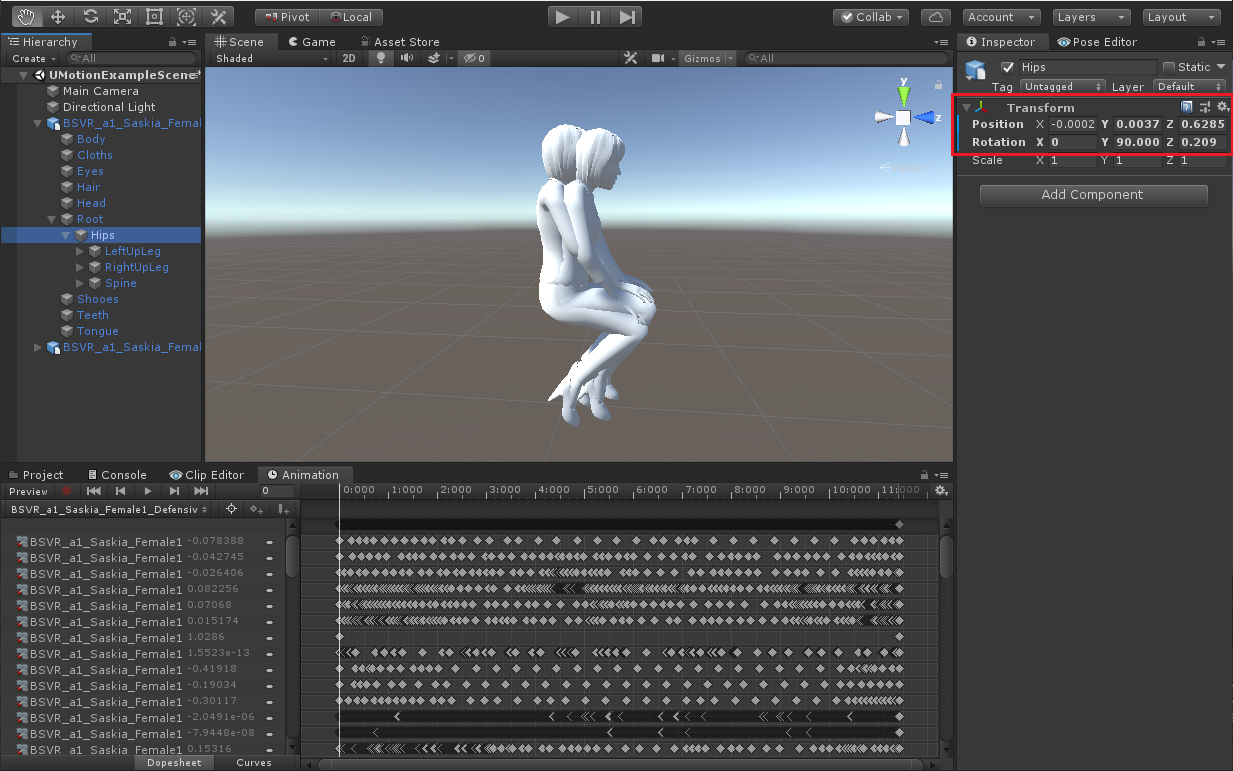
When importing the animation and comparing it to the original, I get the same rotational difference as shown in your screenshot. The difference is coming from the non-humanoid bone named "hips":

UMotion stores the rotation of non-humanoid bones only once (when assigning the character to the Pose Editor). This pose is then saved as "reference pose". When importing/exporting an animation, generic bone are always kept at reference pose (as it is a non-humanoid bone it is not animated). In the case of your character, Untiy seems to treat this bone differently though: As soon as the Unity plays your animation once, it actually modifies this hips bones orientation. UMotion keeps using the old value and this is causing the difference that you see.
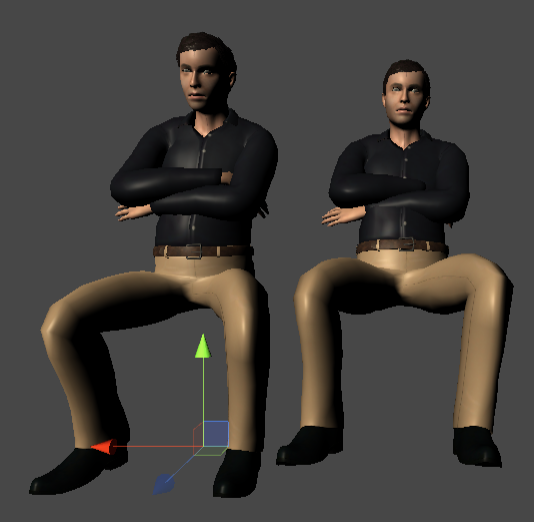
In this screenshot you see your model added twice. One model played the animation once (using Unity's animation window) and the other never played the animation. Notice how the hips suddenly have a different position/rotation on the character that already played your animation.
There is an easy fix to get the correct Hips orientation into UMotion:
- Preview the animation on your character using Unity's animation window.
- Stop the "Preview".
- Assign the character to your UMotion project. If it's a fresh UMotion project, you're already done (UMotion now uses the correct hips orientation as reference pose).
- If it's an existing UMotion project, go into Config Mode and click on the "Apply Scene Pose" button followed by the "Save Reference Pose" button. This saves the new hips position/rotation into your reference pose.
- Re-importing your animation is not needed, they should be perfectly equal now.
- Re-exporting your animation is necessary.
I have to think about what I can implement to avoid such a situation in the future...
Subtle differences (in the range of a few millimeters) can still happen (this is expected due to the lossy nature of the humanoid animation system). If you want a more direct (lossless) approach, use your character as generic. Then export the animation into the *.FBX of your character (set "Write Mode" to "Update Existing File"). Once done, change your character's *.FBX back to "humanoid".
Best regards,
Peter

Clip editor resets animation modifications after exporting and playing scene
Hey there!
I'm having an issue with UMotion's Clip Editor these last few days where it just rollbacks the modifications I've made on an animation after I export it.
The exported file remains intact, but if I click "Play" on Unity and then go back to UMotion Clip Editor the animation clip seems to have gone back to an earlier version of it before I started modifying it.
However, this doesn't happen everytime flawlessly, I'm not exactly sure what are the correct steps to reproduce this bug.
The steps I usually take before the issue happens are:
Export clip > Save (ctrl+S) > Play (Unity) > Stop (Unity) > Drag character model to Pose Editor > Realize everything is lost and life has no meaning anymore
Fortunately I can retrieve the animation by importing back the exported clip, but it doesn't help much if I've used IKs.
Hope you can help me, this is driving me insane :(
Hey there, Peter!
Just here to give you a feedback on this issue. It seems that updating to V1.21 fixed it, I'm not having any more troubles now.
But answering your questions:
1. Yes, I had keyframes on my changes.
2. What I was losing were new keyframes that I inserted and also modifications that I made on the already keyed frames before starting to modify them.
3. This one I can't really answer because I didn't try it.
4. Yes, apparently Fast Entering Play Mode was enabled.
Sorry if I can't be more specific with some things.
How do I properly move my characters mid section for crawling and such?
I set up all my animations, and basically any of the animations where my character's spine had to be moved, he is crazily below the ground when I test the animation.
Like I had to severely move the zombie to get him to crawl, and when making the animations the zombie seemed to be in the perfect place compared to the ground. Now when I test the animations my limping and crawling show him half way into the ground, much lower than what it looked when I was using the clip editor to make the animations.
I moved the rig into crawl position by selecting all the IK bones and translating all them downwards and such. Is there certain bones that should not be translated maybe? I am not sure how I go about this, any help would be appreciated.
Thanks
Hi,
thank you very much for your support request.
I guess you are using "humanoid", right? Please try to change the root motion settings of your exported *.anim file (select the *.anim file and try playing with this settings in the Inspector). Enabling "Bake Into Pose" and setting "Based Upon" to "Original" might work:
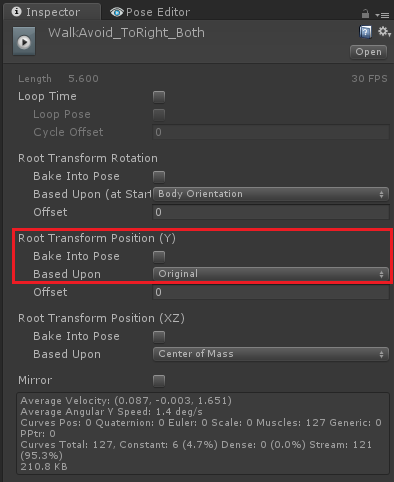
Also make sure that your character's humanoid avatar is setup correctly: In Unity's avatar editor all bones have to be green and the character must be in a T-stance. Also try to avoid any scaling (other than 1) applied to the character (that sometimes confuses the humanoid animation system). If you change something here, you have to re-export your animation from UMotion.
If none of the above helps, you can try to export your animation to *.FBX. Important: In the export settings set "Write Mode" to "Update Existing File" and select your character's *.FBX file as destination file (so that UMotion exports the animation directly into your character's *.FBX). This ensures max. compatibility with your humanoid character.
Please let me know in case you need any further assistance.
Best regards,
Peter

Animating with other non-humanoid objects when animating humanoid characters
So, so far I am incredibly impressed with the asset, and would have loved to knew about this a long, long time ago. This asset is for me mostly useful due to the fact its capable of animating humanoid rigs. However, I right now need to implement weapon holding, and with generic animations, this is very simple, due to the fact you can move around and adjust the weapon. However, when animating a humanoid, you cannot manipulate non-humanoid objects while animating, which could make the process potentially just as annoying as having to create the animation in generic rigs. Is there a way to achieve this?
Hi,
thank you very much for your support request.
Yes you can animate non-humanoid joints/transforms in a humanoid animation. UMotion just disables editing those "generic" joints/transforms by default. Open the "Config Mode" and select the joint/transform that you want to enable in the hierarchy. Then in the properties tab, set "Visibility" to "Show".
Please note that Unity can't re-target generic joints/transforms to other characters. I mean if they exist in the exact same transform hierarchy (it must have the exact same parent bones with the exact same name) Unity can still animate them, but Unity won't do anything to match the animation to the new character's proportions.
Please let me know in case you have any follow-up questions.
Best regards,
Peter

Can I remove root motion from an animation?
Hi I was wondering if it is possible to remove root motion from an animation that wasn't made in UMotion? I'd like to change an animation so that is just an "In place" animation if at all possible. This would be on a generic rig, as it's an animal.
Hi,
thank you very much for your support request.
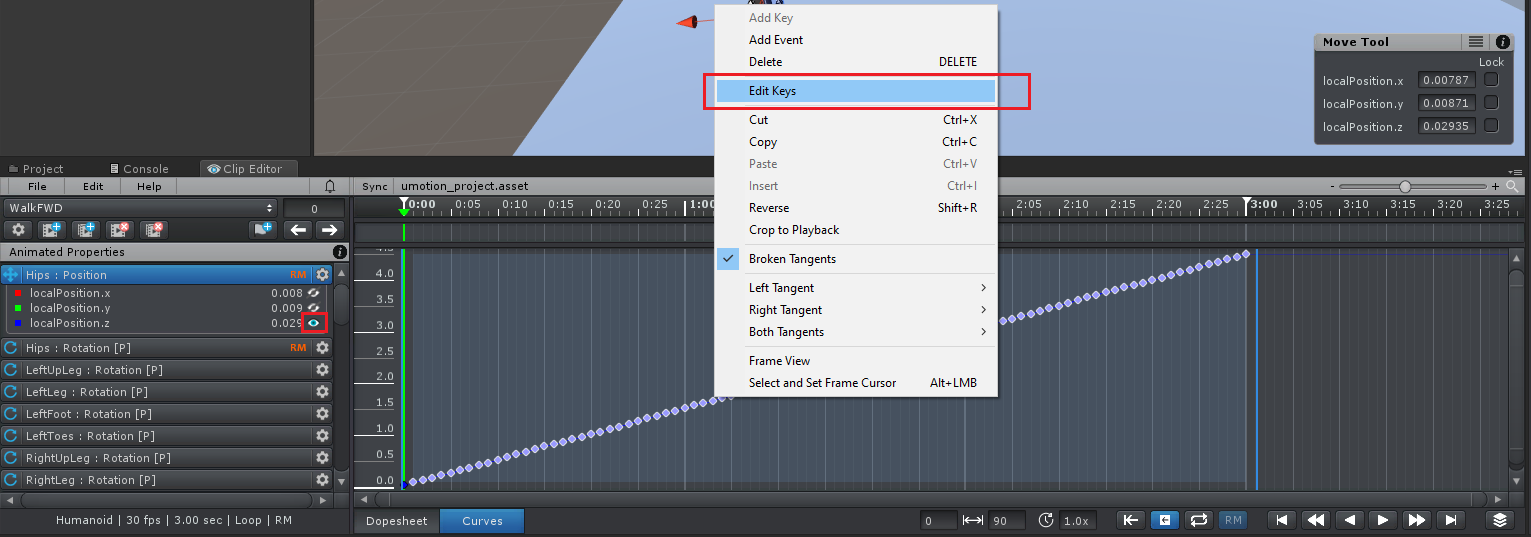
Sure. If the root motion is on a bone named "hips" for example, select the position property (in the Clip Editor) and open the curves view. Then you should see the root motion movement in that curve.
If the root motion is performed on the Z axis, hide the other axis (by clicking on the eye icon). Then copy the value of the first key (right click --> Edit Key --> copy the value field content with CTRL + C) and then select all the other keys and past the value onto them (right click --> Edit Key --> paste value into value field with CTRL + V --> hit enter). Repeat this for other axis if necessary.
Please let me know in case you have any follow-up questions.
Best regards,
Peter
front, side, top views
Hi there. I'm just wondering if it is possible to access front, side, and top views within umotion similar to autodesk aps? Is this currently possible, and if not would it be in the future?
Hi,
thank you very much for your support request.
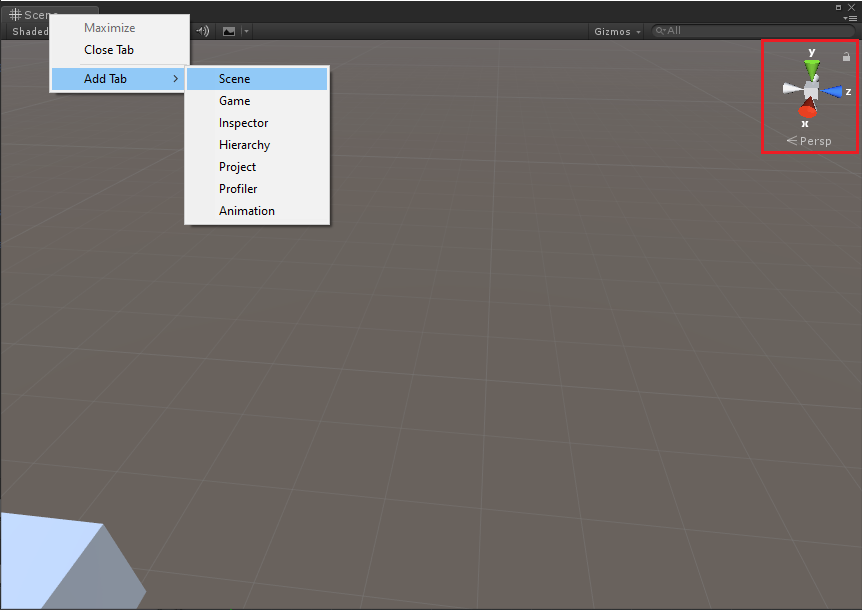
The scene view part is in Unity's responsibility (I don't want to mess with it in order to keep the user experience similar to "native" Unity). This means that you can access the different views as you would do it regularly in Unity. You can align the camera view to an axis by clicking on one of the axis displayed in the upper right corner of the scene view. You can add multiple scene view windows by right clicking on the "Scene" tab (drag them where you want them to be and use the axis gizmo to determine their axis alignment).
Further information: https://docs.unity3d.com/Manual/SceneViewNavigation.html
If you want shortcuts for accessing the different views, you might want to check out this (free) asset: SceneViewPlus - Asset Store
Please let me know in case you have any follow-up questions.
Best regards,
Peter
Customer support service by UserEcho
