
 Missing About menu
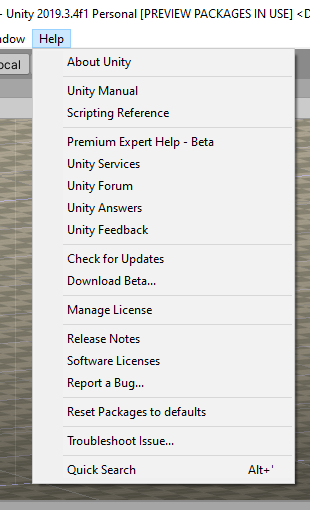
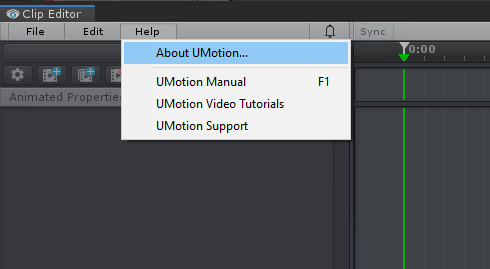
Just noticed that the _Help_ → _About UMotion_ menu item is missing.
 Missing About UMotion

Hi David,
thank you very much for reaching out.
The about menu can be found in the clip editor:
Please let me know in case you have any follow-up questions.
Best regards,
Peter
 Robot Kyle is Generic Legacy
I've downloaded the latest Robot Kyle from the asset store. When I add him to the Pose Editor I get an error box saying that he's a Generic (Legacy).
What does this mean, in practical terms? Should I do something to upgrade it to Humanoid or Generic?
Hi David,
thank you very much for your support request.
You could either:
1) Leaf Robot Kyle as "legacy" and create a UMotion project of type "legacy" for it. This is the way to go when you want your character to use the legacy animation system.
2) Change Robot Kyle to "humanoid" and create a UMotion project of type "humanoid". This way you can use all the humanoid features (i.e. animation re-targeting).
Please let me know in case you have any follow-up questions.
Best regards,
Peter

Exporting clips with layers
I'm adding a rotational offset to an animation clip, which I'm exporting as an FBX (2019) file. A second layer using Additive blending is used to add the rotational offset. If I have the rotational offset layer selected when I do the export, the exported animation has only the animation frames based on the layers keys from the additive layer (Rotation Offset). To get the animation to work properly using both layers, the Base Layer has to be selected before I do the export.
I'm not sure if this is expected behaviour or not.
Thanks.
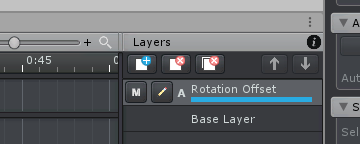
Fixed in UMotion V1.21.
Thanks for reporting.
Best regards,
Peter
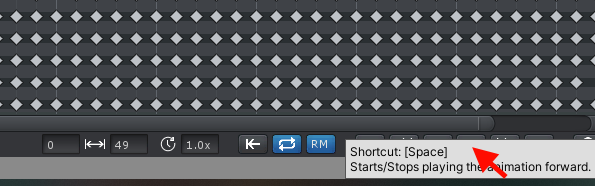
Tool-tip obscures pointer at screen edges
When the clip editor is located at the bottom of the screen, when we move the pointer to some of the buttons at the bottom, such as Play, Rewind etc, the pointer can sometimes be obscured by the pointer, not allowing for the button to be pressed. The pointer must be jiggled around until the tool-tip closes.
The picture below shows a clip editor example, the pointer is hovering over the play button, but this button can't be pressed because it's obscured by the tool-tip. (I've painted a pointer as screenshot does not capture the windows pointer)
This is a relatively frequent issue when unity is full screen and the clip editor is at the bottom of Unity.
It's not a game breaker, but it's a bit irritating at times.
Bug report Pose editor
Hi,i just want to report a bug. If you have the mesh on the pose editor, this will duplicate your mesh while you play..It´s not a big deal, you just have to click the "clear button". But is still a bug.
 Default directory for projects
An option to set the default directory for UM projects would be useful. For myself, I like to place these project files in their own directory specific to the project.
Hi Criag,
thank you very much for sharing your idea. This small workflow improvements are exactly what I'm always looking for :-)
I really like it and have added it to my "ideas for the future" list.
Best regards,
Peter
scene position & rotation changes to update entire timeline curve
Lets say that we want to rotate the hips by an offset of 10 degrees on the X axis for the entire timeline, we will change the hips rotation property to Euler Interpolation, select all the keys that we want to modify within the curves window and then we move then move them up by 10 degrees. Now lets say that we want to move both the X & Y rotations, we can only move these by the same amount, which will either be positive or negative. Lets say we want to change the rotations by X +10 & Y-10, each rotation axis would have to be moved individually.
What would be useful is if we could select all the frames that we want to modify and change the rotations from within the scene view using the rotation/position tool and have all the keys modified by the offset amount rather than only the single frame key, this would overcome the limitations of only being able to modify each axis positively or negatively.
If there is a way to use the scene rotation tool and apply the changed offsets to all subsequent frames, that would also be useful.
Hi Criag,
thank you very much for your support request.
This is already possible by using an additive layer. Create a new additive layer, move the frame cursor to the first frame and use the rotation tool to author the offset. Then create a key for the changed rotation. The resulting rotation offset is then going to be applied to all following keys. Feel free to place additional keys (with different offsets) on different frames. This also works in quaternion/progressive rotation mode.
The following video shows you how to use the additive animation layer:
Please let me know if you have any follow-up questions.
Best regards,
Peter
Animation Curve lock range
When modifying rotations of different items, switching from different items changes the range of the curves window, meaning that if each time the window has to be re-scaled to the desire fit. A useful function would be if the curves window range could be locked.
Hi,
thank you very much for sharing your idea/feature request. I really appreciate that.
I've added this to my internal "ideas for the future" list. I use this list to decide which new features I'm implementing in upcoming UMotion updates.
Best regards,
Peter

using IK at runtime
I was really hoping to use uMotion at runtime for user generated animation content. I was disappointed to find that it will only generate unity asset animations and none of the IK code can be extended or used at runtime. Do you have any suggestions for how I might use uMotion in that way, or am I completely out of luck?
Hi,
thank you very much for your support request.
Like a 3D modeling application, UMotion generates animation files (*.anim or *.FBX) that contain all your IK data in a "baked" form. This ensures max. performance during runtime.
You can combine UMotion with runtime IK solutions (e.g. FinalIK, custom scripts) via the UMotion callback system. That way you can preview the IK effect inside UMotion and decide if the results should be baked into the final animation or if you want to execute IK during runtime.
For further information, please check out the manual (click at the info button highlighted in the screenshot below):
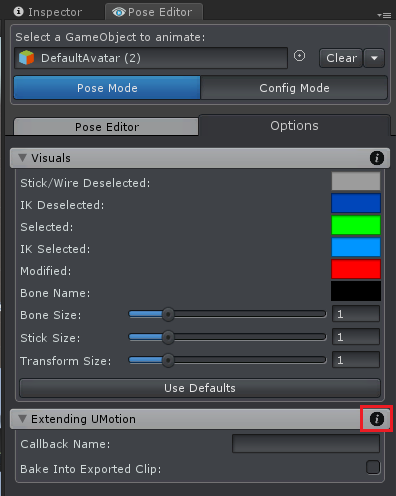
Please let me know in case you have any follow-up questions.
Best regards,
Peter
Converting forward walk into a diagonal walk
I'm trying to turn a forward walk animation into a diagonal. For this, I take the delta Z position from the final frame and use trig to get the new X & Z delta, ie Z.Sin(45) & Z.Cos(45). Using Curves, I use the blue bars from the positional data to smooth down the Z motion, while for the X motion, I set the final frame position to Z.Cos(45) and then have to remove all frame positional data in between the 1st and last frame. This results in a small amount of motion being lost and the character seems to slide around a little.
I'm converting rotations to Euler Interpolation for rotating the character, however I don't think this has any bearing on the positional data.
Is there a better way to do this perhaps?
Hi Craig,
thank you very much for your support request.
You can do this in the Inspector of your animation:
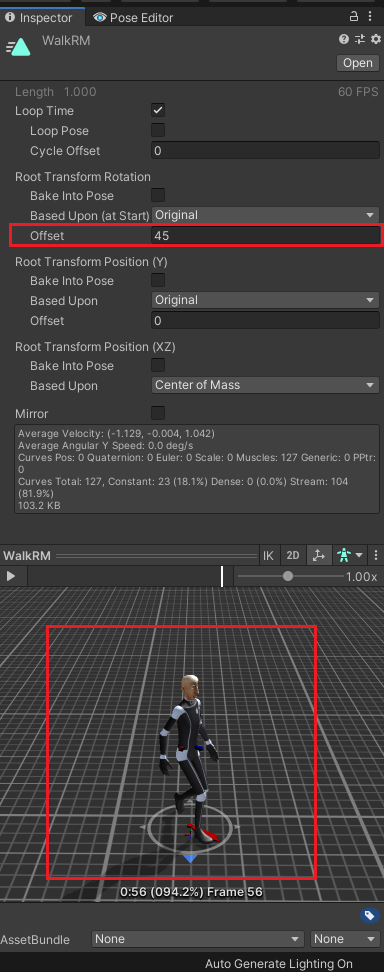
Please let me know in case you have any follow-up questions.
Best regards,
Peter
Customer support service by UserEcho
