 Override layer and FBX export issue
Hi,
First many thanks for this awesome plugin!
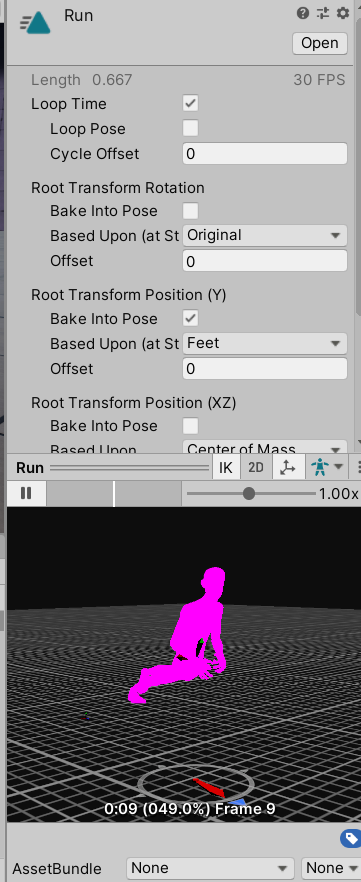
I have an issue when exporting an humanoid animation to FBX when using override layers. If I don't use any override layer, the hips orientation (red arrow in the Unity animation preview window) points in the expected direction. As soon as I add an override layer, even without any keyed frame, the red arrow always point forward, and the feet of the character start moving around. The effect is if the hip was still and the feet compensate the movement, loosing al the foot floor placement. The issue doesn't happen if I export to anim file. Many thanks

 Using Layers
I am using the layers functionality in the Clip Editor to create variations of a single base animation. My base animation clip has 5 layers on it that modify the movement of some bones to add variety to the original motion. I would like to be able to Mute and un-Mute layers from my script.
My current workflow is to duplicate the current clip (with all the layers), then mute the specific layers differently on the different duplicate clips, then export them to create 5 modified animations. However, if I need to modify the base animation clip I have to delete all the duplicate clips, then re-duplicate them from the base clip, then mute the specific layers differently, then re-export them as separate animations.
Is there a way to mute and un-mute layers from script? If not is there a less manual workflow for creating many animations?
Thank you for the help!

Hi,
thank you very much for your feature request.
Currently the UMotion API doesn't provide access to the layers and their properties. I have taken a note to consider adding this in a future update.
I would say for the moment, the best manual approach is to duplicate the animation (one per modifying layer) and if you really need to change the base animation you would copy all keys of the modified base animation and then go through each duplication and replace the base layer keys their. Considering that modifying the base animation would probably not happen too often, this shouldn't take too much time.
Please let me know in case you have any follow-up questions.
Best regards,
Peter
 UMA Models Not Working
I am trying to edit animations for a UMA character using UMotionPro. Whenever I try to drag in the UMA model I get the error same as this post: https://support.soxware.com/communities/1/topics/323-only-avatars-created-by-unity-model-importer-are-supported-umotion
I have tried the steps in that post and am still getting the same error message. Here are the exact steps I followed.
1. Installed Unity FBX Exporter
2. Exported the UMA character in runtime
3. Changed the "Avatar Definition" to "Create From This Model"
4. Added an animator component to the prefab
5. Attempted to drag the character into the post editor, getting the same error
Do I need to use Model Importer or something or how do I go about getting UMA characters to work with UMotion?
Thanks!

Hi,
thank you very much for your support request.
Ok so you've already exported your UMA character to *.FBX. That's perfect. Please make sure that the following steps are performed correctly:
Select the exported *.FBX and make sure that it is setup correctly --> Open the "Rig" tab in the Inspector and ensure that "Humanoid" is selected and that "Avatar Definition" is set to "Create From This Model". Click on "Configure..." and make sure that all bones are shown in green and the character is in a T-pose.
Now, drag & drop that *.FBX file into your scene. The created character instance should automatically have an animator component attached. Create a new UMotion project of type "humanoid" and assign the character to it. This should work without giving you a warning message.
The important part is that your character really is an instance of your exported *.FBX.
Please let me know if you need any further assistance.
Best regards,
Peter
 How to make animations for fingers?
Thanks

Hi,
thank you very much for your support request.
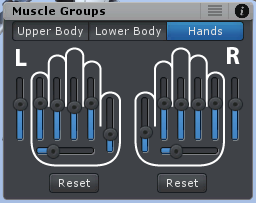
You can animate finger bones just like any other bone. If you are using a "humanoid" character, you can even use the Muscle Groups Tool Assistant that offers some easy to use sliders for finger posing.

If you do not see the finger bones:
1) If you are using "humanoid", make sure that you have assigned the finger bones in the humanoid avatar configuration (select the character file, in the Inspector switch into the Rig Tab, click on "Configure...").
2) If you are using "generic" and you don't see finger bones, it's very likely that your character may not have separate finger bones. You can create some in a 3d modeling application.
Please let me know in case you have any follow-up questions.
Best regards,
Peter

 Hip Ik controller
Hello How can I add an Ik controller on the hip to my Umotion rig currently its taking the hip as the parent, is there a way to add a hip ik controller so i dont need to adjust the legs and upper body each time like in advanced skeleton or any IK rig ?
thank you

Hi,
thank you very much for your support request.
I think what you are looking for is IK Pinning of the feet. When enabled, the feet stay at the same place even when moving the hips. When IK Pinning is disabled, the feet are moving with the hips.
When using the IK Setup Wizard, IK Pinning is automatically setup for you. For completeness, here are the related video tutorials:
Please let me know if you meant something different.
Best regards,
Peter
 Split animations
I want to make an animation of reloading weapons, but I do not want all the bones of the weapon to be inside the player root, because the guns are placed dynamically in the hands. Is it possible to split the animation? or maybe there is another way?

Hi,
thank you very much for your support request.
Everything that is placed as a child of an Animator controller can be addressed by that controller. You can use animation clips that point to transforms that are not always available (but are added during runtime).
So while creating the animation (during edit time), place the weapon as a child of the hand. During runtime, use transform.SetParent() to make the gun a child of your hand.
Please let me know in case you have any follow-up questions.
Best regards,
Peter

 Can i use unity ik after i made the animation?
Hello thi is especially important question for me because if i untic the IK in the unity animator it is fine but if i use other software like final ik just to handle the feets will it mess up anything? And also why this is happening?(Legs kind of just floating)


 IK Pinning with feet
In your tutorials, you demonstrate IK pinning with arms and the hands, you also show some brief clips of adding a IK handle to the feet.
Can you please post a tutorial on how you do this with the feet please. I've spent many many hours trying to figure this out and I'm still none the wiser and a tutorial would go a long way in clarifying a difficult topic.
I'm using animations from Maximo and many of these have annoying issues with foot placement not being correct.

Hi Craig,
thank you very much for your support request.
The easiest way to setup IK pinning is by using the IK Setup Wizard. It automatically configures feet and hand IK targets to include the IK pinning functionality. You can convert existing animations to IK by clicking on "Edit --> FK to IK Convertion".
Here are some in depth tutorials (in the manual there is a nice overview of all available video tutorials in the "Video Tutorials" chapter):
How to use the IK Setup Wizard (and the manual setup approach).
IK Pinning uses the Child-Of constraint under the hood. Watch this before the IK Pinning tutorial.
IK Pinning.
And here a video tutorial where I use all of this in a practical example (fixing a broken MoCap animation):
Don't hesitate to ask in case you have any follow-up questions.
Best regards,
Peter

 Animation position cursor not working after new update
Hi,
after new update, the animation position cursor (the green one) is not working the first time it's clicked, after full animation played. Animation is not being played despite moving the green cursor. When unclicked and clicked again it works until I play animation to the end.
Thanks for fixing the previous bugs - It's much better now :)
EDIT: I've added a video: umotion_cursor_bug.mp4

 Error on Unity Start
Error: Could not load signature of ΊΊΉΉΉΊΉΊΉΊΉΊΉΊΊΊΉΉΊΊΉΊΊΉΉΉΉΊΊΉΊΉΉΉΉΊΉΉΊΉΉΊΉΉΉΊΉ:ΉΉΊΉΉΉΊΉΉΉΊΉΉΉΉΊΉΉΉΉΊΉΉΉΉΉΉΉΊΉΉΊΊΉΉΉΊΉΊΉΊΊΊΉΊΊΊ due to: Could not load file or assembly 'UMotionSourceApplication, Version=1.0.7264.19973, Culture=neutral, PublicKeyToken=null' or one of its dependencies. assembly:UMotionSourceApplication, Version=1.0.7264.19973, Culture=neutral, PublicKeyToken=null type: member:(null) signature:

Hi,
thank you very much for your support request.
Please check my answer to a similar support request: https://support.soxware.com/communities/1/topics/318-errors-in-unity-201842f1
Please let me know in case you have any follow-up questions or if this doesn't solve your issue.
Best regards,
Peter
Customer support service by UserEcho
