 Negative Values for Blendshapes
I am using some custom blendshapes with UMotion that require negative values keyed for the inverse effect applied to my character. Unity 2019 not supports inverse values entered into the blendshape value channel, but UMotion does not allow negative values and defaults to a limit of 0. Is there any work around to allow negative values keyed on blendshape channels in my UMotion created clips?

Hi,
thank you very much for your support request.
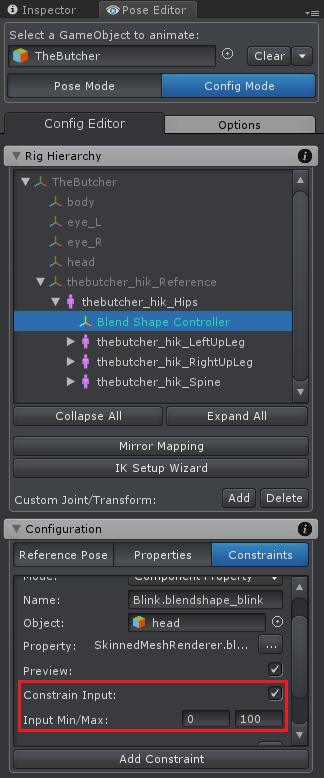
Yes that is possible. UMotion just configures the "Custom Property Constraints" for the blend shapes by default with limits ranging from 0-100 (as this is the most common use-case). In order to set different limits, switch into Config Mode and select the bone/transform that has the blend shapes assigned. Then open the Constraints tab and change the limits to e.g. -100 ... 100:
Please let me know in case you have any follow-up questions.
Best regards,
Peter
 Could you please make a tutorial on how UMotion can be used with other assets such as Final IK or PuppetMaster
Could you please make a tutorial on how UMotion can be used with other assets such as Final IK or PuppetMaster.
The manual does not describe this process sufficiently.
Are there any kind of resources about it?

Hi,
thank you very much for your support request.
PuppetMaster is a run-time functionality for blending between animations and physics (ragdoll). You can create the animations with UMotion just like you would create any other animation. There isn't anything specific to show when creating the animation with the goal to use it combined with PuppetMaster.
What exactly are you planning to do with FinalIK? In UMotion, you could again create the regular animation and then in your game use Final IK on top of it (that would again just be plane animating in UMotion). Or you can use the FinalIK components inside UMotion (to replace UMotion's built in IK). That would require the use of the UMotion callback system (see manual at chapter "Pose Editor / Options" headline "Extending UMotion").
Please let me know in case you have any follow-up questions.
Best regards,
Peter

 Can you lock the interpolation mode?
Is it possible to lock the interpolation mode to stepped/constant? Adding new keys seems to automatically make the tangents into 'auto' by default. Is it possible to set the default tangent to constant without manual intervention every single time after adding a new key?
Thanks

Hi Shayan,
thank you very much for your support request.
If there is a key with tangent mode "constant" (i.e. stepped) before and after the new created key, UMotion is automatically going to create new keys in between with tangent mode "constant" too. So what you could do is that you create a temporary animation key at a frame at the predicted end of your animation that is has it's tangent mode set to "constant".
Unfortunately there is currently no feature that would allow you to set a default tangent mode.
Please let me know in case you have any follow-up questions.
Best regards,
Peter
 How To create an advanced foot roll IK rig
Hi, I'm at a loss here. Sorry if not 100% strictly related to this asset, but how do you go about setting up a rig that allows for IK pinning of a foot and toes? I'm talking about something like what's shown here (at 2:49):
I've read the docs and watched the tutorials, and there's no guide for how to do this with UMotion.
I have UMotion Pro, in case it matters.

Hi,
thank you very much for your support request.
The foot roll setup shown in this video was based on a Blender tutorial that I saw in the past (can't find it anymore).
Here is a quick instruction how it was created. Please note that this instruction requires basic knowledge about the features of the "Config Mode". I highly recommend following it using the Robot Kyle model from the examples and later in a second step try it on your own model.
- Create a new UMotion project
- Run the IK Setup Wizard with default settings
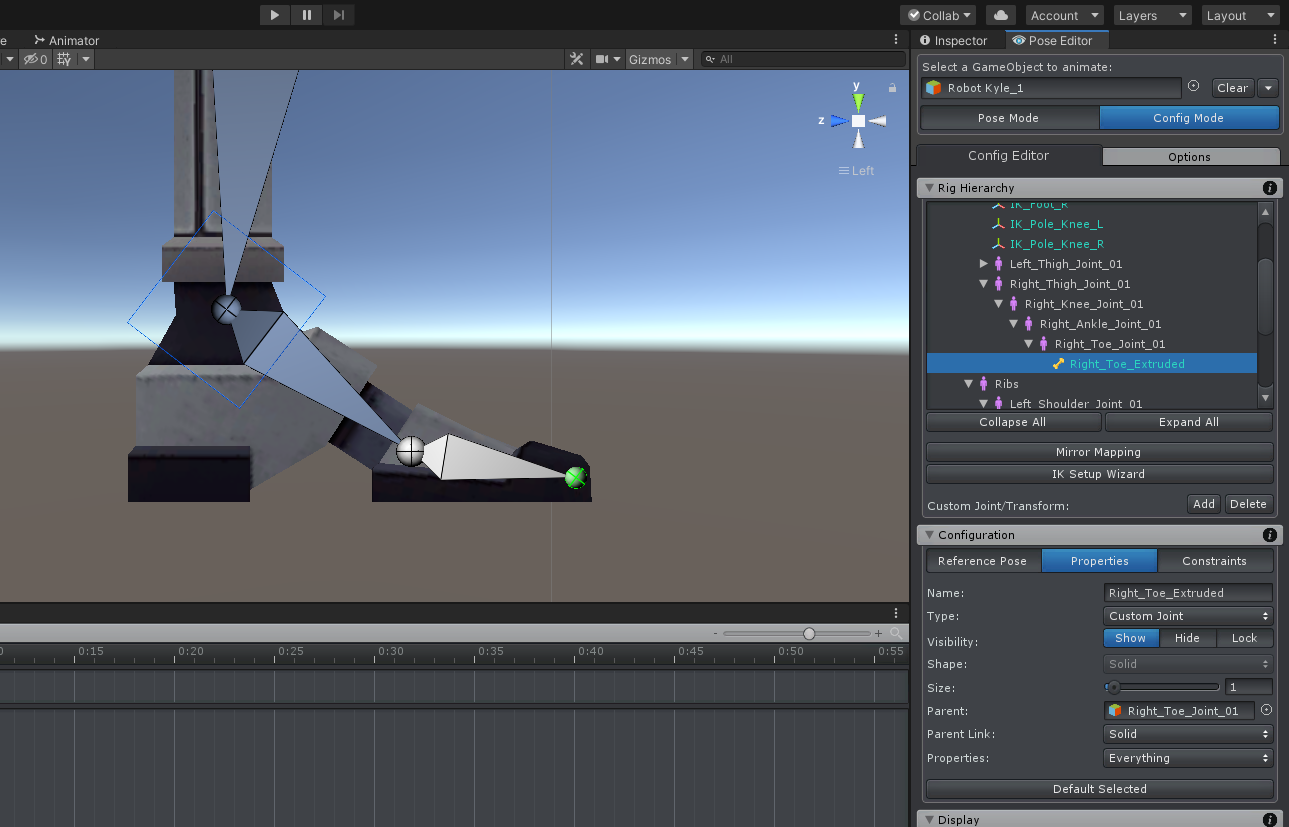
- Stay in Config Mode and extrude the toes bone (I recommend doing this in an orthogonal side view):
- Create 4 custom transforms at the center of the toe joint. Move one to where the heel ends and one to where the toes and. Keep the other two at the center. Give them a proper naming and visual appearance:
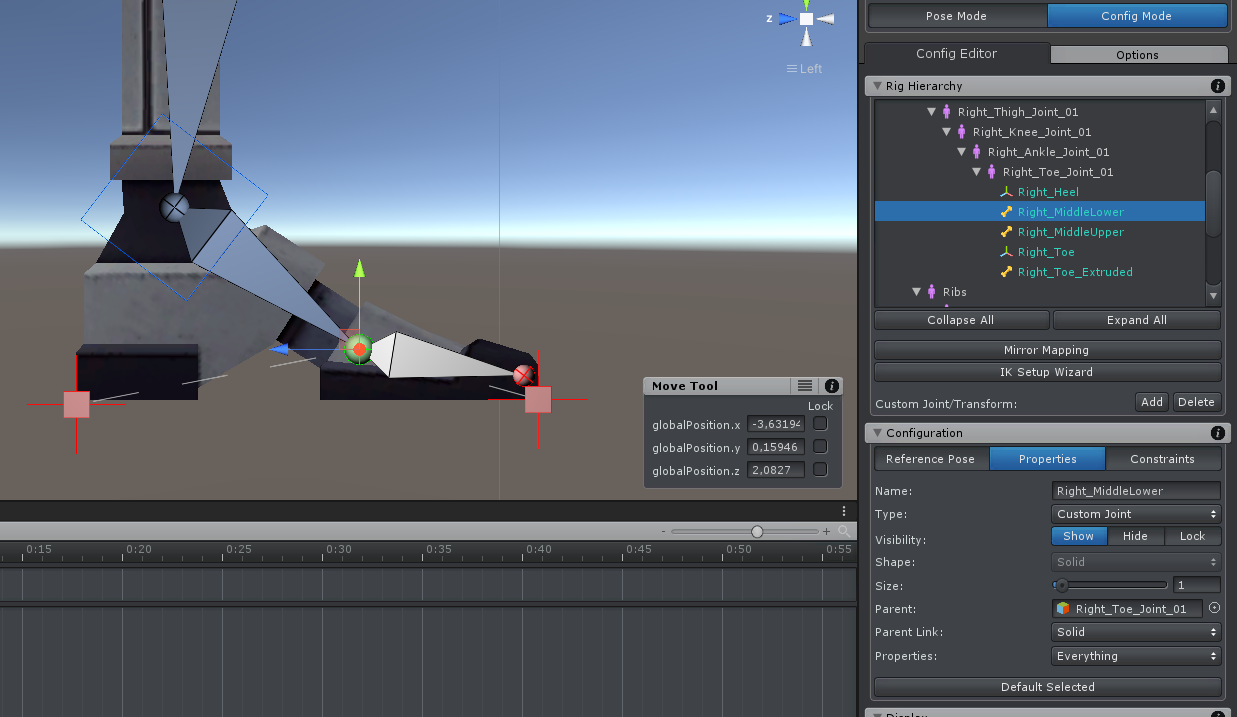
- Adjust the parent/child relationship as shown in the screenshot below:
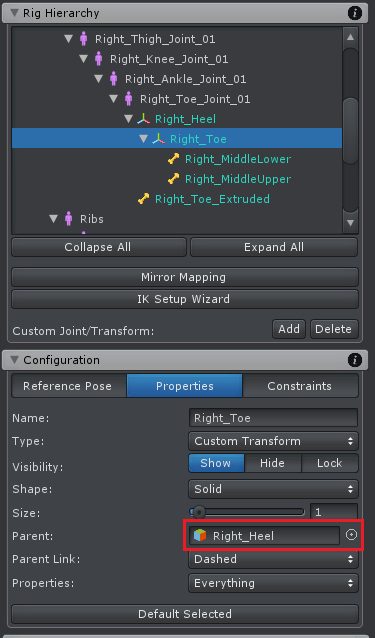
- Create a new bone at the center of "Right_Toe_Extruded" and make it a child of the "Right_MiddleLower" bone.
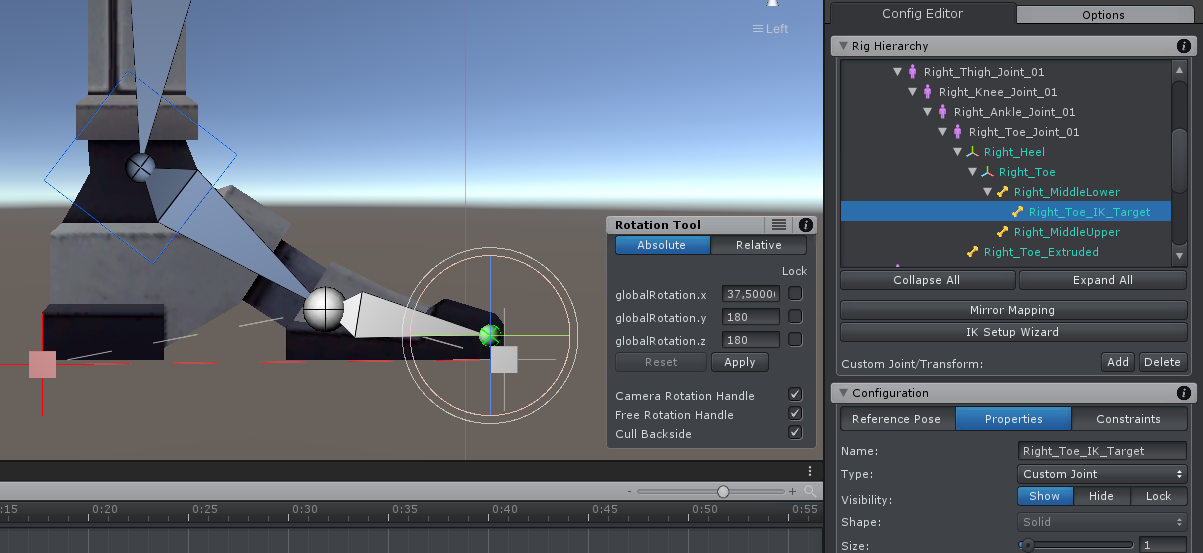
- Make the "Right_Heel" a child of the "Hips".
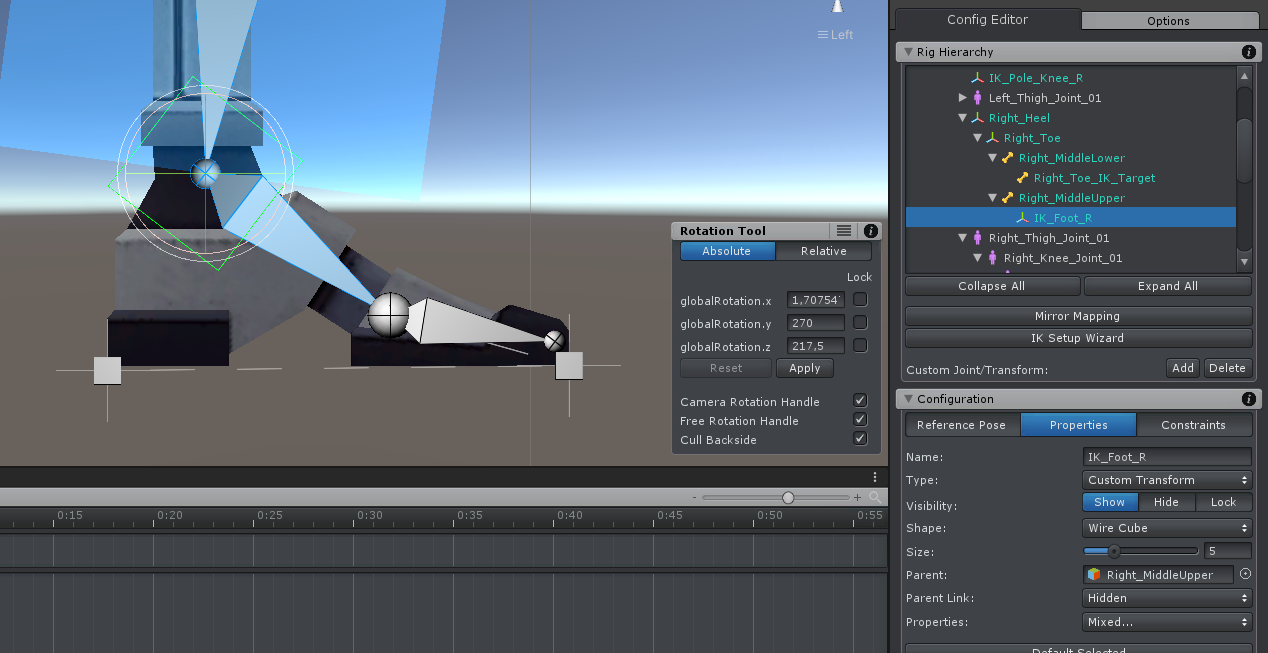
- Make the "IK_Foot_R" a child of the "Right_MiddleUpper" bone.
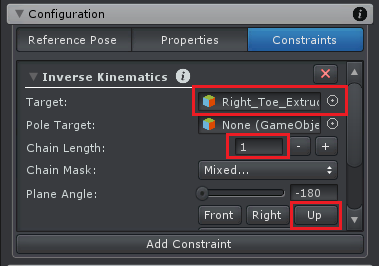
- Setup an IK constraint on the "Right_Toe_IK_Target". The target is the "Right_Toe_Extruded" bone, the bone lenght is 1 and click on the "Up" button for correct bend plane orientation.
- Setup a Custom Property constraint on the "Right_Heel" for controlling both FK/IK Blend channels at once:
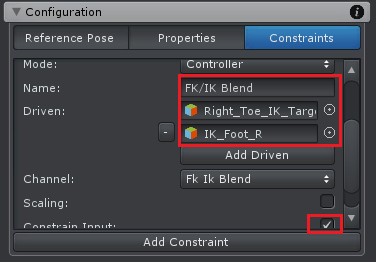
- In the "Properties" tab, set the "Visibility" to "Hide" for the "Right_Ankle_Joint_01", the "Right_Toe_Joint_01" and the "Right_Toe_Extruded".
- Change the appearance of the "Foot_IK_Right":
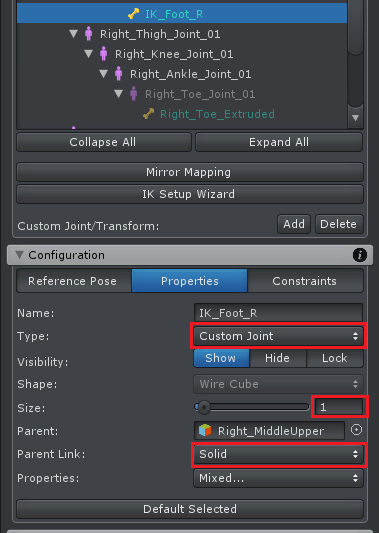
- (Optional) Add a Child-Of constraint to the "Right_Heel" and enable the "IK Pinning Mode". This allows you to pin the heel in your animation (otherwise it would move with the hips).
- Save the Reference Pose.
- Repeat for the second foot.
You can now switch to Pose Mode to test your setup. Make sure to set the "FK/IK Blend" slider of the heels to 1. Setting the "Rig Layer" to "IK" hides all the unnecessary FK bones.
If you have any questions, please let me know.
Best regards,
Peter

 Fighting animations
Can I create my own fighting animations straight out of the box with this asset without any other tools?

Hi,
thank you very much for your support request.
Yes you can. The quality of the result is going to depend on your artistic skills of course :-)
If you need to sync fighting animations of two or more characters, you can use the "sync with Unity Timeline" feature of UMotion. That way you can animate one character while previewing the animation of the other character in context.
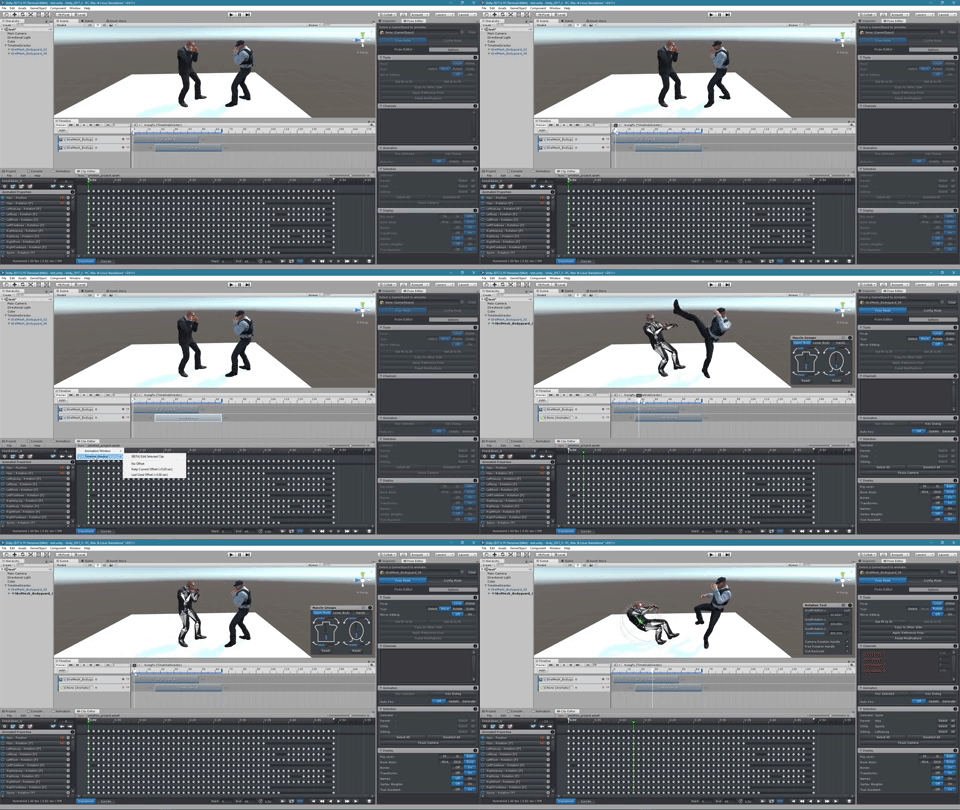
High-res video: https://www.facebook.com/Soxware/videos/1968103476786125/
Please let me know in case you have any follow-up questions.
Best regards,
Peter

 IK Setup wizard NOT pinning the feet.
Hi,
I used the IK setup wizard, and the hand and feet IK goals as well as the elbow and knee poles work great to control the limbs, but for some reason the feet are not pinned.
Any idea what I could have done wrong? How can I fix this? I watched the video, and it seems fairly complicated to do a custom pinning job on the hand. Is that how you pin the feet also?

Hi,
thank you very much for your support request.
Pinning works the same on the hands and feet. In order to pin an IK target, select it and in the "Channels" panel tick the "IK Pinned" checkbox:
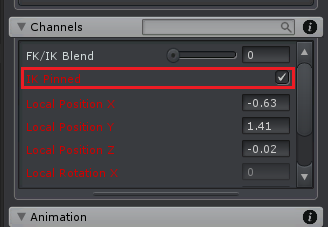
The videos you mentioned show you how you can manually setup IK pinning (in case you are not using the IK Setup wizard).
Using the IK Pinning feature uses the Child-Of constraint under the hood. There are a few common pitfalls you need to be aware of so I highly recommend watching the Child-Of video tutorial:
Please let me know in case you have any follow-up questions.
Best regards,
Peter

 Since there's no Pose library, what's the Umotion workflow....
I really like Umotion. My previous workflow for creating humanoid animations where they all share starting position from a "neutral" pose was to always have that neutral pose in my pose library (3ds Max). In UMotion, I have to load a clip from a previous animation that starts with that neutral pose, then delete all except the initial keyframes.
That's fine, not too hard. The problem I just learned the hard way is that after you create your new animation clip (based on that previously created animation) when you export your newly created clip, you don't get a dialogue box asking what you want to call your new clip. Umotion just overwrites the existing clip you loaded - with no warning - thereby erasing your reference clip.
I'm sure there's a workflow people use to avoid this accidental erasure. Having a simple pose library would solve so many issues.
Anyway, thanks for an otherwise very good product.

Hi,
thank you very much for your support request.
If you want to have the same initial pose on different characters, than the pose library implementation would need to be able to do pose re-targeting. Importing a humanoid animation clip (which is Unity's re-targetable animation format) does this re-targeting automatically. There are lots of edge cases that make a pose-library feature more complicated than you would expect at first glance, for example if you have a "generic" or "legacy" character opened you won't be able to use any of the "humanoid" poses. You can share humanoid poses between humanoid characters but generic poses can only be used on the same generic character... That might be confusing for users (especially Unity beginners).
So yes such a feature is possible but at the moment I think it's too complicated compared to the time saving it would give you as the alternative workflow (just importing an animation clip) is already pretty fast. I recommend that you create one clip that is called "HumanoidT-Pose.anim" that just contains two frames of plane T-pose. Import this clip in your new project, then rename the clip via the settings button. Keep this clip in a "Pose Library" folder, then you don't accidentally overwrite the animation clip. Please also consider to always use version control software (GIT or SVN) on your projects (making it possible to always restore your things in case you accidentally overwrite something).
Having a dialog that pops up when you overwrite an animation clip via export would basically pop-up every time you export your animation. I imagine this being quite annoying in the regular use cases... I'm afraid that there is no way to reliably detect if an animation clip was created by a different UMotion project and only show the warning in case of overwriting from a different project.
Please let me know in case you have any follow-up questions.
Best regards,
Peter

 Is there a "Hand Group" I can key rather than selecting individual fingers?
I really like Umotion. I like the muscle groups. When dealing with hand/finger poses, is there a simple Hand Group that can be keyed rather than selecting all the fingers of that hand?

Hi,
thank you very much for your support request.
I'm glad you like working with UMotion so far. Unfortunately there is no button or shortcut that keys all hand bones, but here are some tips that might help you in this situation:
- When you hold [Shift] while clicking on the hands wrist bone, you automatically select all bones of the hand (i.e. all child bones). Pressing [S] (i.e. "Key Selected --> Key All") is then going to create keys for all hand bones.
- You can key all modified bones by using [CTRL] + [Return] (opens the key dialog) and then press [Return] to key all modifications. To make this even faster, you can replace the [CTRL] + [Return] shortcut with a single button via "Edit --> Preferences" (Clip Editor).
Please let me know in case you have any other questions.
Best regards,
Peter

 I want to fix the ik pole
I want to fix the ik pole
If you rotate the hip bone, it will rotate to the knee, so you want to fix the pole
Ik Pinned is ON, but is there anything else I can do?

Hi,
thank you very much for your support request.
If you don't want the pole targets to move with the hips, you can change their parenting in config mode (you have to re-do your previous created keys for them as the previously stored local positions are now relative to a different parent).
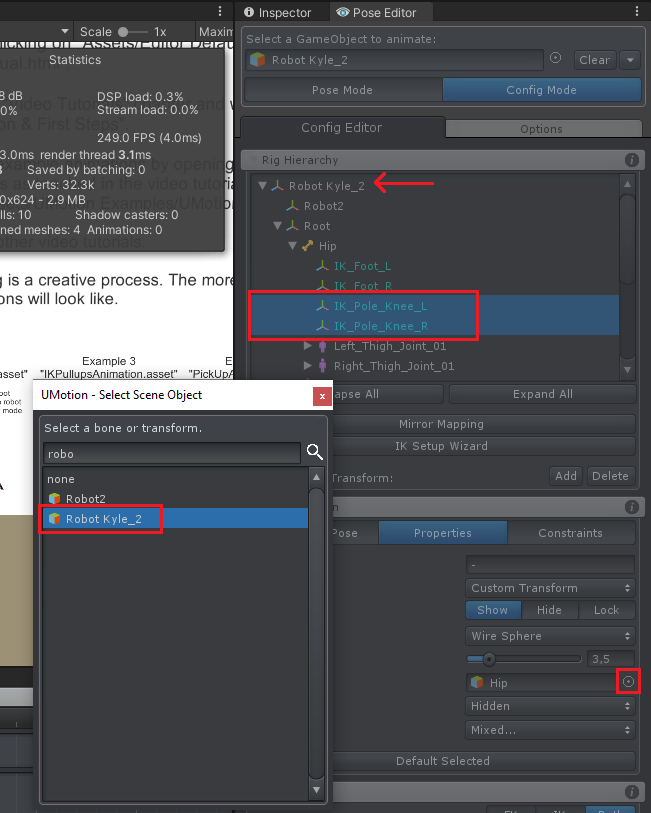
If you want to change the parenting of the pole targets during the animation, you could use a child-of constraint on them. See video tutorial:
Please let me know in case you have any follow-up questions.
Best regards,
Peter

 Child transform is controlled by animator even after dis-parenting
Good day!
Issue:
I have a character that can throw a weapon. The thrown weapon transform is being controlled by the animator even after weapon.transform.SetParent(null).
More description:
1) The weapon is initially the child of character's hand. Character has the animator.
2) At a certain timeframe, animation event is triggered to call:
- weapon.transform.SetParent(null)
- isKinematic = false
3) The weapon transforms local values remains the same as before dis-parenting (as it is being controlled by animator)
4) Unable to change any weapon transforms when this occur.
Important note:
- I did not use child-of constraint. Because the thrown weapon should use rigidbody physic
- When this occur during gameplay, disabling the character's animator component could make the weapon move again.
- When this occur during gameplay, dragging around the animation could potentially fix the issue too
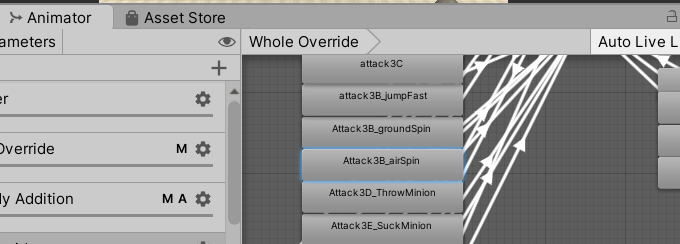
- There is no keyframe nor animator on the weapon at all.
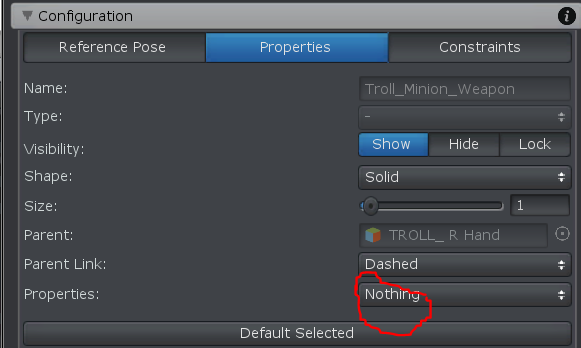
Updates:
I noticed if I rename the weapon name, the issue could be fixed. But is there a better solution?

Hi,
thank you very much for your support request.
Can you check the exported animation (with Unity's Animation Window). Are there any animation curves for the weapon or any of it's child transforms (in any of the animations you play on that Animator)?
Calling Animator.Rebind() after you changed the parenting should release your weapon: https://docs.unity3d.com/ScriptReference/Animator.Rebind.html
Best regards,
Peter
Customer support service by UserEcho
