
 A hand rig as a humanoid project
Hi,
I am a complete newbie to Unity and to UMotion, I hope you can point me to the right direction.
I have a hand rig (no arms, legs or body). I want to use the nice Hands Muscle Groups Assistant window. Right now I can't create a UMotion humanoid project using this rig, so I can't use the Muscle Groups Assistant. Is there a way to get the Hands Muscle Groups Assistant window for a generic UMotion project type?

Hi,
thank you very much for your support request.
The problem with this is, that a generic rig is really just a hierarchy of any sort of bones. Unity/UMotion can not differentiate if a generic rig is a "hand" or e.g. an animal. Thus it is not possible to provide any sort of predefined assistant windows for generic rigs.
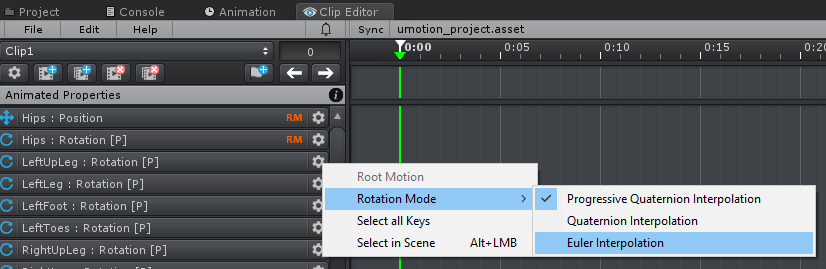
Anyway, if you change rotation interpolation mode to "euler" for your finger bones, you can use custom property constraints to control the rotation of the bones. The custom property constraints show up as sliders in the "channels" view and thus offer an animation experience that is closer to what you get from the muscle groups assistance.
This video explains the different rotation modes in UMotion and shows you how to switch to euler interpolation:
Btw. if you're just looking for a nice way to curl all 3 finger bones at the same time, you can use the following feature:
- Hold shift while selecting the top most ("proximal") finger bone. This automatically selects all child bones too.
- Use the rotation tool (in local space) to apply a rotation. The rotation is smoothly distributed between all 3 bones making the fingers curl in a natural way (if you rotate in the right direction of course ^^).
Please let me know in case you have any follow-up questions.
Best regards,
Peter

Cannot Move Keys
Strange problem in uMotion Pro. When I click on a key, or select multiple keys, I cannot drag it to move the key. In the tutorial videos you just left click on a key and drag to move, but not working for me. HELP PLEASE!!!
Hi,
thank you very much for your support request.
I just double checked, dragging keys seems to work fine for me in UMotion V1.22p05. Can you show me a gif/video of your situation so that I get a better understanding of your specific situation?
Please note that if your rotation keys are in "Progressive Quaternion" or "Quaternion" interpolation mode, you can only drag them left/right (in the curves view). That is intended (for more information please watch the following video tutorial):
Best regards,
Peter
How to animate generic objects in humanoid animation
Hi Peter
Thank you for this amazing tool. I have some problems animating a character, that was previously a generic one. I changed the rig to humanoid and set all bones to the appropriate checkboxes. The animations are working fine, but there are the bags, that the character (a soldier) carries. These are in the rig hierarchy directly under the root parent:
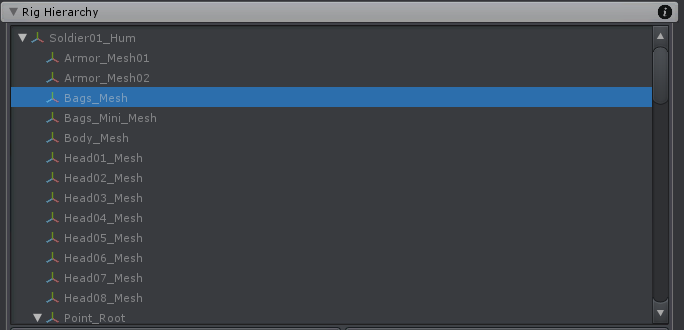
These don't animate together with the character, when I want to show the transforms, it shows me the message "Animating generic objects that have no humanoid bone in their parent hierarchy is not supported.". What am I supposed to do? If the character does any animation, these bags stay at the same position and thus the character gets stretched:
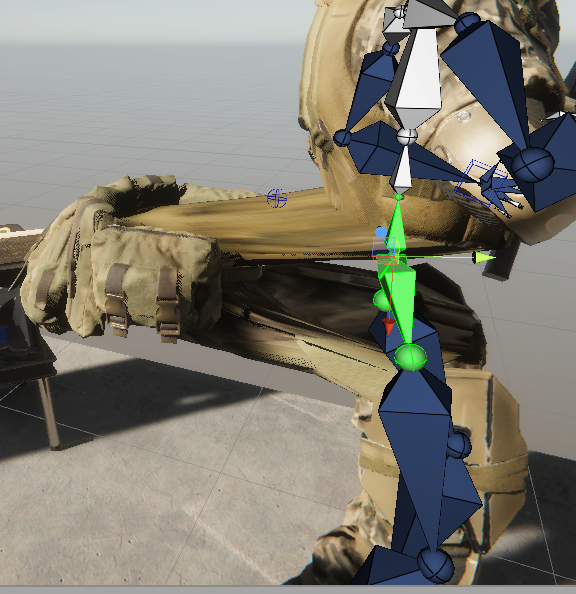
Can you help me?
Hi,
thank you very much for your support request.
Looks like the rig/skeleton of your character is not compatible with Unity's humanoid animation system or your humanoid avatar wasn't configured correctly. This should be a UMotion independent problem. Double check your humanoid configuration (select the character in Unity's project window, then click on the "Configure.." button in the "Rig" tab of the inspector window). All bones should be displayed in green. There should also be no error/warning messages displayed in the "Rig" tab of the inspector window. Try to verify your setup by playing any arbitrary humanoid animation on your character.
This is the related Unity video tutorial: https://youtu.be/pbaOGZzth6g
This Unity manual page describes the required bone structure: https://docs.unity3d.com/Manual/UsingHumanoidChars.html
Please let me know in case you have any follow-up questions.
Best regards,
Peter

 Separate animation export into multiple objects
When it comes to first person viewmodel animations, it's pretty common to animate the arms and weapon together, and then export them separately, so that they have their own animations and can each have their own animation controller. This allows for weapon variations to be animated differently while keeping the arms the same. (eg. Locking the slide back on a pistol without having to double every arm animation for this variation)
So in short, it would be nice if we could export just a section of the hierarchy, with the selected object being the root of this new animation. Then we would be able to create an animation controller on just this object. Likewise I guess this would also need the ability to ignore certain objects in a hierarchy when exporting so that there are no conflicts.
Hi Janooba,
thank you very much for sharing your idea. I really appreciate that.
I've added your idea to my "ideas for the future" list, so that I can consider implementing it in a future update.
Best regards,
Peter

Export humanoid animation as bones
I have a humanoid model(s) that I would like to export as bones/rotations. I need the models to remain humanoid for other purposes. The dope sheet has all the bones and values. Can I export that data instead of passing and making the Animator-type muscle rotations?
Thanks.
Hi,
thank you very much for your support request.
An animation that contains bones/rotations instead of the humanoid "muscle" rotations is a "generic" animation. Afaik "generic" animations can not be played by Unity's animator component of a character that is configured as "humanoid".
Anyway, there are two ways how you can export your animation as "generic" (so that bone rotations are used) from UMotion:
- Export your animation as *.FBX. I highly recommend setting "Write Mode" to "Update Existing File" in the export settings and to select your character's *.fbx file (or a duplicated version of it) as destination file. This ensures that the exported animation is fully compatible with your character.
- Create a new UMotion project of type generic. Duplicate your "humanoid" character and configure it as "generic". Assign an instance of the "generic" character to UMotion's Pose Editor and then import the animations from the "humanoid" project.
Please let me know in case you have any follow-up questions.
Best regards,
Peter

 Error in console log
I have been seeing this error a lot lately in my project every time I open it and sometimes when I go out of play mode, will this affect my game in the future?
Error: Could not load signature of ΊΊΉΉΉΊΉΊΉΊΉΊΉΊΊΊΉΉΊΊΉΊΊΉΉΉΉΊΊΉΊΉΉΉΉΊΉΉΊΉΉΊΉΉΉΊΉ:ΊΉΉΉΉΊΊΊΉΉΉΉΊΉΉΉΉΉΉΊΊΊΉΉΉΉΊΊΉΉΉΊΊΊΊΊΊΉΊΊΊΊΉΉΉΊΉ due to: Could not load file or assembly 'UMotionSourceApplication, Version=1.0.7456.28648, Culture=neutral, PublicKeyToken=null' or one of its dependencies. assembly:UMotionSourceApplication, Version=1.0.7456.28648, Culture=neutral, PublicKeyToken=null type: member:(null) signature:
Hi,
thank you very much for your support request.
All UMotion files are "editor only", meaning that nothing of UMotion (except the exported animation's) end up in your built game. The error that you see here is a false alert generated by Unity's dll loading code. It is never going to show up in your built game and it has no negative impact on the functionality of UMotion or the Unity editor.
Please let me know in case you have any follow-up questions.
Best regards,
Peter

How to animate character with Tools
May animation is more on fitness and I need to animate my character in the chair where the chair moves with the character.
Thank you!!!
Hi,
thank you very much for your support request.
For an introduction on how to use UMotion to animate various things, please follow the video tutorials. Please check out the chapter "Video Tutorials" in the UMotion manual for a comprehensive list of all available video tutorials.
Please let me know in case you want to know anything specific.
Best regards,
Peter
memory leak / freeze on export
I'm finding that in unity 2018.3f and presumably later. that the latest version of umotion freezes on the export of generic animations. it gets to the end is doing the compiling constraints. but never actually finishes. in some cases, it causes a memory leak where it consumes ram until I have nothing left and causes unity to crash as a result. The original generic animation lasts 17 minutes and froze at this point every time it was attempted to be exported. splitting into 5 sections doesn't seem to alleviate the problem in a real capacity. It still freezes at the same point, right before finishing. I should mention though when it's this small there doesn't seem to be the memory leak, that was present before, it stays at an exactly constant amount of memory being used and fluctuating cpu%
I'm using a ryzen 9 300X
RTX 2070 super
64 gigs of ram.
Sending animation event
Hi
I'm not sure if this is a Playmaker issued but as I'm using uMotion I decided to ask here first.
I need to send animation event to Playmaker.
- Select the GameObject.
- Open the Animation Window: Main Menu > Window > Animation.
- Add or select an animation on the GameObject.
- Add an Animation Event to the timeline.
- Select the SendEvent(string) function.
- Enter the event to send.
I can get to the step 5 but SendEvent cannot be found from the list. I also noticed this:

What do I need to do to get access to the SendEvent event or is it even possible?
Hi,
thank you very much for your support request.
This warning is just informational. UMotion runs through all scripts that are not in a custom assembly (i.e. are not using an assembly definition file) and checks if it finds a method with the name that you've entered. If it does not find it, it shows this warning. Unity can still invoke this method if it is in a different assembly, it's just UMotion that doesn't check other assemblies.
In order for animation events to be triggered correctly, just make sure that you've assigned your script to the animated GameObject and that the event name and parameter type that you configured for the animation event in UMotion is exactly the same (case sensitive!) as in your script. When changing something in UMotion, you always need to re-export your animation.
Here is the UMotion animation event tutorial:
Please let me know in case you have any follow-up questions.
Best regards,
Peter
Invalid Driven Object
I'm trying to create a custom property that can be used to curl all fingers in a hierarchy, but I'm getting this error upon assigning Rotation X to it. I don't know what this means, or how I can solve the issue.
Hi,
thank you very much for your support request.
You need to change the rotation interpolation mode of your finger joints to "Euler Rotation".
By default, all joints use quaternions to represent the rotation (this is a 4 dimensional representation of an orientation, hard to imagine and thus makes no sense to manipulate one coordinate of it directly via a custom property constraint).
Here is a detailed video tutorial covering this topic:
Please let me know in case you have any follow-up questions.
Best regards,
Peter
Customer support service by UserEcho
