
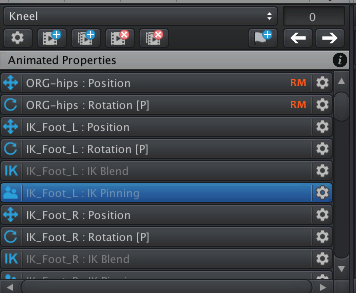
 IK Pinning Disabled
I've imported my humanoid character into my UMotion project and am able to animate it just fine. However, in trying to creating a kneeling pose, I found that the IK pinning options are all grayed out and I can't pin any of the joints to accomplish this. I used the IK setup wizard when starting the IK project and all of the information I can find only mentions that as being needed. If I go to Edit > FK to IK Conversion is does enable them, but it also causes all of my current animations to be reset. Any idea what is going on here?

Hi,
thank you very much for your support request.
Correct, IK Pinning doesn't work on an additive layer (as you can't really add up IK Pinning in a meaningful way). You can only adjust IK Pinning in the base layer or in an override layer. I'll try to make this clearer in the docs.
Please let me know in case you have any follow-up questions.
Best regards,
Peter
Apply twist motion as arms / legs move Humanoid Rig
But instead of using a driver to apply a blend shape as the arm moves up or down (or any other finnicky joint) I'd like to manipulate a twist bone on the rig. Is this possible to do with UMotion?
Thanks.
Hi,
thank you very much for your support request.
Yes, you can manipulate all bones that are present in a character's skeleton (including twist bones). But please note that Unity's humanoid animation system does not support twist bones. While you can define the twist bone as extra bone of your humanoid character, extra bones are not re-targeted to other humanoid characters. Thus it doesn't really make sense to use humanoid anymore (as animation re-targeting is really the only benefit you get from using humanoid) --> use generic instead.
Please let me know in case you have any follow-up questions.
Best regards,
Peter

 Additive scale keyframes inserted on export
I believe I've found a bug with generic rigs and additive layers.
Problem
If an additive layer is selected for editing in the clip editor and "Auto Key" is set to "Generate", often when switching animations or exporting, one or more scale keyframes (and sometimes a rotation keyframe) is added, causing the final animation to be modified and exported incorrectly.
Expected Result
Scale keyframes should not be added to the additive layer of animations when switching animations or exporting aimations on a generic rig.
Steps to reproduce
1. Create a uMotion project and configure a generic rig
2. Set "Auto Key" to "Generate"
3. Import an animation or add some keyframes to the Base Layer
4. Create an additive layer and place some keys for bones in the rig
5. Export animations (or, sometimes just changing the selected animation for editing will do also work)
Fixed in UMotion V1.22p10 (available on the Asset Store in 1-2 days). Thanks again for reporting.
Best regards,
Peter

 "Change Pivot" Feature request / Question
Hi Peter. Thank you for great plugin!
I've made a few good animation and Just wanted to add here a Feature request / Question:
- Can we automatically change Pivot mode based on Rotation / Moving tool? I mean - when I press "W" for moving the Pivot changes to Global, and when I press "E" for rotation the Pivot goes to Local. I know that there is the "X" key. But it breaks a quick workflow and creates a lot of mistakes/misclicks.
thanks
Hi Maxxx,
thank you very much for your feature request.
While being useful in your use case, it's not guaranteed that everybody always wants the move tool to automatically be in global space (and the rotate tool to automatically be in local space). It really depends on the current situation but also on personal preferences. Unity for example is also not changing the editing space automatically when switching from the rotate to the move tool. I think in order to be consistent it's better to keep the current "manual" behavior.
Please let me know in case you have any follow-up questions.
Best regards,
Peter

vehicle + humanoid
Hello,
I have a humanoid on a quad bike. I downloaded the humanoid from mixamo with some default animations. I m wondering if I can import the quadbike and animate the humanoid on top of the quadbike? The quadbike is attached to a rigidbody and wheel colliders and will be moving using the physics engine.
Hi,
thank you very much for your support request.
Yes this should work, but I would recommend changing your character from "humanoid" to "generic". Humanoid is great when you want to share animations between multiple characters but is less precise (e.g. fingers can have slightly different poses in the exported animation, hands might not be exactly at the handle,...). Humanoid is also a bit more CPU intensive. Generic plays the authored animation directly (without converting it into the lossy humanoid animation format). Here is a detailed blog post about what humanoid is: https://blogs.unity3d.com/2014/05/26/mecanim-humanoids/
To animate your character, make it a child of the quad bike. Create a new UMotion project and then drag and drop your character (not the whole quad bike) into the Pose Editor of UMotion. If you want to keep the hands on the steering handles (that are controlled via physics/script), you need a runtime IK solution on top of the regular animations. Please note that UMotion is not a runtime IK solution (IK is only executed at authoring time in UMotion).
Please let me know in case you have any follow-up questions.
Best regards,
Peter
Problem with humanoid root position/orientation
Question, I got two animation clips (Humanoid), but the root/hip have different orientations and positions. The chatacter is facing in different direction if one or the other animation is applied. I played with the root transform import settings, but there is still a noticable shift in position if transtition from one to the other clip.
I tried to use Umotion Pro clip editor, importing both clips, and adding a layer to both. I was then adjusting the hip position and rotation (they are marked rm - rootmotion) in an override layer (also tried additive) for both clips so they are excatly the same.
But after export of both clips, the position and orientation do not match.
What do I do wrong?
Hi,
thank you very much for your support request.
The generation of the root motion curve for humanoid is a bit buggy in Unity (as the root position always seems to be based on the center of mass i.e. it is slightly different depending on the pose of the character, no matter what you have authored in the original clip initially or what you have configured in the clip Inspector settings).
That's why UMotion offers a feature to generate the root motion curves (instead of Unity) in the intended way. To enable this feature, open the clip settings in UMotion (the gear icon) and check the following checkbox:
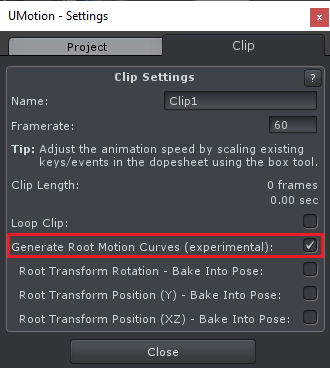
If this doesn't solve your issue, please post a few screenshots showing your problem.
Best regards,
Peter

Big Problem with root motion
I make my animation with Umotion. Then, I had a weird rotation when I put my humanoid .anim file in my animator. I checked the problem in forum. I found this.
So, I ticked the "General Root Motion Curves" and "Root transform rotation--Bake into pose". Then, the weird rotation disappeared. That's fine. However, the charactor's y-position seems to be frozen. The pelvis's y-position freezes.
But it works fine in preview and umotion.
I don't know how to fix this.
Hi,
thank you very much for your support request.
If the animation previews correctly, then UMotion exported the animation correctly (so the problem must be somewhere in the setup of your character/its animator/its avatar). It's hard to diagnose this with the current amount of information. A few guesses:
- Maybe you've added a game object as parent of your character that scales the character (or offset's its position)?
- Maybe the avatar setup of your character is not correct (select your character in Unity's project window, then in the Inspector click on the "Rig" tab and then on "Configure..."; all bones should be green; the rig tab should also show no errors)?
- Toggle the "Apply Root Motion" checkbox in the Animator component and see if that changes something.
- Toggle the "Root Motion Position(Y) - Bake Into Pose" in UMotion and see if that change something.
Please let me know in case you have any follow-up questions.
Best regards,
Peter
Coping keys of imported animation into new clear one!
Thank you for great plug in!
Sorry for noob question, but:
- I have a clear newanimation and lot of fbx files with old animations
- I want just to copy pose (some keys) from old animation to new one
- I've imported old animation in different ways with different settings!
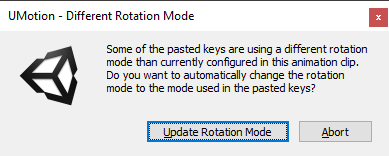
- But when coping i have error "Different Rotation Mode - Some of the posted keys are using a different rotation mode than currently configured in the animation clip"
- So - with the same pose config - posted keys look broken!
What is the Rotation mode? How to find it in clear new animation? cant find answer...
thanks
Max
Hi,
thank you very much for your support request.
To learn more about rotation modes, please check out the following video tutorial:
The dialog message you get indicates that the rotation mode of the copied keys is e.g. "euler interpolation" but in the destination animation clip the same rotation property is in e.g. "quaternion interpolation" mode (and already has keys). UMotion is then asking you if you want to update the rotation mode so that they match:
Please let me know in case you have any follow-up questions.
Best regards,
Peter
How to edit animations where humanoid is holding an object?
There are lots of different objects in the game that aren't part of the humanoid rig and are their own standalone objects. However, the players can pick these objects up, which is executed with an IK pickup animation that then re-parents the object to the hand bone. This all works fine; however, it gets complicated when I want to create animations based on that object holding pose. Since that object isn't part of the rig, I get an error when trying to load the animation project with the object as a child of the hand (`Human bone mapping for human bone "Right Thumb Proximal" is not unique: Found multiple transforms named "ORG-thumb_01_R".`). I can of course edit the animation without the object in hand, but it becomes very difficult to align fingers, etc correctly with relation to the object in that case. What is the recommended approach to handling this type of workflow?
Hi goldfire,
thank you very much for your support request.
What is the recommended approach to handling this type of workflow?
You're approach is correct. The question is, why are there at least two transforms named "ORG-thumb_01_R" in your character's hierarchy (at runtime)? Try to fix that and your approach should work fine.
Please let me know in case you have any follow-up questions.
Best regards,
Peter
Shoulder bones and Hip are represented by multiple bones.
Hello,
I imported a generic rig. Some bones like the shoulder bones are represented by multiple bones which are all selected at the same time:
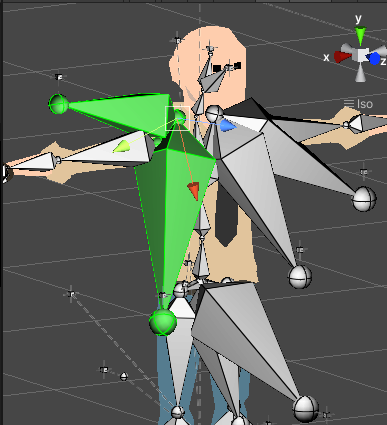
Any idea why?
Hi,
thank you very much for your support request.
Bones are only the connection between joints (joints are the spheres at the beginning and end of the bone). The joint is the thing that really manipulates the mesh when it is rotated and the bone (= the connection) is just a visual helper. UMotion draws bones between every joint <-> joint connection, so in your case this means that there are several joints (floating in the air) that are a child of the shoulder joint which UMotion then visualizes with a bone connection. You can select those individual joints by clicking just on the sphere (= joint) of the end of the bone.
In UMotion's config mode you can disable joints you don't need by setting the "Visibility" to "Lock" or "Hide" (see manual) in the properties tab. Use the "Parent Link" setting to configure the appearance of a bone connection between joints.
In case your joints are not used anyway, it's probably a cleaner approach to completely remove them from your character in a 3D modeling application. This safes you a bit of run-time performance (the less joints, the less work the CPU/GPU has to do when playing an animation on your character).
Please let me know in case you have any follow-up questions.
Best regards,
Peter
Customer support service by UserEcho
