 Error when loading UMotion Pro for the first time in Unity 2017
I get this error message when I start UMotion Pro for the first time in Unity:
TypeLoadException: Could not load type 'ΊΉΊΊΊΊΊΊΊΉΊΉΉΉΉΊΊΊΊΉΊΊΊΊΉΉΊΊΉΉΊΉΉΊΊΊΊΊΉΊΉΊΊΉΊΊΊ' from assembly 'UMotionEditor, Version=1.0.7484.14450, Culture=neutral, PublicKeyToken=null'.
What error is this, will it still work?
I hope it will still work!

Hi,
thank you very much for your support request.
This error is just a false alert generated by Unity when it loads some of the dlls. Everything should work just fine, you can safely ignore this error.
Please let me know in case you have any follow-up questions.
Best regards,
Peter

Blend animations
Hey Peter,
I have 4 directional movement animations and an aiming animation. When I use animation layers from Unitys animator, the characters rotation is way off. Do you have a recommended way of how I can use UMotion to combine the aim and walking animations into a single animation. Basically I want to use the aim animation from the torso upward and the walking animations for feet and rootmotion.
Thank you :)
Hi Martin,
thank you very much for your support request.
Yes it's easy to combine the animations in UMotion:
- Create a UMotion project and assign your character to the Pose Editor.
- Import all animations, that you want to combine.
- Open the aim animation and select all keys (CTRL + A in the Clip Editor) and copy them (CTRL + C)
- Open the first movement animation and create a new animation layer of type override
- Paste the aim animation keys (CTRL + V) into the new layer
- Delete all keys of bones you don't want to override
- Optional: You can play with the blend weight of the layer in case you don't want to 100% override the upper body.
- Repeat for the other movement animations.
Please let me know in case you have any follow-up questions.
Best regards,
Peter
How to properly make use of UMotion Pro along with Final-IK
Hi There ! I would like to understand how to properly make use of UMotion Pro, along with Final-IK. I mainly aim to take advantage of Final-IK's "Biped IK Solvers" to create the key poses needed by the animations even more easily & faster. I've tried to add the CallBack "UpdateSolver" as mentioned in the docs... but didn't see any changes... please help !
Hi,
thank you very much for your support request.
- Create your IK rig outside of UMotion (using Final IK). You need to use dedicated game objects as IK goals (the Final IK gizmos can't be animated by UMotion).
- Make sure that everything works: Enter play mode and drag the IK targets around. The character should change it's pose properly.
- Then back in UMotion, set the callback name (Pose Editor --> Options) to "UpdateSolver" (you did that already correctly). UMotion should now be executing the Final IK scripts at edit time.
- In UMotion's config mode, make the custom IK goals visible (you can also configure their appearance).
- (Optional) Use custom property constraints to control the properties of the Final IK solver from within your animation.
- Back in Pose Mode, moving the IK goals should correctly modify your character (like previously in play mode).
Please let me know in case this doesn't work for you.
Best regards,
Peter

Binding Warning : Some generic clips animate transforms ...
I receive the following warning message when I select my character I've applied an animation to that I created in UMotion ...
https://i.postimg.cc/P5yTV9Wy/binding-warning.png
When I start the game my character immediately falls through the stairs halfway (only when the animation is applied) ...
https://i.postimg.cc/k40mtmCJ/floor-fall.png
Disclaimer : This is my first attempt to use UMotion and I've only been using Unity for a month. The animation plays just how I want when I view it in UMotion, but when I carry it into Unity and view the scene with the game running the above happens.
I figured out the issue. I don't know why but the Animations Rig tab Animation Type was set to Generic instead of Humanoid.

Weird behaviour with humanoid Avatar Mask that contains extra bone
Hello.
I animated some characters with uMotion and in particular with child-of constraint option.
Here's what I've done
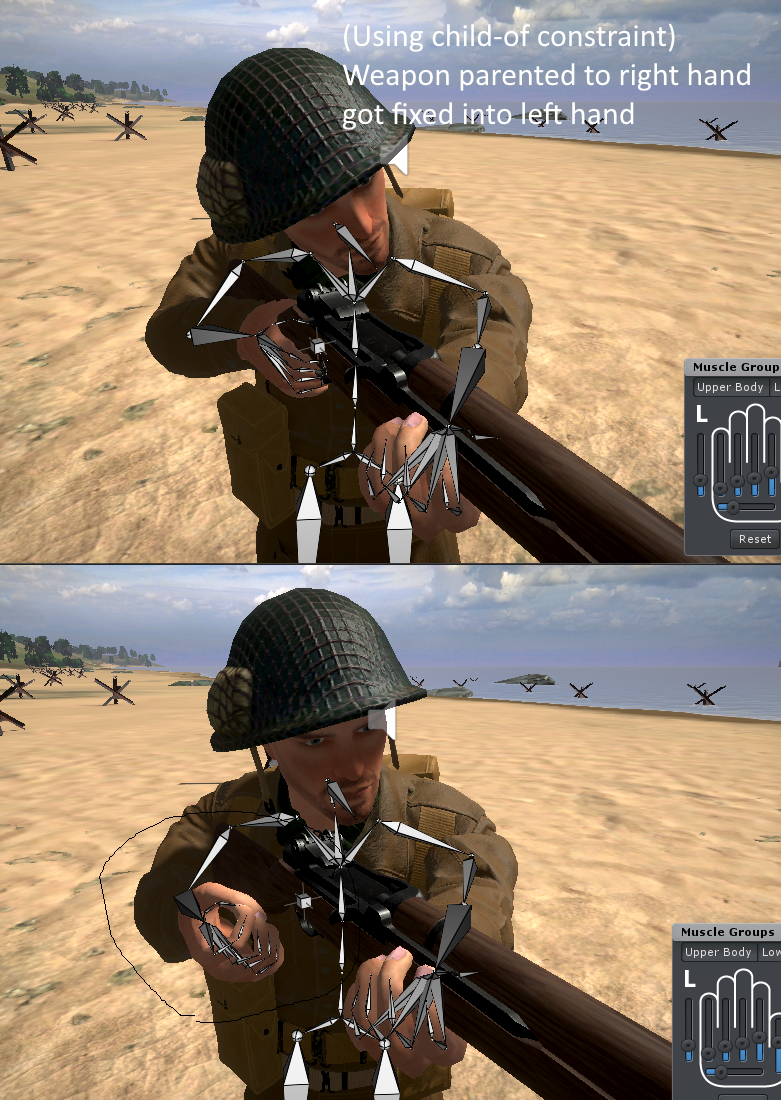
Basically the rifle attached to right hand (weapon is child of a bone called "WeaponJnt" that is contained in imported skeleton. I did this just as I learned from another topic I made where I added the weapon transform as new transform in prefab, but now i created a new bone in Autodesk Maya, so I'm using an humanoid skeleton with an extra bone)
Everything works just great when I just animate the character with Mechanim, without using Avatar Masks (As you can see, rifle became child of constraint of left hand, so even if weapon is under an extra bone it get recognized from animation):
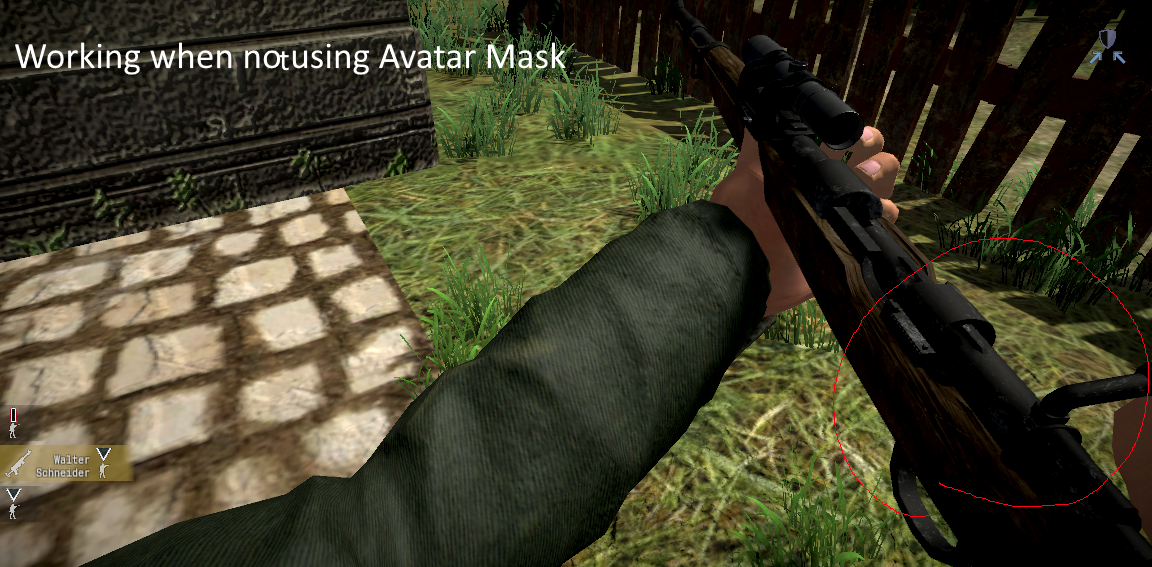
However I still have the same problem I had when i was using a new transform instead of an extra bone as weapon transform; The mask dosn't get applied on the rifle transform, wich dosn't get animated and dosn't follow left hand during animation.
Mask seems correctly implemented.
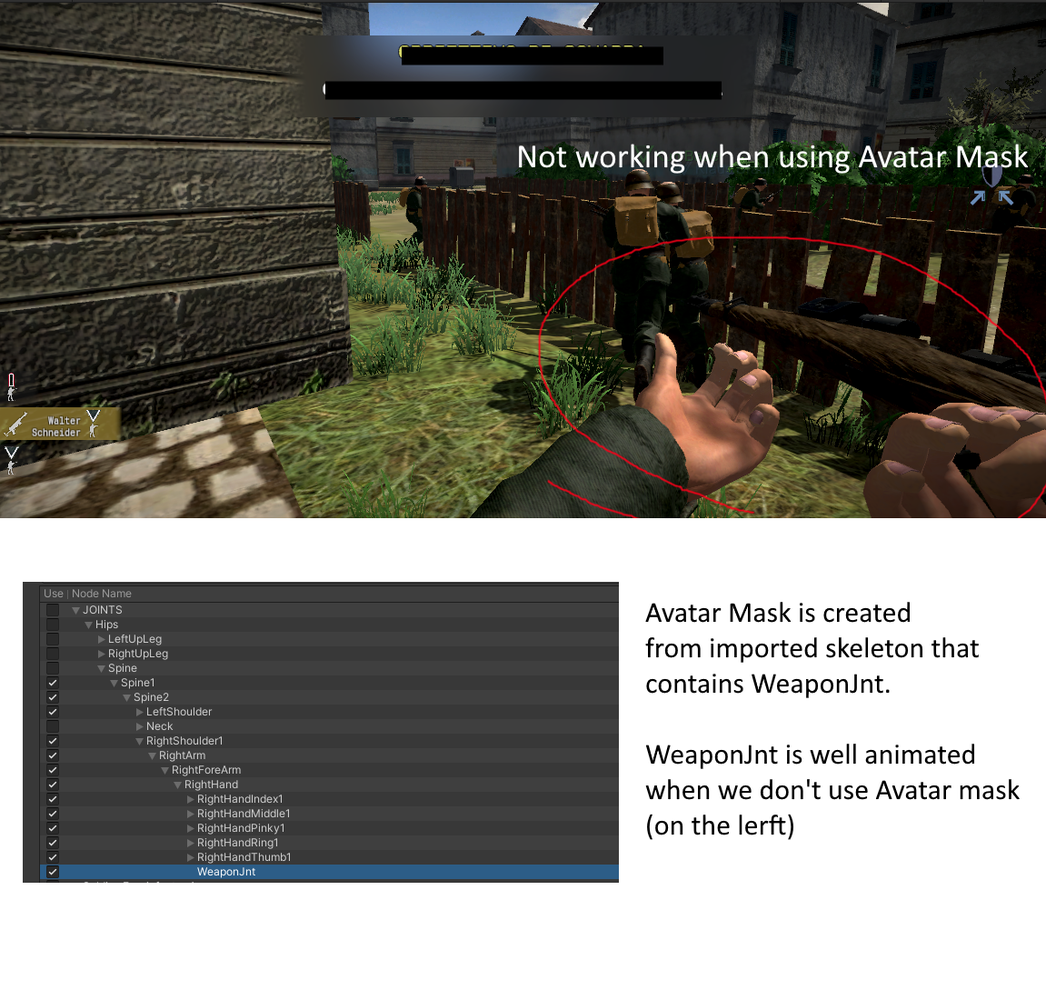
After watching tons of similar posts I guess this should be working quite good;The animation can see and animate the extra bone, bvut the mask, even if the bone is imported, visible and ticked, got ignored.
Also the name, parent transform etc of the imported extra bone haven't been modified in character prefab.
Hi,
thank you very much for your support request.
If the animation works correctly after being exported from UMotion (and not using the avatar mask), then UMotion did everything correct (= the animation is OK). So the issue must be related to your animator controller/avatar mask setup. To debug such issues, the easiest way would be to compare the local rotation/local position values of each bone of the not working setup with the working setup. Then you can see at which bone the differences start and then check why that bone is manipulated by the Animator component in such a way. Please note that from the last spine bone on, all bones need to have the correct orientation/position otherwise your hands won't reach the weapon correctly. Maybe your second layer in the animator controller is additive instead of override? Or the blending weight is not 1?
Best regards,
Peter

Convert Generic to Humaniod Character axis is off
I got the Orc character from Maksim Burgrimov. The conversion from generic to humaniod works great and the animations are working also. The strange thing is the character postion is off. Instead of standing it's sideways. Is there a setting that I need to do? First time using Umotion but looked at the video ( https://www.youtube.com/watch?v=Cxn24UKtw4A ) for help.

Hi Chris,
thank you very much for your support request.
I'm not exactly sure why the rotation of your character is offset (therefore I would need to see how you exactly converted the character step-by-step).
Anyway, when you export your animation to *.fbx, you can use the rotation offset in the export settings to fix your issue (click on the "gear" icon):
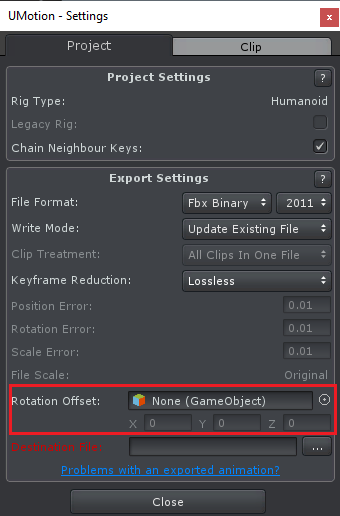
First choose the bone/transform on which you want to apply the rotational offset. Then use the value fields to add a 90° rotational offset. Click on the "?" icon (on the top right of the UI) to open the corresponding page in the manual to learn more about this feature.
Important: Please always set "Write Mode" to "Update Existing File" and choose your humanoid character's *.fbx file as "destination file". That way UMotion exports the animation directly into your humanoid character's *.fbx file. This ensures that the exported animation plays well with Unity's humanoid animation system.
If you have any further questions, don't hesitate to ask.
Best regards,
Peter
 Bake layer changes to Base Layer keys
well it's selfexplanatory. I'd like to be able to bake tweaks that i made in the particular layer into the Base Layer keys
Hi,
thank you very much for sharing your idea. I really appreciate that.
I've added it to my list of "ideas for future versions". I use this list as a basis for planning upcoming features.
Best regards,
Peter
Pre-select animations to export
It would be great to make some window with animations clips list where you could select only animations you need to export and remember those settings. Or even have some presets for different combinations (export walks, jumps,etc separate and shooting separate etc) . Also for example if you got some test clips or reference anims imported that you dont want to export.
Yes I can remove unwanted from FBX but it should be done every time you export. and you should remember hat to delete/ Not realy optimal
Thank you! The tool is very helpful anyway.
Hi,
thank you very much for sharing your idea. Much appreciated.
I've added your idea to my "ideas for future versions" list. Regarding the presets, the closest thing you could do right now would be to create a different UMotion project per preset (e.g. a "walk" project, a "jump" project)...
Best regards,
Peter
Humanoid animation: strange thumb orientation
Hello, I encountered strange behavior - when creating animations with uMotion everything works fine except for both thumb bones.
For some reason something from animation is not applying to that bones, in other words when playing animation in game -> right and left thumb bones are not following animation correctly.
I've tried in different humanoid characters (both with IK and without), started new project and all result are the same.
Here is a quick example screenshots done in new project in Unity 2019.3.
Made simple animation in uMotion Pro with both hands to demonstrate the issue:
a) this is how I want animation to look
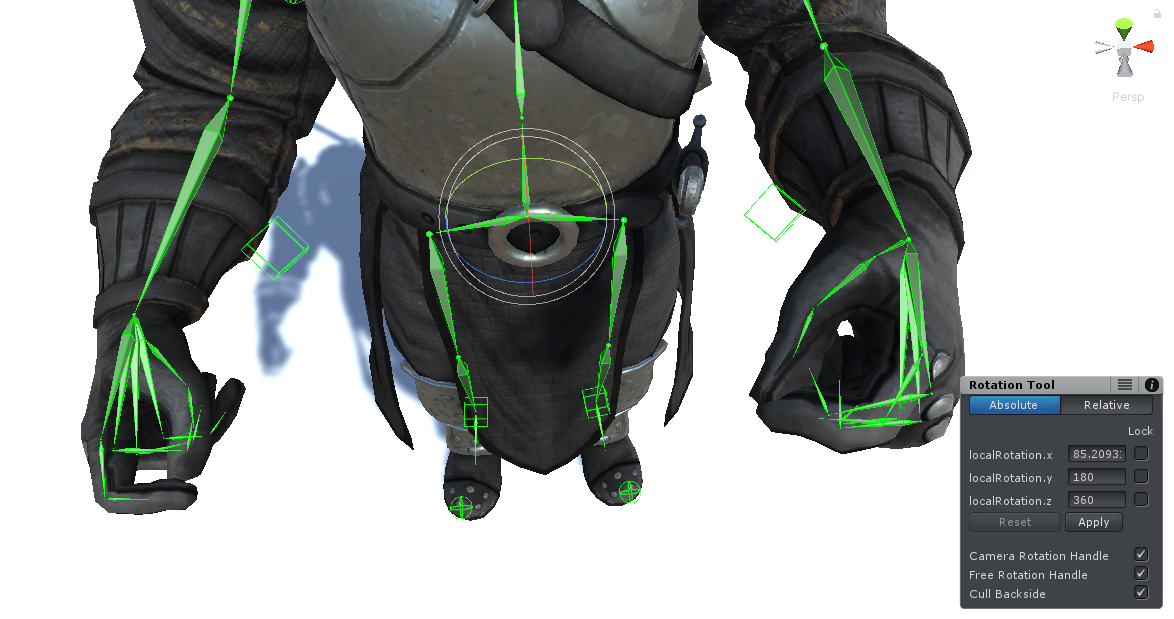
b) this is how animation looks in game
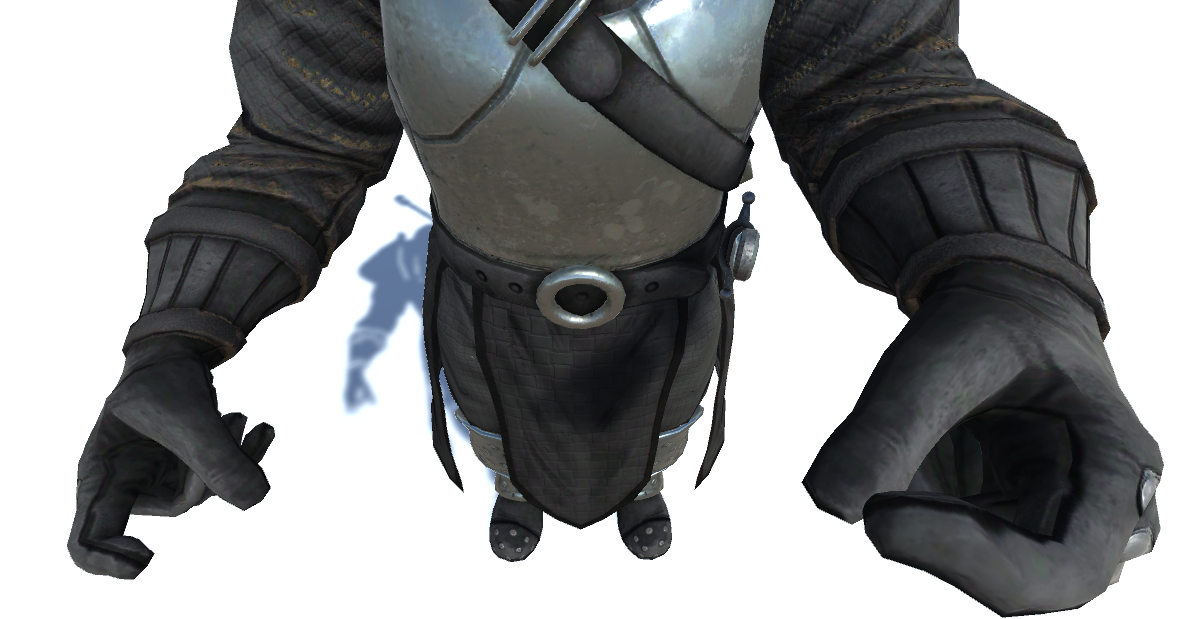
As you can see from screenshots: right thumb is completely off from animation, left thumb is somewhat missing rotation.
Can you assist me to understand why is this happening and how to fix it?
Hi,
thank you very much for your support request.
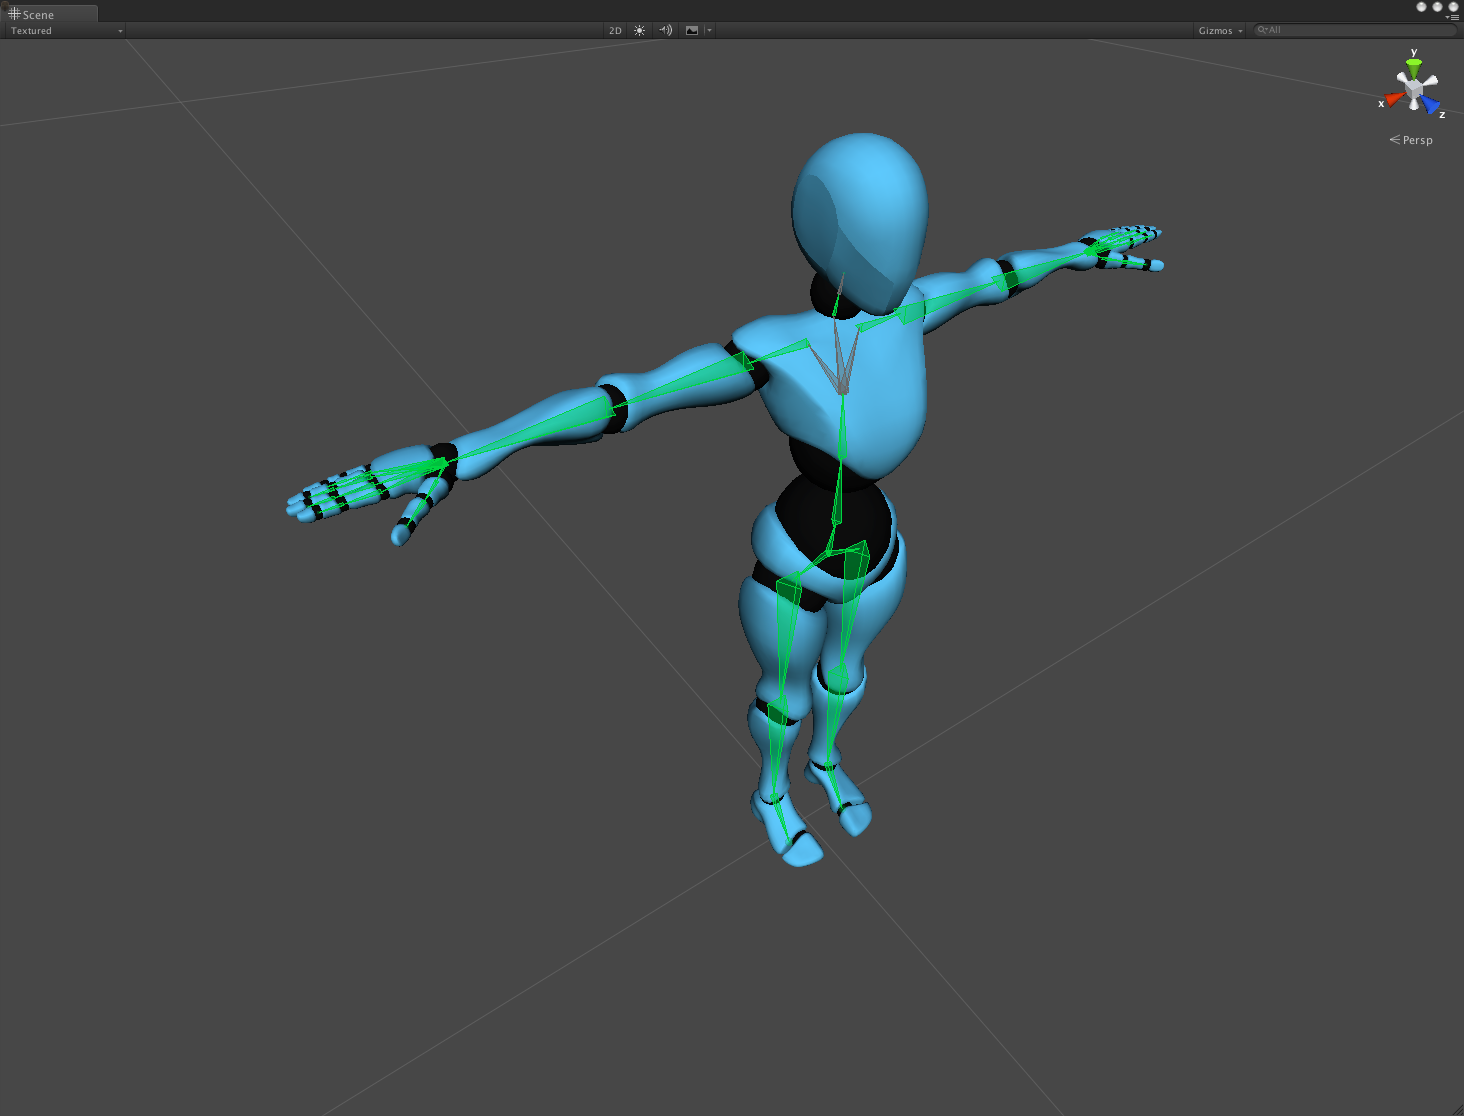
The animation re-targeting quality of "humanoid" is largely dependent on how accurate the T-Pose of your character is in the humanoid avatar configuration. If you get re-targeting issues on specific bones (the thumb bones in your case), make sure to adjust the thumb bone in the humanoid avatar configuration to match the T-Pose more accurately:
- Select your character in Unity's "Project Window".
- In the "Inspector" window click on "Rig" and then on "Configure...".
- Now ensure that the bones of your thumb are both highlighted in green (and that their role's are assigned correctly). Then ensure that their pose is correct as described by Unity:
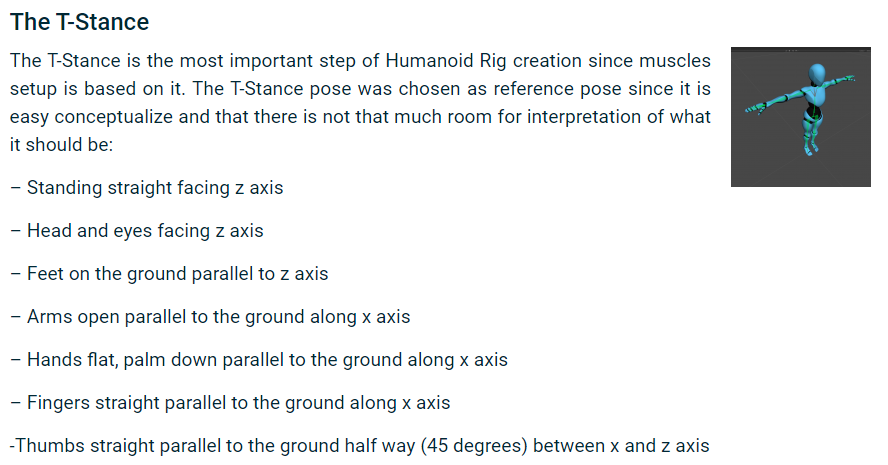
Source: https://blogs.unity3d.com/2014/05/26/mecanim-humanoids/
Enlarged version of the picture from the blog post (notice the thumb orientation):
When you've saved your changes of the humanoid avatar, you need to re-export your animation from your UMotion project in order for the changes to be applied to the animation.
Btw. small re-targeting errors are always expected when working with humanoid. That's just in the nature of this animation system (check out the blog post linked above to get a better idea of what humanoid is all about). If you want "pixel perfect" results, use "generic" instead.
Please let me know in case you have any follow-up questions.
Best regards,
Peter

A hand rig as a humanoid project
Hi,
I am a complete newbie to Unity and to UMotion, I hope you can point me to the right direction.
I have a hand rig (no arms, legs or body). I want to use the nice Hands Muscle Groups Assistant window. Right now I can't create a UMotion humanoid project using this rig, so I can't use the Muscle Groups Assistant. Is there a way to get the Hands Muscle Groups Assistant window for a generic UMotion project type?
Hi,
thank you very much for your support request.
The problem with this is, that a generic rig is really just a hierarchy of any sort of bones. Unity/UMotion can not differentiate if a generic rig is a "hand" or e.g. an animal. Thus it is not possible to provide any sort of predefined assistant windows for generic rigs.
Anyway, if you change rotation interpolation mode to "euler" for your finger bones, you can use custom property constraints to control the rotation of the bones. The custom property constraints show up as sliders in the "channels" view and thus offer an animation experience that is closer to what you get from the muscle groups assistance.
This video explains the different rotation modes in UMotion and shows you how to switch to euler interpolation:
Btw. if you're just looking for a nice way to curl all 3 finger bones at the same time, you can use the following feature:
- Hold shift while selecting the top most ("proximal") finger bone. This automatically selects all child bones too.
- Use the rotation tool (in local space) to apply a rotation. The rotation is smoothly distributed between all 3 bones making the fingers curl in a natural way (if you rotate in the right direction of course ^^).
Please let me know in case you have any follow-up questions.
Best regards,
Peter
Customer support service by UserEcho
