
 The rotation of the bones taking into account the restriction of the muscles in the avatar of the character
Hi! Is it possible, as in the very animation asset, to rotate bones taking into account the restriction of muscles? So that it would be impossible to rotate a bone more than specified in the restriction of this avatar bone

Hi Lev,
thank you very much for your support request.
Unfortunately this is not possible. Try to create natural/human capable poses, then you should be never exceeding any joint limits. Use your own body as reference, to see where the natural limits of a specific joint in your body are.
Please let me know in case you have any follow-up questions.
Best regards,
Peter

Odd jerking motion in head
I've got a strange twitch in my character's head when I animate her. This didn't happen before.
If I rotate the torso in any way, then adjust her neck bone so she's looking forward, she get a twitch instead of smooth movement.
Her neck bone is set to progressive quaternion. I've tried setting it to quaternion and euler, then redoing the movements from scratch in both cases, to no effect.
It seems to move smoothly until just before the next keyframe, where it does a twitch.
I've done these types of movements many times before in uMotion and I haven't encountered this before.
Oh jeez, I got it. Certain bones in the rig needed to have the same rotation mode. The rig has different bones set to different things for some reason.

Event Function not showing up in UMotion - Animation Event dialogue box
I'm trying to create the foot steps example in the Tutorial video. I have created a void function that will play an audio file of a foot step. I've placed the script in Assets>Editor and even tried Assets>Scripts. In either case, the foot steps script doesn't appear in the list of choices available in the Animation Event dialogue box. I see plenty of others in there like Start(void), TestRunnerCoroutine(void), Run(void), Cleanup(void), etc. however my foot steps script is not there.
Thanks.
Hi Quix22,
thanks for reaching out.
As a workaround: You can just type the name of the method into the "function name" field. Even without it being listed, it should be called properly.
I'm not sure why this method isn't listed. Can you try to reproduce this issue in a fresh Unity project? If so, please send that project to me via the email support form so that I can take a closer look (request a link to my dropbox via email in case the file size is too big).
Thank you very much.
Best regards,
Peter

Cant click on bones
Hi. I cant seem to figure out why I cant select some of the bones in my model. I have set inverse kinamatic handles on both hands. Toggling IK or FK or BOTH buttons doesnt seem to enable me to select the bones. The non selectable bones seem to be just random ones. Not sure if this is a bug or have I forgotten to do something ? I can select them from the clip editor, though I have to search for each one for 5 mins till I find exactly the name I want...
Here is a video
Hi,
thank you very much for your support request.
Please update your UMotion version to the latest from the store (latest at the time of writing is V1.26p03) to see if that solves your issue.
Does it also not work, in case you create a fresh UMotion project and keep the rendering style of the bones unchanged? Maybe the problem is related to some of the specific visualization settings you are using.
You can also try to create a fresh Unity project, then copy & paste your character and it's UMotion project file (*.asset) into the fresh Unity project. Does selecting work in there? If not, may I ask you to send me this fresh Unity project so that I can do some further debugging? You can send it to me via the email support form (or request a link to my dropbox via email if the size is too big).
If it does work in the fresh Unity project, then there might be some editor extension or script that conflicts with the selecting process in your Unity project. In that case duplicating the whole project and then deleting other assets step by step is the best process to identify the root cause.
Best regards,
Peter

Mimicking "Multi Referential Constraint"
Hello,
I've been trying my around to find a way implementing this spesific Unity Animation rigging constraint behaviour.
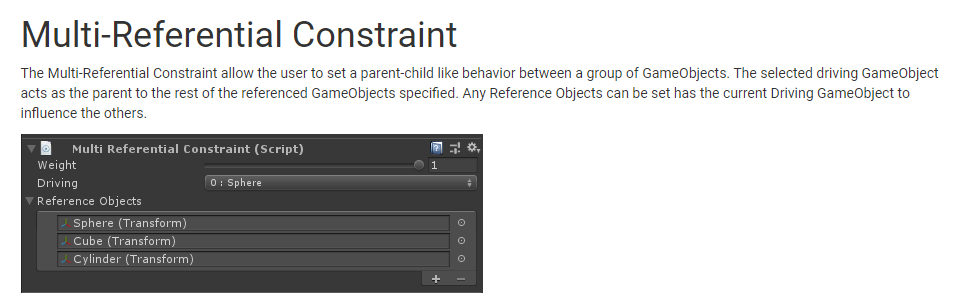
Is there any way to do this in U-Motion. I've tried to use the Custom Property Constraint, but can't find right way to achieve what I need.
I need this to make animation for the footstep part. Something like this :
Please let me know your thoughts on this. Is it possible to achieve?
Or maybe any alternative way to do this with current U-Motion features (Pro)?
Thank you.
Hi,
thank you very much for your support request.
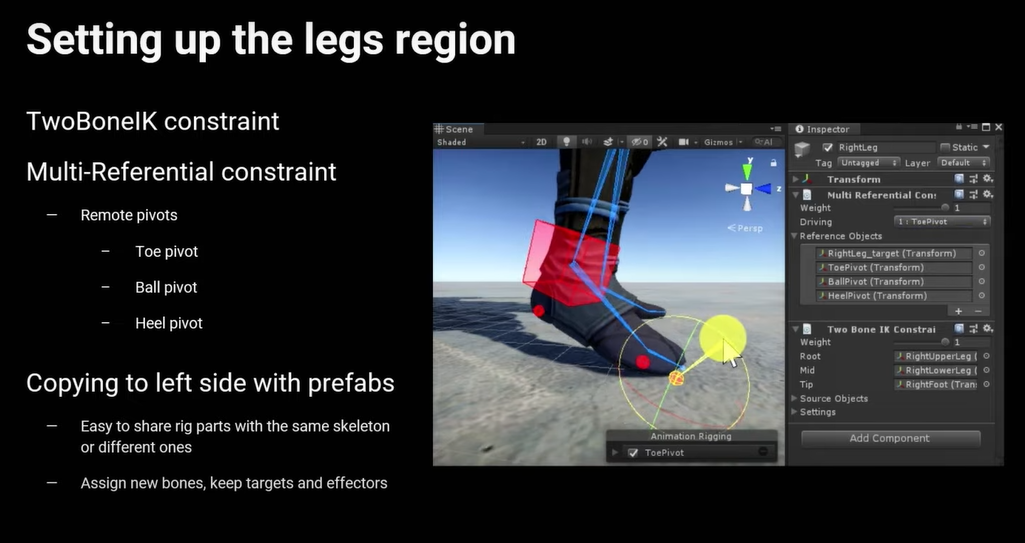
The equivalent of the "Multi-Referencial Constraint" in Unity is the "Child-Of Constraint" in UMotion:
You can create such "advanced" rigs like the foot roll rig you mentioned by adding custom bones/transforms that act as pivot points and using custom IK chains. You can add new bones/transforms via config mode. Here is the video tutorial regarding config mode:
And here is a written tutorial, that explains how I've created the "advanced foot roll" rig you are referring to: https://support.soxware.com/en/communities/1/topics/524-how-to-create-an-advanced-foot-roll-ik-rig#comment-682
Please let me know in case you have any follow-up questions.
Best regards,
Peter

IK handle rotation rotating just ik handle and not objects
I need to spin the sword so the tip point over the right shoulder. The rotate gimbal only spins and not the bones or mesh. I can move the object but not rotate.
Hi,
thanks for reaching out.
If I understood you correctly, you want the sword to move/rotate with the hands IK handle? In that case you need to make it a child of the right hand. Assign a child-of constraint to the sword (in config mode). Then in pose mode, select the sword and in the channels view set the "Parent" to be your hands wrist bone (in the moment the hand grabs the sword).
More information can be found on the child-of constraint video tutorial:
Please let me know in case you have any follow-up questions.
Best regards,
Peter

gitignore cache etc for UMotion
Hello,
Is there any recommended list to add for .gitignore related to UMotion in general?
Hi Jae,
thanks for your support request.
- You can ignore the "<YourUnityProject>/UMotionData" folder.
- You can ignore any files in the "<YourUnityProject>/Assets/UMotionEditor/Data" folder.
- You can ignore/delete the "<YourUnityProject>/Assets/UMotionExamples" folder if not needed.
- You can ignore/delete the "<YourUnityProject>/Assets/UMotionEditor/Manual" folder if you want a really tight package (but usually it makes more sense to keep it).
Let me know in case you have any follow-up questions.
Best regards,
Peter

Delete/Ignore Animation Parameters
Hello again Peter!
First of, thanks for the many guidances on using generic rigs!
Alas, I am now having another issue, or two depending on how you see it.
A) I have a Speech Bubble, which is childed to the character parent, since it should move around with the character's position and rotation (not animation though). Alas, since I have a few rather narrow areas for the characters to be in, I'd liek to be able to scale it down or move around when needed. However, since it is chidled to the character, UMotion really wants to animate it and therefore overrides all changes I make in script ( I usually start by keying all parameters before every animation). Is there any way I can tell UMotion to exclude that from all animations, aka delete the animation property?
B) Kinda similar, working with blendshapes. Since the character has over 50 blendshapes for facial expressions, deleting them all manually from every animation is quite tedious as well. Is there any wayy to tell UMotion: "Don't put the blend shapes in your animation window"? Especially since this really clutters the clip editor :D
The reason why I'd want the blendshapes independent of the animation is to use "Keyposes" and give them nuances with different facial expression, by the way :)
Thanks for your time as always
Max
Hi Max,
thank you very much for your support request.
Regarding A): Go into config mode, select the transform you want to exclude. Then under the "Properties" tab set "Visibility" to "Locked". Click on the black info button in the "Properties" tab to open the according page in the manual to learn more about this.
Regarding B): When you first assign a character to UMotion, it asks you if UMotion should add the blend shapes to your project.
If you already have them in your project, you can remove them by opening config mode. Select the bone/transform that has the blend shapes assigned. Open the "Constraints" tab and remove the "Custom Property" constraints of all the blend shapes (by pressing on the X button).
Let me know in case you have any follow-up questions.
Best regards,
Peter
Importing to Unity 2018.2
I want to import the asset to Unity 2018.2 as upgrading to 2018.4 breaks all of my prefabs. Is there a way to do so?
Hi,
thank you very much for your support request.
Download Unity 2018.4, create an empty Unity project and import the latest UMotion version from the asset store. Then copy & paste the installed "UMotion Editor" and optionally the "UMotion Examples" folder from your 2018.4 project to 2018.2.
Please note, that Unity 2018.2 isn't officially supported anymore. I think it should still work though, but it's not guaranteed.
Let me know how this works for you.
Best regards,
Peter
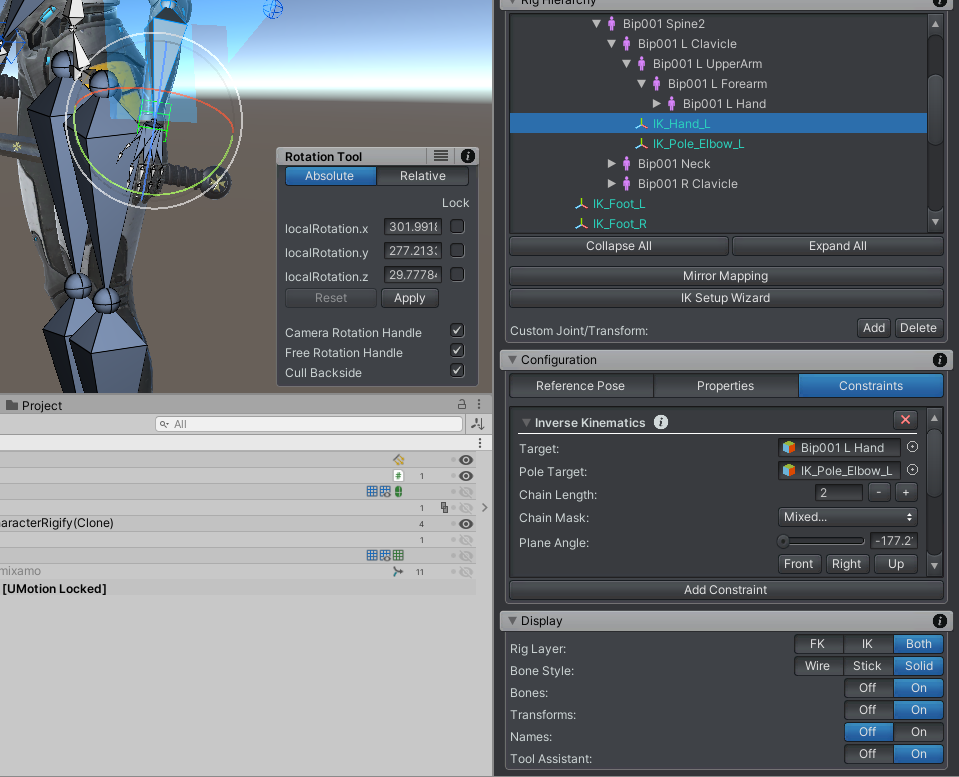
Hi,
thank you very much for your support request.
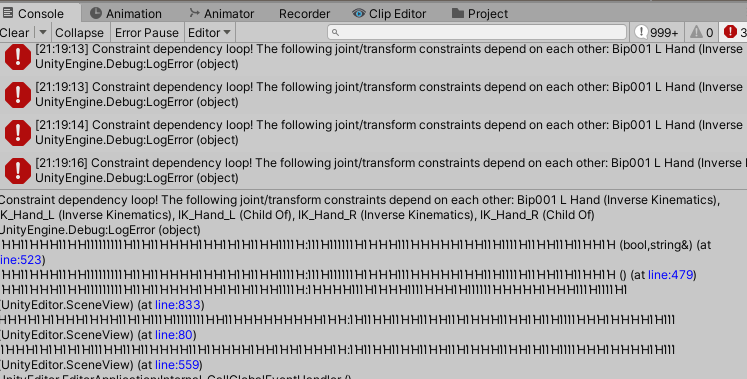
The easiest way would be by creating a fresh UMotion project, and let the IK setup wizard do the IK setup for you. The IK setup wizard should generate a correct setup that does not have a dependency loop.
If you want to correct your setup by hand, make sure that the IK handles are not a child of a bone inside the IK chain. From what I see in the screenshot, your "IK_Hand_L" handle is a child of the "Bip001 L UpperArm" which is part of the IK chain. That would cause a dependency loop as the IK constraint is manipulating the rotation of the upper arm based on the "IK_Hand_L" position, but doing so will also alter the position of the IK_Hand_L as it is a child of the upper arm --> it's a loop. Make the "IK_Hand_L" a child of the "Bip001 L Clavicle" instead.
If you still get errors (for other bones), try to identify and solve the issue based on the same principles.
Let me know in case you have any follow-up questions.
Best regards,
Peter
Customer support service by UserEcho
