
 Length of animation clips in exported FBX file
Hello.
I am the user who asked the question related to the "no to all" button yesterday.
I have another question.
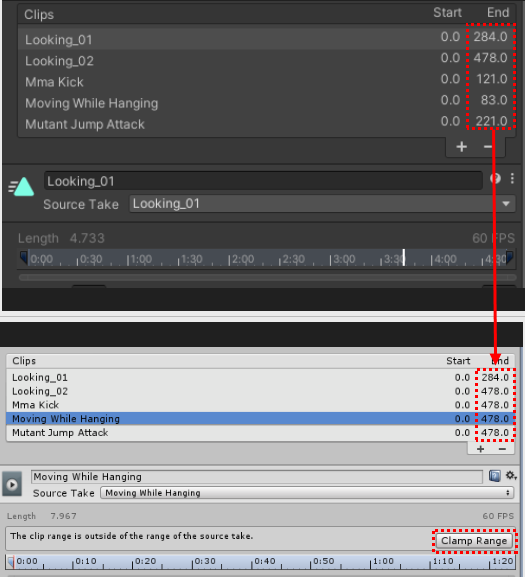
I noticed that the length of the animation clips in the exported FBX file is not reflected when imported into another Unity project or Maya.
Binary/ASCII 2010~2020.. doesn't matter.
As in the image, when importing, only the length of the first animation clip is reflected normally, and the rest is applied as the length of the second clip.
In other Unity projects, I figured out three workarounds to make the animation clip in this FBX the same length as the original.
One can select the clips one by one and then press the "Clamp Range" button to set them to their original length.
The second is to export as "one file per clip".
However, it is inconvenient to have to open fbx files one by one to ctrl+D to edit the corresponding animation clip in another project.
The last method is to copy the FBX file with ".meta" file from the original project in File Explorer and paste it into another Unity project.
This method normally imports the length of all clips in the imported FBX file. (Obviously this would not be possible in the autodesk "FBX review".)
So, what I am wondering is, when FBX is imported as all clips in one file, is there a way to keep the original clip length without having to copy the ".meta" file along with the FBX file to another project?
(*I have confirmed that Unity's "FBX Exporter" does not have this length issue)
Thank you!
 How to automatically answer No to automatically configuring confirm message
How to automatically answer No to automatically configuring confirm message when importing animations?
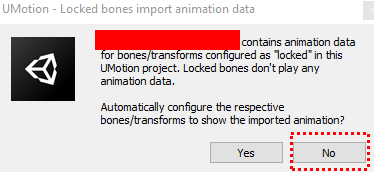
I'm trying to remove certain properties from hundreds of animations, but it's difficult to press No when importing each animation clip.
I tried to modify the Umotion code for this, but found that it uses already compiled DLLs.
Is there a way?

Hi,
thank you very much for your support request.
The easiest workaround would be to unlock the corresponding bones temporarily for the sake of importing. Go to config mode, select the locked bones from the hierarchy window. Open the "Properties" tab and set "Visibility" to "Show". After importing the animations, go back to config mode and set "Visibility" back to "Locked".
Or you confirm the dialog with yes and then reset the visibility manually afterwards.
I'm going to add a "No to all" button to this dialog in the next update. Thanks for reporting this issue.
Please let me know in case you have any questions or if the above workaround doesn't work for you.
Best regards,
Peter

Question to animation
Hello
Just bought the asset .
I got a bunch of animations which came with the 3D model.
I use like 6 of them for my AI.
Now if I want to create a specific animation/pose , should I just modify one of the ones I don’t use? Save it as fbx and then drag into my animator, connect it from the Any state node so I can call this animation anytime from my AI controller when needed.
Hi Hrohibil,
thanks for your support request.
Now if I want to create a specific animation/pose , should I just modify one of the ones I don’t use?
You can also just create a new one. If the existing animation is already very similar to the animation you are trying to create, then I would recommend modifying the existing one as it might be easier/faster. If the animations are very different, it might be better to start with a new animation.
Save it as fbx and then drag into my animator, connect it from the Any state node so I can call this animation anytime from my AI controller when needed.
Yes, export to *.fbx or *.anim and then assign the animation to a new state in your animator controller. Making a transition from the Any state to your new state is a good start, but the right way to do it might be depending on your AI controller so I recommend checking it's documentation.
Please let me know in case you have any follow-up questions.
Best regards,
Peter
How to avoid interpolated frames when import animation from outside?
How to avoid interpolated frames when import animation from outside?
Hi,
thank you very much for your support request.
When you import an (external) humanoid animation into your UMotion project, the animation has to be re-sampled thus additional key frames can get created. Generic animations on the other hand don't need to be re-sampled on import (the original keys are used).
If you want to tweak an animation previously created by UMotion, re-open the related umotion project, do the changes and then re-export your animation. Don't create a new UMotion project and re-import the exported *.anim file again for tweaking. Especially with humanoid, you would loose quality with every import/export loop. Furthermore *.anim (or fbx files) can't store the UMotion editing data (rig setup, animation layers, IK handle curves etc.) so if you are not using the original umotion project but instead re-import the exported *.anim file you would loose all of that editing data.
If you need to transition from one UMotion project to a new UMotion project (this is only necessary in very specific situations), make sure to import the animation directly from the old UMotion project (by selecting the old UMotion project *.asset file as animation clip you want to import). This copies all the editing-only data and doesn't need to do any re-sampling.
Please let me know in case you have any follow-up questions.
Best regards,
Peter
Export Animations for Use in 3dsMax
Hello,
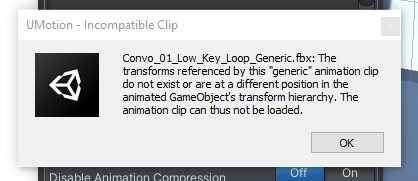
I hope this isn't too far outside the scope of UMotion, but I'm trying to get some animations that I've purchased from the Asset Store to import into 3dsMax for use on a rig I have in there. This rig is also a character from the Unity Asset store. Both the animation and the rigs are set to Humanoid, but while I'm able to set the rig-type on character to Generic, I'm not able to do the same with the animation and then import it into UMotion to try and then re-export an animation out in order to get it working in Max. I get the below error:
Is this something that your Animation Converter could help with? I know most people ask the question how do I get a rig out of Max/Blender/Maya into Unity, but I enjoy working with UMotion and Unity so much, that I'd like to do the pipeline in reverse, but I'm not sure how or if this is even possible.
Any advice appreciated :)
Hi,
thank you very much for your support request.
Yes this is possible with UMotion Pro. Here's how:
- Make sure that your animation and your character are both configured as humanoid.
- Create a new UMotion project of type humanoid and assign your (humanoid) character to the pose editor.
- Import the humanoid animation.
- In the export settings, set the export file type to FBX. Then select your humanoid character's *.fbx file as destination FBX file.
- Export your animation.
Your animation is now written into the FBX file of your character and is thus using your characters rig/skeleton. Import that character in 3ds max.
Let me know in case you have any questions.
Best regards,
Peter

Example scene is totally broken.
Hi!
I bought the plugin, opened the example scene in Unity Editor 2020.3.23f, and it looks totally broken:(
https://monosnap.com/file/otWu07xT7NtfF2DmXYjdtvvpQYcZF0
Please help!
Hi,
thank you very much for your support request.
Looks like the RobotKyle.fbx wasn't imported correctly in your project because it already existed in your project (from the screenshot I can see that it's named TCP2_DemoRobotKyle even though in the UMotion package it's called "RobotKyle.fbx"). Search for "robotkyle" in Unity's project window and delete every occurrence. Then re-import UMotion from the asset store and see if that fixes the issue.
You could also import UMotion in a fresh Unity 2020.3 project just for playing with the examples.
I just tried importing UMotion in a fresh Unity 2020.3 project and I did not get that results, so this shouldn't be a general issue. Unfortunately Unity's package importer isn't really good at dealing with such conflicts, but I'm afraid there isn't much I can do against this.
Please let me know in case you have any follow-up questions.
Best regards,
Peter
Quick question about the product
Hello, just a question I’m currently modeling 3d character and just wanted to ask if i wanted to create animation for a fps, can i still use a full body of my work? Or do i need to slice the 2arms? Because i wanted to work on a FPS but can see a full body of that character, or probably in the future a third person for update purposes.
Hi,
thank you very much for your support request.
UMotion doesn't have any limits in this regards, you can animate any type of 3D model/character. So if you want to animate a full body, you can do that with UMotion.
Please let me know in case you have any follow-up questions.
Best regards,
Peter

Bug with foot positions
Foot Position.mp4
Why this happens? In preview in edit mode all it's ok, but in play mode foot positions are crewed up, I really don't know why, please help!
Hi,
thank you very much for your support request.
If you take a look at this screenshot (taken from your video):
You can see that the offset is also in the preview. How Unity treats root motion offsets (rotation and translation) depends on this settings:
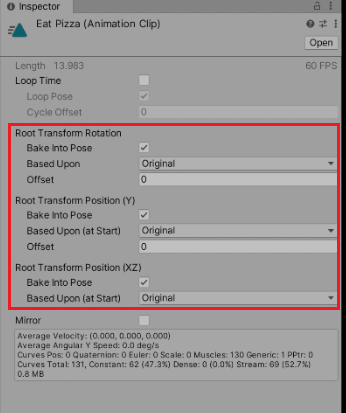
It depends on what you want to achieve exactly but I would suggest trying to remove the "Bake Into Pose" check-mark from "Root Transform Rotation" and maybe also from the "Root Transform Position (XZ)". More information about root motion can be found in the Unity manual: https://docs.unity3d.com/Manual/RootMotion.html
Please let me know in case you have any follow-up questions.
Best regards,
Peter

facerig
Hello. I have a humanoid character that works very well with uMotion. But, if I add some bones for the face animation, in another program like Blender, or Maya, could I make face animations in uMotion? Thanks.
Hi Cristian,
thank you very much for your support request.
Yes this is possible. The humanoid animation system does support the following face-rig bones natively:
- Left Eye
- Right Eye
- Jaw
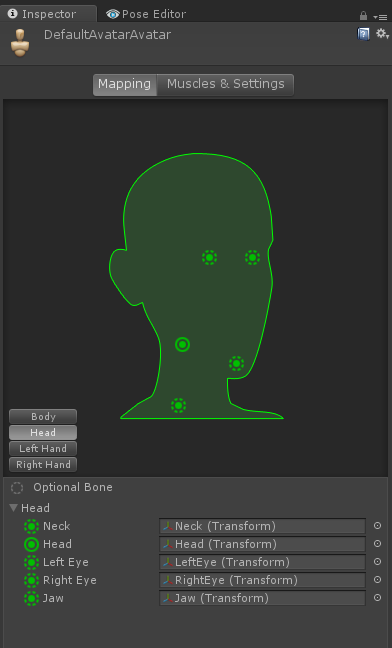
You can have more bones in your face rig, but those are going to be treated as "generic" bones that means they are not part of the animation re-targeting. Animation re-targeting is a humanoid exclusive feature that allows the animation to be created for one character, but then be played on any other humanoid character (something that does not work for generic animations). In other words, your generic bones are not going to be played on other characters.
If you have updated your characters rig but already had a UMotion project, create a new UMotion project for your updated character. You can then import all animations from your old UMotion project by using File --> Import Clip (in the clip editor) and select the old UMotion project *.asset file as file you want to import.
Generic bones are not visible by default in a humanoid UMotion project. You can make them visible by switching into config mode, select the bone you want to enable from the rig hierarchy tree view. Then under "properties" set "visibility" to "show". More information about config mode:
Please let me know in case you have any follow-up questions.
Best regards,
Peter
Export only humanoid bones
Hello I bought Your system :)
Its really cool, but I have 2 questions:
1. How to export only humanoid bones when exporting animation to fbx. I want to export only what is necessary for animation, no additional empty game objects of my object. I know System is basing on what is in Character that I edit. But basically, if that is humanoid It And I have dozens of animations (mainly we use only skeleton if fbx with animation ) I dont like the thing that system dont have option like: "Export Only motion for humanoid" or something like that.
2.How to get rid of the need of renaming all objects if they are called the same? Cant it be done automatic way on export like changing it to some 1,2,3 etc if there is problem with fbx
3.I exported my animation to actual fbx, but it seems like it is connected to old one animation in the same fbx, when I choose that animation both animation are chosen at once, some problem with meta files or something? Overall my workflow is to keep in the same fbx animation of old anim (I rename it to OLD or something like that) and new animation, everything would be good if not the thing I described that when selecting one anim unity select both of them so replacing it is impossible.
Customer support service by UserEcho
