 Best way to close gap after removing part of an animation
I would like to remove a part of an animation. I can select all relevant keys in the dopesheet's top row and remove them, but that leaves a gap. What's the best way to close this gap? Selecting all remaining keys and dragging them is incredibly slow and cumbersome depending on the total remaining size of the animation clip.

Hi,
thank you very much for your support request.
What's the best way to close this gap? Selecting all remaining keys and dragging them
Yes, selecting the remaining and dragging is the intended workflow. With long (mocap) animations that contain lots of key frames, this can indeed become a slow operation. That's due to a lot of data having to be moved around during this process.
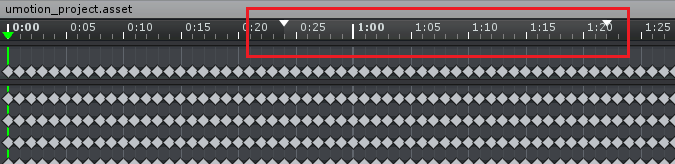
If you want to crop a small portion out of a longer mocap section, you can also use the white arrows in the time ruler of the clip editor to mark a section you want to crop. Then click on "Edit --> Crop To Playback" in the clip editor. This does not require any manual moving of the remaining key frames.
If your mocap source (fbx) files are large and you want to extract small portions out of it, use Untiy's animation import settings (shown in the inspector when selecting the *.fbx file) to cut the required slices out of the fbx file. Then import those slices into UMotion to further fine tune them if required. This avoids having to deal with huge data sets in the UMotion editor as you split the animation already externally.
At the UMotion product page on the asset store I recommend keeping the length of dense mocap animations imported into UMotion max. at around 1-2 minutes. That should give acceptable editing performance on a medium gear PC.
Please let me know in case you have any follow-up questions.
Best regards,
Peter

Animate Facial Rig on Humanoid Avatar?
Hi there,
I am trying to make an animation on a humanoid avatar that also has a facial rig.
Is there a way to animate the facial bones on the humanoid avatar using UMotion?
Thank you :)
- Aurora
Hi Aurora,
thank you very much for your support request.
The Unity humanoid animation system by itself only supports eye and jaw bones. If you have them configured in the humanoid avatar definition, they also show up in UMotion (attention: changing the humanoid avatar configuration requires you to create a fresh UMotion project to see the changes take effect).
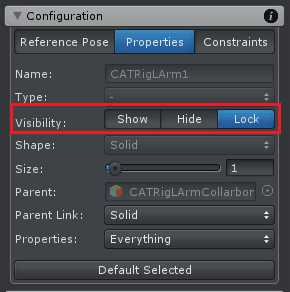
If you have additional bones, you have to treat them as "generic" bones. That means they are going to be ignored by the humanoid animation retargeting system and as a result do not work across multiple humanoid characters. But they are played correctly on your specific character. You can animate generic bones in a humanoid UMotion project. They are just hidden by default. Go into config mode, select the generic bones you want to show in the rig hierarchy view. Then open the properties tab and set "visibility" to "show".
Please let me know in case you have any follow-up questions.
Best regards,
Peter
 Apply transform after callback
Through the callback function, I can mirror the whole pose, including single bones(hips, waist...). However, there is a problem that the modified position and rotation will not be saved in the key frame, so there is no way to apply interpolation.
Please consider adding such a feature, which can greatly improve the scalability of umotion.
Thank you.
Hi,
thank you very much for your feature request. Much appreciated.
I get your point. I've put it on my to-do list and might implement that in the next update.
Best regards,
Peter
Parameters of callback function
Is it possible to add some parameters to the callback function, such as the current frame index and the total number of frames?
I am working on a motion path system. With these parameters, I can record the bone position every frame.
Hi,
thank you very much for sharing your idea.
Yes, I think passing these parameters should be possible. I have to double check though. I've put this on my to-do list and might implement this in the next update.
Please let me know in case you have any follow-up questions.
Best regards,
Peter

Beginner Setup?
Hi :)
I'm planning to use UMotion to start a new Project. A lot of your instructions seem to assume that you already have rigs and animations to import. Since I don't, can you tell me the ideal set up to begin animating from scratch with Umotion. I'm a beginner to 3D in general. Sorry if this is super basic.
I'm using blender. So what is the best way set up a humanoid rig that will work best for UMotion? I was using a rigify simple metarig but it couldn't import to UMotion as humanoid, only generic but with some missing bones. So What is the best starting rig that I can use with Humanoid mode.
Thanks!
Hi Ethan,
thank you very much for your support request.
If you import UMotion in a fresh Unity project, the provided robot kyle character is automatically configured as humanoid. There are also example UMotion project files (*.asset) that you can look at which are compatible with robot kyle. In your specific case, it might be that robot kyle already existed in your Unity project and was configured as generic.
One easy and beginner friendly way to create a humanoid compatible rig, is to use the auto rigging functionality of Mixamo. Upload your character and mixamo is going to create a humanoid compatible rig for you. If your not satisfied with the vertex weights mixamo auto generates for you, you can fine-tune them in Blender.
Drag and drop the character into your Unity project's assets folder. Select the character's file in Unity's project window so that the import settings are shown in the inspector. Under the rig tab, configure your character as humanoid. Click the "configure" button to open the humanoid avatar editor. Make sure all your character's bones are highlighted in green and that your character is in a T-stance. Click "Apply". Your character is now ready to work with the humanoid animation system.
Official Unity tutorial:
If you want to use your character in UMotion, create a new humanoid UMotion project, drag&drop your character into the scene and assign it to UMotion's pose editor.
Please make sure that you use one dedicated UMotion project per character. Sharing the same UMotion project across multiple different characters is not intended.
Please let me know in case you have any follow-up questions.
Best regards,
Peter
FPS weapons to TPS
Hello.
I have a fps weapons and hands asset - and it looks nice and all, so i figured that i would import them into the game im making that is not fully fps, so that means animating these as full body without the existing hands mesh and animations.
Id like to keep the integrated animations, so i figured remove the arms and then process them through here, but doing this does not seem to work as my brain says it should,
if i export with add, i keep getting errors related to pieces missing, particularly the arms ive removed
if i make a new file i get no mesh - however the animations are neatly sorted but theres no object....
https://i.imgur.com/T4QMtNN.png
Can someone tell me what im doing wrong with this and how to transfer the weapons to a full model?
Hi,
thank you very much for your support request.
So you want to split the arm and firearm objects and make two distinct animations out of it? Using UMotion for that would be a bit of an overkill. Just duplicate your original *.anim file and your original combined rig (= the weapon+hand setup). Then for one instance you remove the hands and for the other instance you remove the weapon. Assign one instance of the *.anim to the weapon only and one instance of the *.anim to the hands only. Then open the Unity animation window, select the weapon only models root object, and delete all unnecessary animated objects. Do the same with the hands only model.
Please let me know in case you have any follow-up questions.
Best regards,
Peter

 Exported Animation includes unwanted parameters (using layers)
Hi,
I am creating an animation using layers, I use two override layers, with the lower being used only to test during animation. I mute the test layer, and export - expecting umotion to only export the keys for the unmuted layer with my actual animation. But the exported clip has a few additional properties that were not keyed in the animation laye. This problem persists unless I delete the test layer. Is it supposed to be possible to mute layers and have the export completely ignore the keys on that layer? Seems like a bug, since the exported clip is not including all of the properties of the muted test-override-layer, but only a few of them (which are not keyed in the unmuted layer)
I am using a generic rig.
/Felix
Fixed in UMotion V1.27. You can download this update in the next couple of hours via the asset store.
Thank you very much for reporting this issue.
Best regards,
Peter

Any easy way to flip/mirror an animation vertically?
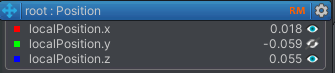
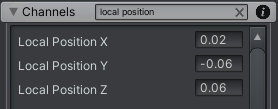
I'm trying to mirror an animation in the z axis so not left/right but up/down. To do this I'm trying to subtract 180 degrees from the Euler Y value and negate the local position X and Z, which I think should work. Subtracting 180 degrees from the y angle in the channels editor works (ish) but there are only 2 decimal places. For the local position X and Z these differences really show up. In the example above the two X/Z values end up being -0.02 and -0.06 due to rounding:
Other than editing each key by hand and suffering the drop to 2 digits of precision is there an easier way to achieve mirroring an animation vertically?
Is there a way to increase the number of digits of precision used in the channels editors?
Hi Arloeran,
thank you very much for your support request.
Is there a way to increase the number of digits of precision used in the channels editors?
I'm looking into this and might patch that in the next UMotion version.
In the meantime:
The move and rotation tool assistant windows shown in the scene view give you the full resolution float value:
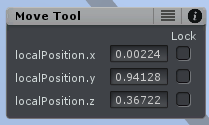
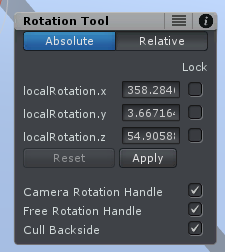
The tool assistant windows are shown when you have a bone selected and have the move/rotation tool selected. The tool assistant visibility can be toggled via the "Display" section of the pose editor (just in case it's hidden in your UMotion project).
Btw. it's also possible to flip a whole curve in the "Curves" view. Select all keys and then use the blue bars to flip the curve vertically. This flips around the upper or lower maximum, so it requires you to move the keys back up/down again in a second step. Also this method isn't very precise obviously, but it's fast.
Please let me know in case you have any follow-up questions.
Best regards,
Peter
Referencing/Linking animation clips in other clips in the same project
Hi Peter!
I am just starting to work with the layers feature - in this case using it to create emotes that will be on an override layer in the game.
When doing this, I thought it would be very handy to be able to have layers with linked clips that the emote can be layered with (such as idle, run, walk etc) instead of copy-pasting the keyframes to layers of every emote-clip. That way, if for instance the idle pose changes slightly, I could see the change across all clips without having to re-copy paste the keys.
So what I'd like to do is to be able to make a new override layer in "layer clip" which links to the keyframes of another clip: "base clip"
The important part would be that when a change is made in "base clip" it would also show in "layer clip".
I would then create my new animation on another override layer on top of the linked "base clip" layer inside "layer clip"
I think this feature would come in handy for all animation set ups that use layers, since many different poses and animations could be linked to the layer clip - an you could see how all combinations will look directly in umotion.
/Felix
Hi Felix,
thank you very much for sharing your idea. I really appreciate that!
I've added your idea to my internal list where I collect all good ideas. I use this list to prioritize features for new versions.
Please let me know in case you have any questions.
Best regards,
Peter

Animation only works with root motion after editing
Hello! :)
I'm very new and worried this is a dumb question / request for help. I have a model with animation that I imported, it works great without root motion enabled. But after I'm done editing, anything from the waist down becomes wild. Enabling root motion fixes this, but I wonder where I went wrong during (or before?) the editing process.
I saw a post about how to remove root motion from a model, but that was a bit confusing. I tried it and only made worse by turning the root motion animation just as bad and very chaotic. I made a quick gif to show with and without root motion (left with, right without). Models used are from the Cartoon Heroes pack, free on unity's asset store, and I modified the sword stance.
Love your product. Game design would be so much harder without your amazing work.
Hi,
thank you very much for your support request. Also thank you very much for the nice words. I'm glad you enjoy working with UMotion.
Hmmm... it's a bit hard to tell what exactly is going on without seeing the whole editing workflow and the actual files but I think the following might help:
- Select the exported animation file in Unity's project window.
- In the inspector window, set everything to "Original" and enable "Bake Into Pose" for the positions:
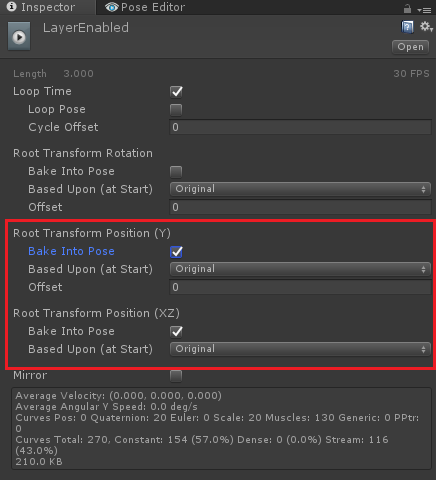
In case this doesn't help, the easiest way for me to look into your specific issue is if I can do further investigations with your actual files. Please send me the original animation, the UMotion project, the exported animation and the related character (without textures if you want) all packaged as a *.unitypackage. You can send that file to me via the email support form (or request a link to my dropbox in case the file size is too big).
Thank you very much.
Best regards,
Peter
Customer support service by UserEcho
