
 Transfer objects between rigs
I have two rigs, and I want Human 1 to give Human 2 an object. Now that object is a child of Human 1, how can I transfer it to Human 2, so it can have a parent from Human 2?

Hi,
thank you very much for your support request.
If you want to do this in one single animation without any scripting, the only option is to make both characters "generic". Add them below one parent empty GameObject and add an animator to that GameObject. Then you can control both characters and the holding object from a single animation. This would be a good approach if you need this in a cut-scene, but wouldn't be suitable for an in-game mechanic.
If this is not an option for you, then things get a bit more complicated. This would require a mix of scripting and pre-made animations maybe even runtime IK on top of it:
- You create a "giving object" animation and a "receiving object" animation in UMotion (just the arm movement).
- Now create a script that plays the "giving object" animation on human A and the "receiving object" animation on human B at the same time.
Use UMotion to place an animation event in the "giving object" animation that calls a scrit method in the right moment that uses transform.SetParent() to change the parent of the item from human A's hand to human B's hand. This would teleport the item from one human to the other. - If you want a complex but more realistic behavior, where the hands actually meet no matter how the humans stand relative to each other, you would need to use runtime IK (e.g. Unity's animation rigging or FinalIK from the asset store). Unless this is THE core mechanic in your game, I wouldn't go so far though.
Please let me know in case you have any follow-up questions.
Best regards,
Peter

I see that the new API also works for IK handles, but how do we know if we have a bone selected or an IK handle?
I see that the new API also works for IK handles, but how do we know if we have a bone selected or an IK handle?
Edit clip settings for all clips
Is there a way to edit clip export settings, specifically the Root Motion(experimental) checkboxes for all clips instead of going one by one?
Hi,
thank you very much for your support request.
Unfortunately this is currently not possible.
As a workaround, you could edit the project file directly with a text editor:
- Close the UMotion project (File --> Close Project in the clip editor)
- In Unity click on File --> Save Project.
- Backup your UMotion project file (*.asset).
- Open the *.asset file with a text editor that's capable of editing huge text files.
- Scroll to the end of the file (or use the search function to search for the specific strings):
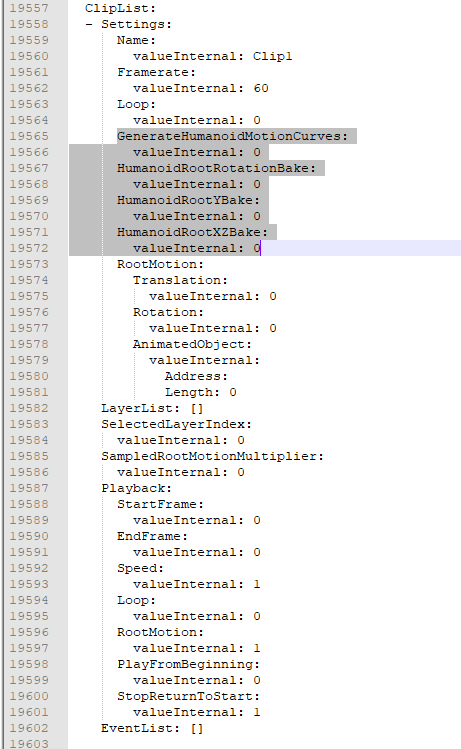
- Change the "valueInternal" to 1 to enable the checkbox on a corresponding setting.
- Save the file after you made the changes.
- Open the project file with UMotion again and check your changes.
I hope this helps. Let me know in case you have any follow-up questions.
Beste regards,
Peter
 New API misses 2 crucial things
Here are 2 requests:
- Select Bone & Select Hierarchy (So we only have to select the hand to get all the fingers for example)
- GetTotalKeyframes (the total amount of keyframes of a clip, good for a loop & automation)
Thanks for the clarification. I've added this to my ideas for the future list and might add that in a future UMotion update.
Best regards,
Peter

Can't load old animation files (1.28 - 1.26)
I updated Umotion to 1.28 and now I can no longer use 1.26 version files.
This sounds like an issue with the Unity import pipeline / the importing procedure with Blender. Importing stuff can be challenging as there are a lot of different settings involved especially when working with "humanoid".
I'm rather sure that this is the root cause of the issue, as there have been no changes in UMotion's code regarding animation import that would explain a different behavior between V1.26 and V1.28.
Best regards,
Peter
Hi, the new API looks great, can you please write us a copy pose script to show us an elaborate example?
It would be nice to see this in action. It takes quite a while going through the trial and error and it would help a lot to see some actual functionality carried out by the new API in conjunction with the pose/clip editors.
Hi,
thank you very much for your support request.
With PoseEditor.GetSelectedTransforms() you can get access to the current selection. Just iterate over the transforms and store the local position, rotation and/or scale values.
List<transform> transformsList = new List<transform>();
PoseEditor.GetSelectedTransforms(transformsList);

List<Quaternion> copiedLocalRotations = new List<Quaternion>();
foreach (Transform transform in transformsList)
{
   copiedLocalRotations.Add(transform.localRotation);
}
To apply the saved pose use PoseEditor.TrySetFkLocalPosition/Rotation/Scale().
for (int index = 0; index < transformsList.Count; index++)
{
   PoseEditor.TrySetFkLocalRotation(transformsList[index], copiedLocalRotations[index], "Paste Pose", false);
}
A complete documentation of the UMotion API can be found here: https://www.soxware.com/umotion-manual/UMotionAPI.html
Please let me know in case you have any follow-up questions.
Best regards,
Peter

how to combine animations using script API
I need to concatenate multiple clips together and export them, can this be done using UMotion Pro API?
Hi,
thank you very much for your support request.
Similar to your other request about scaling the timing of the animation, this would require having quite a few more things exposed by the clip editor API. At the moment, the necessary things are not yet available from the clip editor API but I might add that in future versions.
You could concatenate multiple clips using Unity's regular editor API though (combine several animation clips into one *.anim file).
Please let me know in case you have any follow-up questions.
Best regards,
Peter
how to change animation speed from script
Is there a way for me to change the speed of animation (specifically rescaling the keys in time) using the UMotion API?
Hi,
thank you very much for your support request.
Unfortunately, this is currently not possible yet. I've put this on my "ideas for the future" list to consider this in a future update.
Please let me know in case you have any follow-up questions.
Best regards,
Peter

 Reproducable bug - player gameobject deleted when dragging to "Select a GameObject to animate" if gameobject is inactive
If player gameobject is inactive and I drag it to the "Select GameObject to animate" it comes back with the message saying "The human avatar doesn't fit the selected gameobject. The required human bone "Hips" has not been found." .. but then it deletes my player gameobject from the scene!
If I try again making the player gameobject active it works as expected.
Thank you very much for your patience. A fix for this issue has been implemented in UMotion V1.28p01.
Thanks again for the time you've put into reporting this issue. I really appreciate your help in further improving the stability of UMotion.
Don't hesitate to contact me in case you find any other issue or in case you have any questions.
Best regards,
Peter

I can't select a bone with the mouse
Hi! I ran into this problem: in the new version of unity 2022.1.0a15, it is impossible to select a character bone by clicking on the interactive bones in the editor, but they can be selected if you climb into the scene camera under the character model, then the choice is normal.
Customer support service by UserEcho
