
 Adjusted timeline [Feature Request]
Hi Peter!
I've recently bought the Animator's Survival Kit (highly recommend for anyone who doesn't have it yet). Since it uses hand-drawn animation as a starting point, they work with 24 FPS.
In UMotion we have the option to adjust the framerate, which is awesome. However, I get very confused when any animation is longer than 1 second, because the timeline / header starts counting the frames again after each second, which makes it hard to figure out what the 39th or 76th frame or whatever is.
Is there a way for the bar to be able to display either seconds or frames (like the Unity Animation window has)? Or possibly to display both numbers simultaneously, which could be even more convenient?
Thanks!
Best,
Maarten
ps. Not sure if I should put this in Questions or Ideas...?

Hi Maarten,
thank you very much for sharing your feature request. I really appreciate that.
I think that would be a great usability improvement and I've added this idea to my "ideas for the future" list. I use this list to prioritize new features for upcoming updates.
"ps. Not sure if I should put this in Questions or Ideas...?"
No worries, I moved it to the "ideas" forum.
Best regards,
Peter

 FK to IK Conversion adding extra keys
I have a clip using FK, and when I click "Edit>FK to IK Conversion", extra keys get added every frame between my existing keys. Do I need to manually delete these extra keys or do they serve a purpose I'm missing?
Hi Sean,
thank you very much for your support request.
When you convert your animation from FK to IK, UMotion has to re-sample your animation. That means that it has to goe through the animation frame by frame. If the pose on the current frame and on the previous frame is different, it has to create keys at the current frame. In your case, the animation curves might introduce changes between your placed key frames so in order to match that movement as close as possible, UMotion is going to create keys at these in-between places too.
You can delete the newly introduced keys manually (tip: keep the FK keys so that you know where the original keys have been), but you might need to play with the animation curves of your new key frames to match the original FK animation. Setting the display option of the "Rig Layer" to "Both" is going to show you the bones of the FK layer and the IK layer at the same time, making it easy to compare your IK animation with the original FK animation.
Please let me know in case you have any follow-up questions.
Best regards,
Peter

all my animation is missing after i fix animation pose
good day
I followed the tutorial video, and all my animation become missing on my character after i fix animation pose with u motion. how can I stop this from happening?
Hi,
thank you very much for your support request.
You need to either manually create key frames for your changes (select the bones you want to key, then click on "Key Selected" --> "Key Modified" e.g.) or you should set "Auto Key" to "Generate" to automatically create keys whenever you adjust your characters pose.
The quick start tutorial covers both methods:
Please let me know in case you have any follow-up questions.
Best regards,
Peter
Work around for "Needs to be at least 2 frames long."?
I've imported some of my old Unity animations into a UMotion project, and now I am trying to export them back to Unity animations so I can use them in game. However, a majority of my animations are only 1 frame long because they are just static poses which is what I'm using for the game. Unfortunately, when I try to export them, they get skipped, with the error "Clip [clip name] skipped. Needs to be at least 2 frames long."
Is there a way to disable this behavior since my clips are intentionally 1 frame long?
Hi Sean,
thank you very much for your support request.
This restriction was implemented because there are some edge cases where a one key frame animation doesn't work as intended. I recommend that you select the master key frame (click on the top-most key to select all keys on that frame) then use CTRL+C, move the frame cursor one frame forward and then press CTRL+V. Thus creating a two frame long animation with no motion.
If I'm not mistaken, this shouldn't increase the build file size of the *.anim as curves with only two key frames are optimized into a "constant" curve by Unity. You can see the build file size in the Inspector of your *.anim. Please note that the size the *.anim has on your disk (shown in Explorer/Finder) is NOT the size it consumes in your built game.
Please let me know in case you have any follow-up questions.
Best regards,
Peter
Tips on Organizing UMotion Projects?
Does anyone have any tips they'd like to share on how they organize their UMotion projects, as well as how they organize the clips within their UMotion projects?

How to export animation with IK bones
如何将转换后的IK动画与软件创建的IK骨骼一起导出?
另一个是转换后的动作文件在导出后无法被其他软件识别为骨骼
[Moderated] Google Translation:
Wie exportiere ich die konvertierte IK-Animation mit den von der Software erstellten IK-Bones?
Zum anderen kann die konvertierte Aktionsdatei nach dem Export von keiner anderen Software als Bone erkannt werden.
Hi RadiumLHY,
thank you very much for your support request. I've translated your question to English (please post in English in the future).
The IK features are only available within UMotion. Once you export your animation the affect of the IK constraints is baked into the animation. You can export your animation as *.anim (only compatible with Unity) or *.FBX (compatible with most 3D modeling applications). When exporting to *.FBX, I recommend exporting the animation into the *.FBX file of your character (set "Write Mode" to "Update Existing" in the export settings).
Please let me know in case you have any follow-up questions.
Best regards,
Peter
Missing "Local Position" Channels on all bones except the hip?
If you go to Pose Mode->Channels with a selected bone ONLY the hip has position as a possibility. ALL other bones can only be animated with rotation????
I just bought umotion pro and I am using "all star characters" from the asset store....
Hi,
thank you very much for your support request.
Moving the local position of human bones is not supported (and is probably not what you are looking for, as real life humans are not moving the local position of there bones as that would mean that the bone moves out of the joint). I think what you are looking for is Inverse Kinematics. The quick start tutorial shows you how to quickly setup and use IK:
For more information, please check out the full-length IK tutorial:
Please let me know in case you have any follow-up questions.
Best regards,
Peter

"Humanoid Bone Already Defined" when trying to assign a new character to a project
When I try to assign a new character to the project to edit, I get this error. How can I get around this?
Furthermore, is it possible to delete or hide the properties I'm not using in the dopesheet view?
Hi,
thank you very much for your support request.
A UMotion project is per character. So if you want to animate a new character, please create a new UMotion project for it.
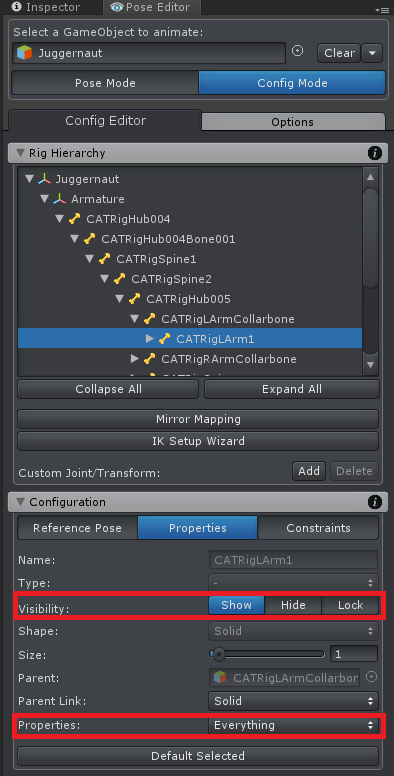
"Furthermore, is it possible to delete or hide the properties I'm not using in the dopesheet view?"
Yes, you can do this via Config Mode. When you select a bone/transform, you can set it's Visibility to "Lock". That is going to hide it in the Scene View and in the Clip Editor. You can also hide only certain properties of a bone (position/rotation/scale) via the "Properities" drop-down field:
Please let me know in case you have any follow-up questions.
Best regards,
Peter

How to Disable/Enable objects?
I have a generic animation (for animating a weapon) and I need to disable certain objects at certain moments during the animation, does UMotion support this?
Hi,
thank you very much for your support request.
Sure, by using a Custom Property Constraint in "Component Property" mode you can animate any property (e.g. the Renderer.enable or the GameObject.active). You can assign the Custom Property Constraint to any bone/transform you like (it doesn't necessarily have to be the one you want to control with the constraint).
For further information, please check the manual at "Pose Editor/Constraint System/Custom Property Constraint".
Please let me know if you have any follow-up questions.
Best regards,
Peter
Inaccurate conversion from FK to IK
I'm trying to convert some clips from FK to IK, but there's some inaccuracies! I followed the instructions in the UMotion Manual under "Clip Editor > FK to IK Conversion > Improving Conversion Accuracy." Unfortunately the steps didn't seem to help much! I included a video of me trying the steps and showing the results.
Any other tips on how to get a more accurate conversion?
Hi Sean,
thank you very much for your support request.
The FK to IK conversion is "lossy" by it's nature (because IK has less degrees of freedom than FK). By comparing the before/after pose from your video it looks like the algorithm is only off by a few degrees (at least that's how it looks on the video to me, let me know if I've overseen something). Assuming that you convert your animation to IK because you want to modify it anyways, this small imperfection are usually acceptable.
If you need to further improve the animation, add a duplicated version of your character to Unity Timeline with the original animation attached. Then use the "Sync" button to synchronize UMotion with Unity Timeline. That way you can preview both animations at the same time (overlaying each other, toggle visibility of the Timeline assigned character) so you can manually do some adjustments where needed.
Please let me know in case you have any further questions.
Best regards,
Peter
Customer support service by UserEcho
