
 Non humanoid characters
I'm making a game with a lot of non-humanoid characters. 4 legged robots, flying and wheeled vehicles for example. Assuming the models are rigged, would I be able to use this product to create and edit animations?
I know the description claims it works with generic models but all of the videos I've watched show manipulation of humanoid characters so I just wanted to be sure before I purchase.

Hi,
thank you very much for your support request.
Yes you can animate any type of rigged model. If your model is not rigged, you can animate all the separate parts (i.e. all transforms you see in Unity's Hierarchy window).
Here is a video where I'm animating a gun that has no bones but is split into separate parts:
In this video tutorial UMotion is with 4 legged models (dog/cat):
Please let me know in case you have any follow-up questions.
Best regards,
Peter

Errors in Unity 2018.4.2.f1
Getting the two following errors:
Assembly 'Assets/UMotionEditor/Plugins/Application/UMotionApplication.dll' will not be loaded due to errors:
Unable to resolve reference 'UMotionSourceApplication'. Is the assembly missing or incompatible with the current platform?
Reference validation can be disabled in the Plugin Inspector.
AND
Assembly 'Assets/UMotionEditor/Plugins/Editor/UMotionEditor.dll' will not be loaded due to errors:
Unable to resolve reference 'UMotionSourceApplication'. Is the assembly missing or incompatible with the current platform?
Reference validation can be disabled in the Plugin Inspector.
Unable to resolve reference 'UMotionSourceEditor'. Is the assembly missing or incompatible with the current platform?
Reference validation can be disabled in the Plugin Inspector.
Hi,
thank you very much for your support requests.
These errors are happening because in some cases Unity is validating *.dll referenes to script files before those script files finished compiling. They are false alerts and can be ignored.
If these errors annoy you, select the UMotion dlls and disable the "Validate References" checkbox in the Inspector. Then click "Apply".
The UMotion *.dlls can be found at:
"Assets/UMotionEditor/Plugins/Application"
"Assets/UMotionEditor/Plugins/Editor"
Please let me know in case you have any follow-up questions.
Best regards,
Peter

Foot placement incorrect when exporting as FBX & open mouth issue
Hi,
I've had a problem where my character's mouth is open by default anytime I import into UMotion. I can't close it because it shows it's closed in UMotion editor (I only have the option to open it more).
I read on another thread that if I export as an FBX instead of anim file I can then just go into the avatar config and delete the jawbone reference - but when I export to FBX the foot placement goes super funky. Ironically, it fixes the mouth though as it doesn't export any facial/blend features.
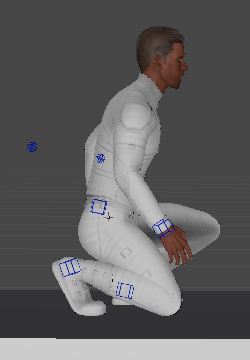
The screenshots below are from a crouching animation which doesn't currently move (I just have 2 frames so it's accepted as an animation).
Here you can see that the right foot placement is fine - this is how it looks in UMotion editor and also if I export as an anim file:
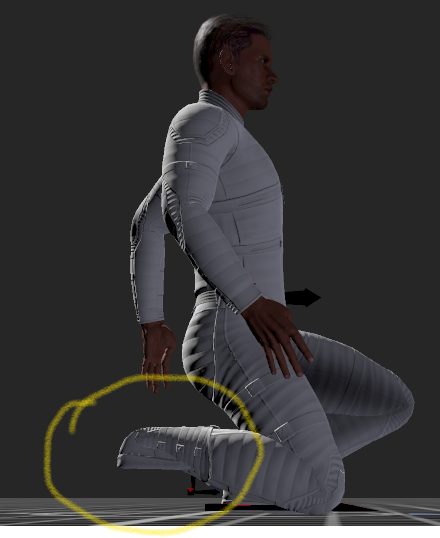
Here is what it looks like if I export as an fbx:
Any pointers would be much appreciated as right now I'm left with either an open mouth or broken foot. Neither are desirable. :-)
Thanks!!!
Hi,
thank you very much for your support request.
When UMotion imports a humanoid animation it just plays and records the animation as if it would be played in-game. Thus if the animation doesn't show expected results (e.g. the mouth is open), then the problem already exists outside of UMotion and is most likely related to the humanoid avatar setup of your character (in your case probably the jaw bone).
For the following steps your character must not be assigned to UMotion's Pose Editor. Select your character in Unity's Project Window, then in the Inspector open the "Rig" tab and click on the "Configure..." button. Make sure that all of your bones are shown in green and that your character stays in a T-Pose (with closed mouth). Then apply the changes.
You can test your avatar config by selecting the animation you later want to import into UMotion. Then drag&drop your character into the preview window shown in the Inspector. Your animation should display correctly (the same way is it was displayed on Unity's default character).
Re-import the animation into UMotion and it should also display correctly.
When exporting to *.FBX, make sure to use the setting "Write Mode" = "Update Existing File" to export your animation into the *.FBX file of your character. This ensures that the correct humanoid avatar is used for your animation and should solve any re-targeting issues (like the one with the foot).
All of this issues are related to the complexity involved by Unity's humanoid system. I highly recommend reading this blog post to understand what humanoid does under the hood: https://blogs.unity3d.com/2014/05/26/mecanim-humanoids/
Please let me know in case you have any follow-up questions.
Best regards,
Peter
Questions regarding humanoid root motion
Hey, so I'm trying to edit some existing asset store animations (particularly kubold mocap animation), but I'm having issues with the root motion rig.
The skeleton for this animation includes a parent 'root' that driven the root motion position and rotation.
The problem is that when using a humanoid umotion project, the root gets dropped and the hips become used as root, this produces subtle but important differences in the position and rotation of the character. The only solution I've found is to use a generic umotion project, export it as a packaged fbx, then reimport it as humanoid in the unity import settings (this maintains the root object, and is a close enough duplicate).
Is there a better solution than this? Is there a way to keep that root transform even in human project rig?
Also, I am having some issues with IK. Working with overriding foot position in mocap animation, I used IK to pin the foot position, deleted various keyframes from the foot etc. In the umotion animation timeline, the feet are perfectly stable, but in export - the foot position shifts, sometimes greatly.
I need to use mecanim ik to ensure foot stability, but this is undesirable. Are there issues where umotion preview should not match the result (noticeably different)? If so, do you have any pointers for achieving exact results (these changes were made in umotion generic project, exported to fbx, reimported as humanoid).
Hi,
thank you very much for your support request.
Only humanoid bones (starting with the hips) can be animated when your project is of type humanoid. Never the less, the imported animation should look exactly like the original animation. In case the exported clip shows some differences, there is a new experimental feature that allows UMotion to generate the root motion curves on it's own (by default, Unity generates the root motion curves which seems to be buggy). Take a look at the root motion related settings in the clip settings (click on the gear icon and open the Clip tab).
The unstable foot is a result of Unity's humanoid animation re-targeting system. Mecanim IK is designed as a solution for this. I recommend checking out Unity's blog post (that is covering this topic): https://blogs.unity3d.com/2014/05/26/mecanim-humanoids/
If you want perfect quality (and you are using the animation only on one character), make sure to use generic instead (it's faster CPU wise and generates 1:1 results).
Are you exporting your *.FBX using "Write Mode" = "Update Existing File" to write your animation into the *.FBX of your character? That ensures that the same humanoid avatar as your character is used for re-targeting your animation thus usually results in better quality.
Please let me know in case you have any follow-up questions.
Best regards,
Peter
lock position of foots, to move all the others parts?
Hi... for example when you do deadlifs on a gym, your foots stays on the same position, but all of your others muscles goes down with rotation.
I only can move the character if i select all the parts, how i can solve this? Thanks
Hi,
thank you very much for your support request.
What you are looking for is called "IK Pinning". Here are all the relevant video tutorials (please watch in the following order):
Please let me know in case you have any follow-up questions.
Best regards,
Peter

What point is the animation following exactly?
I'm wondering how Unity determines where to position the GameObject when you set the Root Transform Position (XZ) to Original instead of Center of Mass. What 'point' is the GameObject following here if it's not the center of mass? Is it possible to visualize this point in UMotion if you need precision animation?
I would hazard a guess that it's still following the center of mass but just taking into account any offset from the first key frame but that is a pure guess from what it looks like it's doing in the preview window.
Hi,
thank you very much for your support request.
As far as I can tell, when "Root Transform Position (XZ)" is set to "Original", Unity is going to generate the root motion curve using the "Root T/Q" curves of your character (i.e. the hips position when the animation is created with UMotion). This is still relative to the position where the character started playing it's animation (not in world space). World space positioning is only possible for "generic" characters (when animating the top most transform of that character).
There are some situations where Unity doesn't correctly generate the root motion curve from the original animation, therefore UMotion offers a method to generate the root motion curves by itself (see Settings --> Clip).
Please let me know in case you have any follow-up questions.
Best regards,
Peter
too many keys after import animation
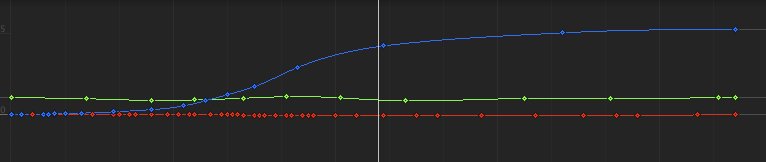
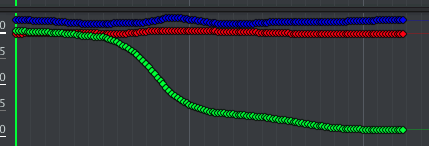
Unity standard editor show curves with not many keys.
After import animation I got key on every frame - this behavior prevents editing animations..
Hi,
thank you very much for your support request.
When you are importing a humanoid animation, the animation is re-sampled. Humanoid is an "intermediate" format that is used for animation re-targeting (i.e. making it possible to share one animation on multiple characters). UMotion converts the animation to "generic" so that you have full range of editing (humanoid has less degrees of freedom, due to the abstractions used for animation re-targeting).
When you export the animation to *.FBX, you can then decide if you want to use the generic animation (recommended when you are only working with one character), or if you want to use the animation as humanoid. When exporting to FBX, set the "Write Mode" to "Update Existing File". Export to *.anim is always converting the animation back to humanoid (when the UMotion project is of type humanoid).
Anyway, having many key frames is usually not an issue. You can add an additive animation layer to add changes on top of the existing animation (without touching any of the existing keys). If you want do redo a bigger part of an animation, you would usually delete the whole part of that curve (including all keys).
Please check out this video tutorial, where I'm editing some existing animations with UMotion:
"also when armature scales by 100 - all key values are scaled too...
do not think this is good..."
Can you provide some further details (maybe some screenshots) what you mean by that?
Please let me know in case you have any follow-up questions.
Best regards,
Peter

Animation Converter different model issue in space
Hi I was able to convert an animation using the Animation Converter from one model in legacy to the same model in humanoid no issues.
However when trying the humanoid animation on other humanoid models they all are about 20 meters high in space instead of being in on the floor so I don't know where it is getting this elevation from it certainly isn't in the original model and its converted form.
I need to be able to convert legacy animations to other humanoid models but somethings not right. For starters the parent game object moves in the original model but it's considered 000 in the other humanoid ones while moving the root bones in the air a lot.
Hi,
thank you very much for your support request.
The humanoid animation system can have problems when there is some scaling in one of the transforms that is a parent of the hips. Sometimes it also makes troubles if you added a parent transform that has not been there in the original model. Also check the humanoid avatar configuration of both humanoid characters. Please note that this could either be on the converted model, or on the other humanoid model that you try to use the animation for.
Does the animation display correctly in the Inspector preview window (with the Unity default avatar)? If that's the case, then the conversion is not the issue but the setup of the other humanoid character.
If you don't find a solution for this, you can send me a new empty Unity project that contains just everything I need to reproduce this situation (please add a short explanation to it). You can send that to me via the email support form (please request a link to my Dropbox there if file size is too big).
Best regards,
Peter

FK/IK blend channel setting grayed out
Does this feature require me to convert the animation to IK?
Why is this required? Since I'm editing things frame by frame why can't I use IK to edit FK bones and keep the animation as FK?
I'm editing an animation that involves swinging a sword. When I convert the clip to IK and make an additive change to the hands at Key 0, the elbows swing wildly and I have to make many corrections to the entire animation. Keeping the clip as FK, doesn't have these problems but I have to struggle with the UMotion interface to edit the hand positions. I have to change IK hand position->Select IK bones->Set FK to IK to see my changes in Pose. Why can't you ungray the blend slider or is there an easier way to do this?
Hi rackley,
thank you very much for your support request.
The "FK/IK Blend" channel is only available at the base layer (or an override layer). It is not available in an additive layer.
Please let me know in case you have any follow-up questions.
Best regards,
Peter

 Clicked Focus Camera and it destroyed my scene.
I just lost my entire project after clicking the Focus Camera button. It was an accidental click, didn't mean to and have lost my entire scene. All of the objects in my scene are centered around 0,0,0 in a circle, the scale that I have applied is missing and the scene is a jumble. I restored the scene from backup but this has had no effect. This has affected every item in the scene, including the vegetation studio rendering and my objects. This has literally in the space of 3 seconds apparently destroyed months worth of work?
Customer support service by UserEcho
