
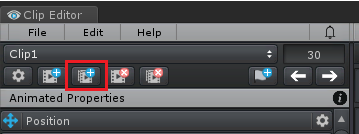
 Don't disable "Display" box in Pose Editor while playing animation
Currently the Display options box in Pose Editor becomes greyed out while the animation is playing, but it feels like they shouldn't have to be.
Just a minor annoyance that I had to stop the animation, change bone rendering style and then play it again.
Bonus request: Add a bone opacity slider to the options, so I can make them semi-transparent.

Hi Johan,
thank you very much for sharing your ideas.
Currently the Display options box in Pose Editor becomes greyed out while the animation is playing, but it feels like they shouldn't have to be.
You are right, it makes more sense to keep the display options enabled while playing an animation. If this is easy to be fixed (from the technical point of view), I'm going to add this to one of the next updates.
Bonus request: Add a bone opacity slider to the options, so I can make them semi-transparent.
You might want to use the wire-frame bone rendering style in that case. I'm adding the idea of semi-transparent bones to my "ideas for the future" list, but I'm considering this with low priority.
Thanks for your idea and don't hesitate to contact me whenever you have such an idea.
Best regards,
Peter

 Copy Animation (Pose) between clips
I saw another post with the same header but it was resolved without answering the literal question of how to copy paste a pose between animation clips so I'm making a new post for it! The wiki doesn't have a search feature and I don't have the patience to comb through every tutorial video to figure it out.
I know you can copy/paste keys but what if the frame you're trying to copy only has some properties keyed? The only solution I've found so far is to key every single property and then copy those and paste them into the new clip. But I don't really want to add unnecessary keys for no real reason. And I can't delete just delete the new keys if I've got some real keys mixed up in there unless I know exactly which keys are the new ones. And I can't undo since that would get rid of my new keys on the new clip I think (I didn't actually try).
I saw something called save reference pose when combing through shortcuts but I can't find any information on it anywhere. I would really appreciate some kind of search function in the wiki!
Hi,
thank you very much for your support request.
There are several possible approaches.
- You could duplicate your animation clip:
- Then crop the animation to 1 frame length. Right click on the time ruler and click on "Set Playback Start", then right click again and click on "Set Playback End".
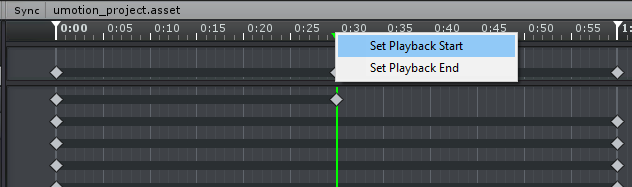
Then click on Edit --> Crop to Playback (this is also creating the missing keys). - Select and copy the remaining keys (CTRL + C), then paste them in your new animation (CTRL + V).
- You can then delete the temporary animation clip.
The other method is like you've already mentioned:
- Create the missing keys on the frame you want to copy (by right clicking at the "master track"):
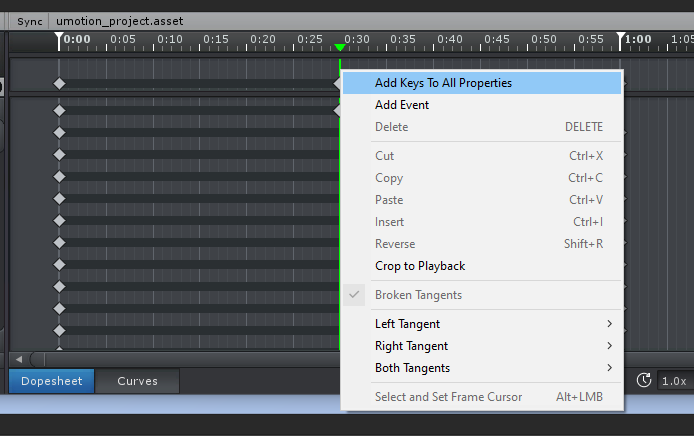
- Select and copy the key frames (CTRL + C).
- Now undo (to remove the keys you artificially created). The trick is to undo before inserting the new keys!
- Insert the copied key into the other animation (CTRL + V).
Please let me know in case you have any follow-up questions.
PS: The manual currently has no search function because it's solely html based (no javascript involved). The manual's purpose is to explain the UI. The idea is that you have all those info buttons spread across the whole UMotion UI that link directly into the corresponding manual page. And then there is the (searchable) support forum that holds the "best practices" like the question you had.
Best regards,
Peter
Wrap keyframes for looping animations
I think it would be easier to make smooth looping animations if the timeline wrapped around.
For example if I have an animation that is 100 frames long (frames 0 to 99) and put one keyframe at 0 and another at 80. Since 80 is the last frame it would behave is if there was an identical frame to 0 at position 100, giving a smooth wrap around.
It would work the same for the start of the timeline, so if I only had keyframes at 15 and 80 (still assuming 100 frames total) it would make a virtual copy of 15 at 115 and a copy of 80 at frame -20 so that it can interpolate all values for all frames in the animation.
This has two IMO significant benefits for looping animations:
1. Not having to maintain a copy of the start frame at frame "animation length + 1".
2. It would be much easier to time-offset a single animated property. Unless I'm mistaken right now if you move an animation track you have to figure out the transform values at "animation length + 1" and copy those to a new keyframe at time=0.
It would of course only be enabled for looping animations
Hi,
thank you very much for sharing your idea. I really appreciate that.
I like your idea and have put it on my ideas for the future list. Please note that I can't promise anything as of right now, but be assured that your idea is heard.
Best regards,
Peter

 Shortcut key not responding in Scene View.
Should the B shortcut key work when the scene view has focus?


Mirror single bones when using copy to other side
Hi, I've seen https://support.soxware.com/en/communities/1/topics/35-how-to-inverse-a-pose and https://support.soxware.com/en/communities/1/topics/584-mirror-posture-doesnt-mirror-middle-bone-such-as-head-neck-chest-etc - has such a feature ever been implemented, I am currently totally stuck because I cant find a way to only mirror the upper body and keeping leg IK but also root motion
I want to create a strafe left animation from a strafe right one, but keep the upper body tilt/rotation so the character can still hold his weapon correctly. So what I did was mirror the entire clip and import it into UMotion using leg IK.
So in theory if I now mirror the upper body again, including the root, the legs should still move into the new (left) direction.
Do you have any idea how I could do that or is it possible to implement a single bone mirroring feature?
Thanks!
Hi Vincent,
thank you very much for your support request.
Single bone mirroring is currently not implemented and I don't have an ETA for that feature yet unfortunately.
I want to create a strafe left animation from a strafe right one, but keep the upper body tilt/rotation so the character can still hold his weapon correctly. So what I did was mirror the entire clip and import it into UMotion using leg IK.
So in theory if I now mirror the upper body again, including the root, the legs should still move into the new (left) direction.
If I understood you correctly, you want to keep the upper body orientation of the original strafe-right animation? You can just replace the upper body keys of the strafe-left (mirrored) animation with the ones from the original animation. You can do this by copy&pasting the according keys from strafe-right to strafe-left. You can either paste into an override animation layer or replace the original keys.
Please let me know in case you need any further assistance.
Best regards,
Peter
Retarget DOF supported by umotion?
My animations all have DOF retargeting enabled, the animations don't work correctly otherwise.
When importing the animation to UMOTION all of my DOF retargeting is gone and my animation does not animate properly becausse all of the animation properties i previously had are gone
Is there a workaround, or does UMOTION support DOF retargeting and I can turn it on there?
Hi,
thank you very much for your support request.
UMotion's humanoid implementation unfortunately does not support humanoid DOF retargeting. As a workaround, you could change your original animation to generic and edit the original animation directly. After you've finished editing, export the animation into the fbx and then configure the fbx animation to humanoid again.
If you purchased UMotion for the primarily purpose of editing humanoid animations that use DOF retargeting, I can offer you a refund (please contact me with your invoice ID via email support in that case).
Please let me know in case there is anything else I can do for you.
Best regards,
Peter

Please fix the bug where the key doesn't move.
Moderated: Removed hard language.
When a bug occurs, you can't move or resize keys anywhere on the curve or dope sheet.
Does not respond to mouse drag.
Currently the solution to this is to turn Unity off and on.
I tried reloading the clip file, changing the settings, changing the layout, or reloading the scene, but it doesn't work either.
If you are working on animation, it will be in the corresponding state at random. It is difficult to implement correctly. This happens every 3 days.
The project is large and restarting Unity takes me 10-20 minutes.
Please fix this bug. I have been under stress for a few days.

Treadmill helper for walk/run cycle creation
If I had a chance to be heard I would suggest this to all animation software makers out there. This would be very helpful especially for movement cycles of any kind. A plane that acts like a treadmill below the feet of the character, that infinitely moves in a configurable direction with a configurable speed and amount of markers (like the notches on a tank chain), so you can adjust it to the speed of your cycle and know exactly when a foot has to touch/leave the ground.
I'm sure this can be done easily with a bit of fiddling, but it would be nicer as part of this marvellous tool, toggleable inside the main animation view.
Hi,
thank you very much for your feature request. I really appreciate that.
You can do this already:
- Create a plane in Unity.
- Make the plane a child of your character's Game Object. If your character is of type "humanoid", place it as a child of the hips bone.
- Add your character to UMotion's Pose Editor and let UMotion create a configuration for your current setup.
- Humanoid Only:
- Open the config mode, select the plane in the hierarchy and set "Visibility" to "Show" (in the properties tab).
- Then switch to the constraints tab and assign a child-of constraint and enable "IK Pinning Mode".
- Return to pose mode, move the frame cursor to the first frame, select the Plane and enable "IK Pinned" in the channels view. This ensures that the plane's position is in world-space.
- Create a key frame on frame 0 with the plane being in the current position.
- Set the frame cursor to where your walk cycle is going to end approximately and move the plane to the desired end point. Then create a key frame for it.
- Optional: Set the position curve to linear (to avoid easing in/out of the plane's velocity). Go back to the curves view anytime you want to adjust the velocity of the plane.
- Before exporting your animation, go into config mode, select the plane and set it's visibility to "locked". This avoids that the plane ends up in the exported animation.
As this is relatively straight forward to do, I currently have no plans to add such a feature to UMotion. I'm sorry.
Please let me know in case you have any follow-up questions.
Best regards,
Peter
Copy a layer to another animation clip
Hi Peter,
Had a question on using layers. Is it possible to copy a layer (additive or override) from one clip to another?
I have several base animation clips (walking/running/jumping etc) to which I'd like to modify by adding a 'Arms holding Shield and Sword' override layer. Instead of having to create a layer for each of the clips I was wondering if I could create just one layer and copy it over to the other clips and maybe tweak it a little from there
Thanks!
Hi,
thank you very much for your support request.
Yes this is possible:
- Select the Layer you want to copy.
- Press CTRL + A to select all keys in the dopesheet of that layer (the Clip Editor window needs input focus).
- CTRL + C to copy all keys.
- Open the other clip and create a new layer. The layer needs to be of same type (additive/override) as the source layer.
- Paste all keys using CTRL + V.
Please let me know in case you have any follow-up questions.
Best regards,
Peter
Issues importing my animations
I have also had UMotion for a while now and am just now transferring everything over from Akeytsu but I'm having issues importing my animations.
First I imported my animations and they loaded in, but with the wrong scale factor applied. So of course I deleted those, fixed the scale factor on the fbx and attempted to import them again. But now despite there being no clips in my UMotion project, it's adding back all the animation clip import attempts I've done cumulatively and renaming them during the import clips process.
Example:
Import "Idle" clip
Notice Import clips window shows "Idle" under animation clips:
Delete "Idle" clip
Optional: (Save project, restart umotion, restart unity, etc)
Import "Idle" clip
Notice Import clips window shows "Idle, Idle_1" under animation clips: (should just be 1 "Idle")
I'm currently at the point where I've got 22 instances that show up in that import window upon adding one file.
I'm on version 1.22p10 pro edition in unity 2019.4.12f1
Also, the "About UMotion" window automatically closes when I navigated away from unity to type out the version. Is that intentional?
I used UMotion very briefly for a while when I first got it but then realized Akeytsu didn't allow for importing animations. Having dealt with that for a bit now though, I can definitely appreciate some of the features UMotion has to offer!
Hi,
thank you very much for your support request.
Example:
Import "Idle" clip
Notice Import clips window shows "Idle" under animation clips:
Delete "Idle" clip
Optional: (Save project, restart umotion, restart unity, etc)
Import "Idle" clip
Notice Import clips window shows "Idle, Idle_1" under animation clips: (should just be 1 "Idle")
I tried to reproduce this starting with a fresh UMotion project following your steps one by one. In my case, it only shows one animation clip named "Idle" at the end. May I ask you to update your UMotion Pro version to the latest one available on the asset store (1.22p11) and then check again if this happens on a fresh UMotion project? If so, may I ask you to record a video so that I can follow your steps more closely (maybe I performed one of the steps slightly different than you did)?
Also, the "About UMotion" window automatically closes when I navigated away from unity to type out the version. Is that intentional?
The intention was to close this window automatically when clicking anywhere outside of the dialog. I notice now that this might be annoying in the case you mentioned and took a note to change this in a future update.
Best regards,
Peter
Customer support service by UserEcho
