
 Blending layers
I'm trying to blend between two animation layers, I can't see that this is possible. A blend parameter on each layer would be very useful.

Hi Craig,
thank you very much for your support request.
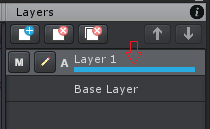
Blending layers is possible, but the blending weight is fixed for the whole duration of the animation (it can't be animated). Click on the blue bar and drag to the left to reduce the weight:
Please let me know in case you have any follow-up questions.
Best regards,
Peter

Is it possible to create an IK with the hand moving away from the rotation of a third-party object?
Hello everyone! Is it possible to create an IK with a hand moving away from the rotation of a third-party object? I would like to make an animation of the rotation of the handle with my hand using IK. but i can't assign the target object to this handle
Hi Lev,
thank you very much for your support request.
Generally speaking, an animation can only reference things that are a child of the Animator component that plays the animation. So in order to reference the switch, it would need to be a child of your character's Animator component.
Please also note that the effect of UMotion's IK constraint is baked into the final animation. That means that there is no IK executed at runtime anymore (meaning that your hand won't adapt to runtime changes e.g. when your character has position offsets relative to the switch). Depending on your requirements, you might want to use a runtime IK framework (like Final IK or the new animation rigging package) for this kind of situation.
Please let me know in case you have any follow-up questions.
Best regards,
Peter

I want to control UMotion IK from a script.
Is it possible to operate the Position and Rotate of IK (example: IK_Foot_L) created by IK Setup Wizard from the self-made method called by Extending UMotion → Callback Name?
Hi,
thank you very much for your support request.
While you can access and manipulate the IK transforms, the custom script is executed after UMotion finished updating the pose so it won't have any effect on the IK chain. The visualization of the IK transform also happens before the callback is called, so that's why you probably haven't seen any changes (when you tried it).
May I ask you to provide some more details about your use-case? Maybe there is another way you can achieve your goal.
PS: Please note that the callback method is only called while inside UMotion. UMotion's IK is not executed at runtime (when your game plays the exported animation). If you are looking for a runtime IK solution, please use Unity's built in IK (or their new animation rigging package) or 3rd party assets like Final IK.
Please let me know in case you have any follow-up questions.
Best regards,
Peter

 Cancelling Display Dialog : This should not be called when a View's DrawRect Method is in progress
I was able to use UMotion with my current setup for a while, I made a couple of animations and then it suddenly stopped working with new models I tried to animate, a few days later I couldn't even open the same model that worked initially. This is the error I keep getting:
Cancelling Display Dialog : This should not be called when a View's DrawRect Method is in progress
UnityEditor.EditorUtility:DisplayDialog(String, String, String, String)
It triggers when I try to select a GameObject from the Pose Editor, the dialog shows and when I select the object I want to work with nothing shows up and this error comes in the console.
Fixed in UMotion V1.24. Available in a day or two via the asset store.
Thanks again for reporting.
Best regards,
Peter

In the "curve" view you can select a range of points and scale or lift up/down - can you rotate/skew as well?
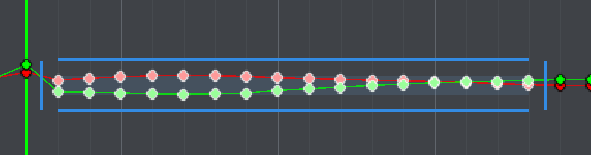
I have a clip I purchased, but I am trying to create a walk loop from part of the clip. Unfortunately there is some other body movement going on in the clip (a head turn). I copied the last value of the clip and pasted it at the start - you can see where green line is the values are different - they jump quite a lot. I don't want to lose the subtle movements in the clip, but I want to adjust the points to get a smooth movement.
E.g. I would like to grab the blue vertical line on the left edge and drag it upwards, with the right edge not moving. That would adjust all the values in between by an amount proportional to where it is in the clip. It is kinda like rotating the blue box, but it might be more accurately skewing the box. The horizontal blue lines would be on a slight angle. (At the moment you can only move the vertical blue lines left/right for adjusting the length.)
My goal is to keep the subtle value adjustments in the clip, but make it end with the same value that it starts with so I can loop it.
I can scale the box (grab the top edge and drag it down), but that loses all subtle values movements in between. I tried deleting points than manually adjusting them (took too long adjusting them all), which is my last resort.
Is there another way to do this instead?
Hi Alan,
thank you very much for your support request.
I'm afraid there isn't really any other way than adjusting the keys manually.
Please let me know in case you have any follow-up questions.
Best regards,
Peter
Horse Animset Pro - Incompatible rig error
After opening the horse model from MalberS Horse Animset Pro, I select an animation clip from out of its animator, and drag it into the Import Clips dialog. For what appears to be every animation clip on the horse model, it gives an error saying "this clip of type "generic" uses a different rig than the animated GameObject and is thus not compatible."
Well, no, it doesn't. If the rigs were incompatible, it would not animate the model properly in Unity, but it does animate it just fine. And even if that were true, you would think that an animation editing tool would come with a feature to remap the bones of the animation's rig onto the object's rig in order to make it compatible, rather than just shutting the user down cold like that!
Unfortunately, as UMotion does not come with source code, I'm unable to do anything to track down the problem besides reporting an asset that reproduces it.
Hi,
thank you very much for the additional information. Meanwhile, thanks to Malbers (the creator of "Horse Animset Pro") I also got access to the demo scene and take a deeper look.
Solution
The error message UMotion is throwing is kinda correct, a detailed explanation follows below. In order to edit the horse animation, just instantiate the horse model (not the prefab!) and use that for your animation work. You can find the model in the "7 - Models" folder:
Explanation of whats going on
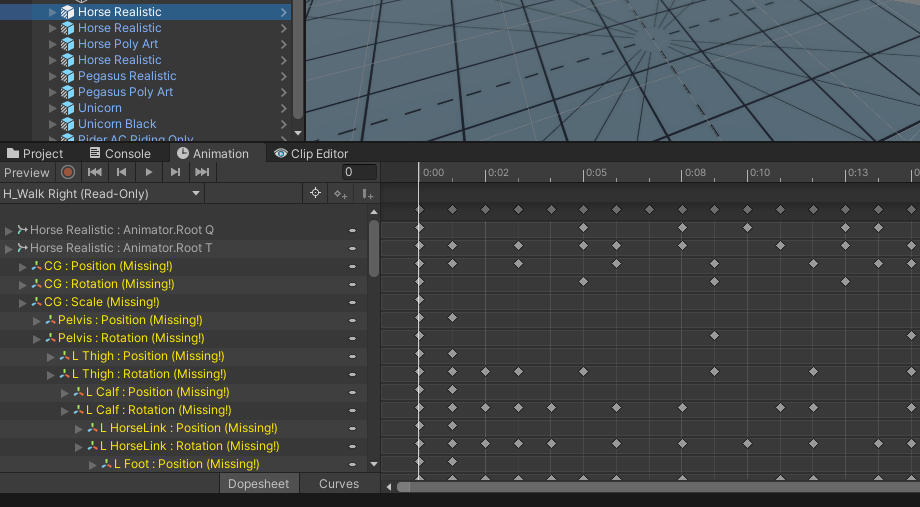
The error message UMotion is throwing is correctly indicating, that the rig used in the animation is indeed different to the rig of the horse prefab. You can see this in the following screenshot (H_Walk Right is the rig of the animation):
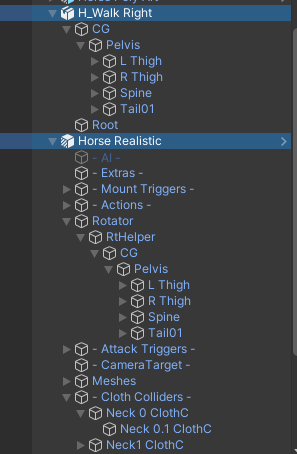
Notice how the animation's rig starts with a bone named "CG", while in the prefab the "CG" is somewhere deeper down the hierarchy. Animations use "transform paths" that are relative to the Animator component for addressing. A transform path looks something like this "CG/Pelvis/L Thig". UMotion validates those paths when trying to import a generic animation. As the prefab has no "CG" bone as a child of the animator component, it correctly shows the error that the rig is not compatible. I am going to improve on the error message so that it indicates this in a more clearer way in a future version of UMotion.
Also please notice, that the original model has the correct rig (see first screenshot). That's why it works when you use that.
So why is Unity still able to play this animation on this prefab with the modified rig? I honestly don't know because even Unity's built in Animation Window displays the bones as "missing":
Another thing, as I mentioned earlier, would be if instead of shutting you down cold, UMotion gave you the opportunity to remap the bones in the animation so that they would fit now.
Yes remapping the paths would solve the import issue, but note that all the paths would also be changed in the exported animation. That would mean that your animation would only work with the prefab's rig, not with the original model anymore. In most cases, you do not want that and instead want to use the correct rig for editing the animation.
Thanks for reporting this. Let me know in case you have any follow-up questions.
Best regards,
Peter
How to compare/diff two clips?
Is there any way to take two clips that are similar but not identical, and diff them to get a frame-by-frame report on what the difference between the two is?
Use case: I have a rigged character with three walk animations: walk straight, walk turning left, and walk turning right. I have another rigged character that only has a walk straight animation. The two rigs are not compatible, so I can't just add the clips from character 1 to character 2. Instead, I want to analyze the difference between the straight and the turning walk clips, so I can duplicate the walk-straight clip on character 2 and turn it into a turning clip.
Hi,
thank you very much for your support request.
You can sync UMotion with Unity's Animation Window (or Unity Timeline). That way you can preview the turning animation on one character using one of Unity's windows, and the one you want to edit/adjust using UMotion. The frame cursors are synchronized which makes comparing the animations very easy.
See it in action: https://www.facebook.com/1783887595207715/videos/1968103476786125/
For more information regarding the sync feature, please check out the manual at the "Unity Timeline Integration" chapter. There is also another video where you can see the sync feature (using Unity Timeline) in action:
Please let me know in case you have any follow-up questions.
Best regards,
Peter
How to make a waist IK?
I want to create and operate a waist IK on a model to create a crouching motion or a hip shaking motion. Is it possible to create a waist IK with Umotion Pro?
Hi,
thank you very much for your support request.
When creating the IK rig using the IK setup wizard, you can simply pin the hands/feet to their current world space position. This ensures that when moving the waist, the hands and feet hold their position/rotation.
Here are the related video tutorials (IK pinning uses the child-of constraint under the hood, please watch the child-of tutorial before watching the IK pinning tutorial):
Please let me know in case you have any follow-up questions.
Best regards,
Peter
Mirror arm movement
I have a walk animation from the Kubold Female animation set, the walk animation has one arm swinging more than the other. I'd like to mirror the arm swing from one side to the other so that it is more symetrical. I've followed some tutorials that you posted on Pose Mirroring. When I select Copy to Other side (Mirror Editing Off) and applied to all frames, the result is that both arms swing together and aren't asymetrical, ie both arms swing forward or backward at the same time. If I select Mirror Editing On, the same happens.
I have Config for Mirror Mapping looks fine, all joints have their corresponding mirrors correct.
I've semi-solved the issue by offsetting the other arms dopesheet by 50% and moving the latter 1/2 to the front, however there is still some glitching when the arm reaches the 50% point.
I can't help but think that the mirroring isn't working properly, as you described it should in the video (Pose Mirroring @1:01)
Hi Craig,
thank you very much for your support request.
The mirroring feature works as expected. It just mirrors a pose from one side to the other. This creates a symmetrical arm swinging in your case.
I've semi-solved the issue by offsetting the other arms dopesheet by 50% and moving the latter 1/2 to the front, however there is still some glitching when the arm reaches the 50% point.
Yes that's the correct workflow. When done correctly, it should also loop seamlessly (as you are using the seamless animation of the "source" arm swing as a source animation for the other arm). Make sure that it loops seamlessly when the arms are still symmetrical. When offsetting, make sure that the keys keep the correct relative frame distance. If you are using euler angle rotation mode (you can also switch temporarily to it), you can check if the rotation curves of your arm bones have any seams.
Please let me know in case you have any follow-up questions.
Best regards,
Peter
humaniod clip greatly offset after exporting
Hello! I am using the free asset from this model which comes with some animations. After importing any animation into umotion and exporting it to .anim, playing the animation will cause the model position is offset greatly.
Details:
Model rig animation type: humaniod
Animation controller is not using root motion
I noticed after exporting, the .anim has a new property key called "Animator.Root T". Deleting it will reset my model into the ground.
I also noticed, in umotion editor clip, I have a property called "Hips:Position", which is root motion (and i cannot disable it?). Not sure if it is intended.
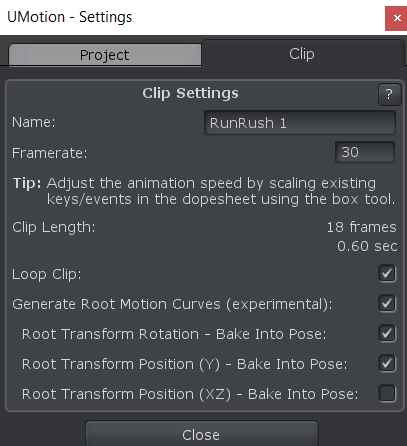
I've tried "Generate root motion curve (experimental)" and tried different combination of Bake Into Pose. But no luck
Hi,
thank you very much for your support request. Also thanks for your detailed description, that helped me a lot in understanding/reproducing your situation.
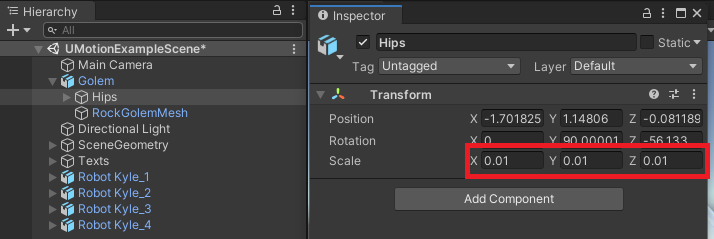
The humanoid anim file generation seems to be wrong due to the scaling that is applied to the hips bone by the original model:
You can easily workaround this issue using one of the following two methods:
- If you have 3DS Max or Maya, you can correct the scaling of the hips. I have Maya and it was as easy as importing the FBX and re-exporting. Looks like the units in the FBX where set to meters instead of centimetres thus causing Unity to add the scaling of 0.01 on import. Maya is automatically changing the units to centimetres thus fixing the issue. I can also send you the corrected models if you like (in case you don't have Maya).
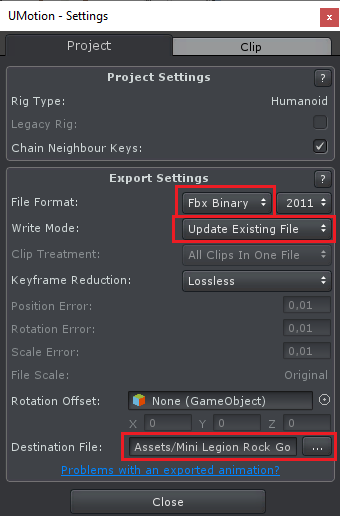
- You can export your animation into the FBX of the character. This lets Unity create the humanoid animation for you, and it seems to be correct even with the scaled hips. Here are the settings that I've been using (the "Destination File" should be the Golem.FBX file.):
Please let me know in case you have any follow-up questions.
Best regards,
Peter
Customer support service by UserEcho
