 Finger bone rotations
Hi, we are working on a VR simulator (using FULL BODY IK on the character) and we need to add a few simple animations to the hand but we do not get 100% accurate finger bone rotations even though the character is in a perfect T-Stance and all bones are correctly set-up and recognized by Mecanim. We strictly followed Unitys rigging recommendations.
Inside your tool the animation (a simple grab animation) looks perfect but once exported to an .anim file some fingers looks different (little finger is 10 degree more right, thumb rotation is 20 degree too much left). It seems to affect mostly the the last finger-tip part. This inaccuracy is probably not a big deal if one does a game for desktop but in VR it looks kind of weird when one or two fingers looks unnatural when you see it very close. It breaks the immersion. We are not sure if this is a unity problem or a Blender related problem (even inside of Blender the animation looks 100% accurate as well as inside your tool).
We were hoping to bypass this problem with your tool since it's integrated with Unity.
We don't understand the fact that the preview inside your timeline is correct but once exported and added to Mecanim the result is different. We can't see the logic behind this behavior nor do we have a clue to bypass it.
Switching to generic is no solution since we are using FINAL IK on the body.
We are running out of solutions (and nervs) :)
Thanks for your help!
Peter

Hi,
thank you very much for your support request.
Humanoid is not the correct choice for this task, as it's architecture per definition introduces small re-targeting errors. The amount of error is proportional with how precise the character's T-Stance (in the Avatar setup) is.
Generic on the other hand is directly playing the animation (without any re-targeting, thus without any errors).
Switching to generic is no solution since we are using FINAL IK on the body
Afaik Final IK is independent of the animation system and should work fine with generic. The only difference might be that you have to manually assign the correct bones to the Final IK component (with humanoid, it can do an automatic setup via the humanoid avatar).
You can transition your existing UMotion project to generic by creating a new UMotion project of type generic. Then change your character's configuration to generic. Assign the character to UMotion's pose editor and then import your old humanoid project into the generic project.
Please let me know in case you have any follow-up questions.
Best regards,
Peter

Replace weapon in animation.
Hello. I been watching the videos of Umotion. I'm thinking on buy in it because of the special. But I need to know if there is a way to replace objects in a animation. Example: I have a FPS arms with shotgun. But I want to replace the shotgun with another model. Is there's a way I can do that with Umotion?
Hi Sergio,
thank you very much for your interest in UMotion.
The most optimal way would be to do this partly in animation and partly in scripting. You have one animation that holsters the current weapon, then a script (e.g. triggered via an animation event) that removes that weapon, spawns the new one and then triggers the gun pulling animation for the new gun.
If you want to solely do this with animations (without any scripting), you would have to place every gun as a child of the character and simply enable/disable the required one via the animation (a custom property can animate the guns GameObject.active property to show/hide the gun). While being simpler to make, this has small performance penalties due to the additional transforms of every gun in the hierarchy of your character. If you're not targeting low-end mobile device, this might not be an issue though.
Please let me know in case you have any follow-up questions.
Best regards,
Peter
Editing Rotation Keyframes
Is there anyway to change the value of rotation keyframes in the curve editor?
I can do with position keyframes, but rotation keyframes I'd like to shift up-down or compress a section of them - e.g. to reduce the amplitude of a motion. I only seem to be able to slip them backwards and forwards.
Thanks!
Hi,
thank you very much for your support request.
UMotion supports 3 different rotation modes:
- Progressive Quaternion (default)
- Quaternion
- Euler
Only euler angles can be edited directly in the curve editor (as the others are quaternion based which is a "hard to imagine" 4 dimensional representation of angels, thus not suited for direct editing). UMotion's "Progressive Quaternion" mode is a special representation of quaternions that at least allows you to adjust the interpolation between rotation keys, but not the amplitude. The downside of euler angles is that they suffer from gimbal lock. That's why they are not the default rotation mode in UMotion.
For more information, please check out the dedicated video tutorial regarding this topic:
Please let me know in case you have any follow-up questions.
Best regards,
Peter

Is it possible to manually restore from a .bak file?
I lost some keyframes and I'm not sure if it was user error (me) or unity didn't save something properly. At 12:30 last night I finished an animation and shut my laptop down. Today when I opened the animation, a bunch of keyframes were missing. I restored from the auto backup made at 12:30 but the frames are not there either. Could the backup be corrupted? Is it possible to inspect the data inside the .bak file?
Hi Rob,
thank you very much for your support request.
The auto backup makes a backup of the project's current state at the interval configured in the preferences. It takes the whole project's data and serializes it into the *.bak file. Unfortunately this data is not human readable so it's not possible to use it manually. If the auto-backup got restored without any error messages, then everything was re-stored correctly.
I'm not sure why your keys are missing, probably because you've deleted them before 12:30 on accident? Have you tried re-storing an earlier backup?
Attention: Auto backups are by default automatically deleted after 36h. You can change this setting in the preferences:
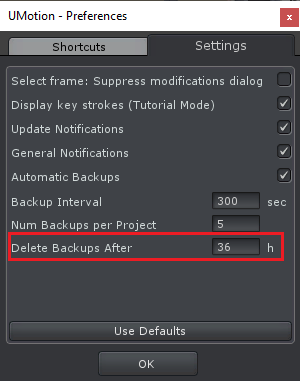
Please let me know in case you have any follow-up questions.
Best regards,
Peter

Humanoid animation does not look the same after export (serious difference).
Mesh.rar
When I export an "Idle" zombie animation where my zombie never moves their legs in the clip editor he suddenly starts floating in the air, as if he is connected, like a puppet, to someone's hand. This does not mean he is flying - he is touching the ground with his feet, but he moves the feet to the left or right when standing, instead of them being glued to the ground like they should be. I've read all your posts about differences in animation, I've tried ALL properties and all tweaks - nothing works. I even copied the entirety of the animation from FK to IK, deleted all keys for IK foot positions and rotations but one and ensured they are pinned - nothing helps, the zombie still floats. Generic animation is out of the question.
I've attached the project file and the zombie mesh file to this post so that you can check for yourself.
Hi,
thank you very much for your support request.
I looked at the files you provided. When exporting a humanoid animation to fbx, I highly recommend setting write mode to "Update Existing File" (in the export settings) and set your original model as destination file. This exports your animation into the characters fbx file (Shirtless Zombie.fbx) and ensures that when Unity imports it, it uses the correct humanoid avatar to generate the humanoid animation. Here is a screenshots of the export settings I used:

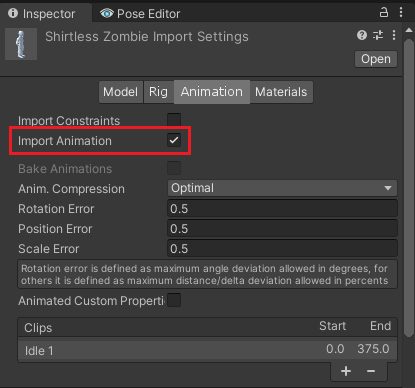
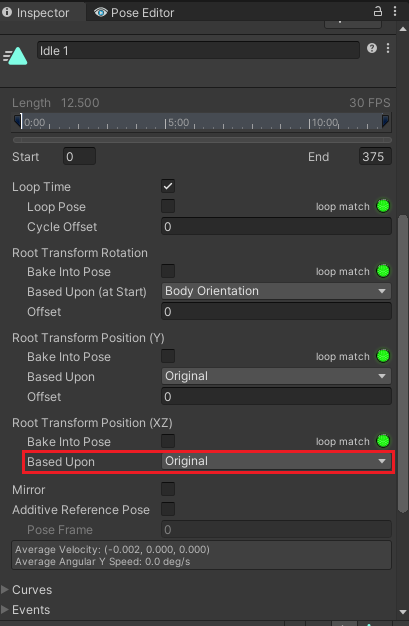
Then select the "Shirtless Zombie.fbx" in Unity's project window. Enable the animation import in the Inspector and set "Root Transform Position (XZ)" to "Original". Then click apply. The animation should now preview correctly in the preview window (and should thus also work in-game).
Please let me know in case you have any follow-up questions.
Best regards,
Peter

Reskinned model is incompatible with existing UMotion project
I've just lost 2 hours of work.
I've been editing my animation and did not export it when I saw that one of my vertices is skinned to the root. I reskinned the model, exported it and saved in my UMOTION project. Now I can't set it for my project:
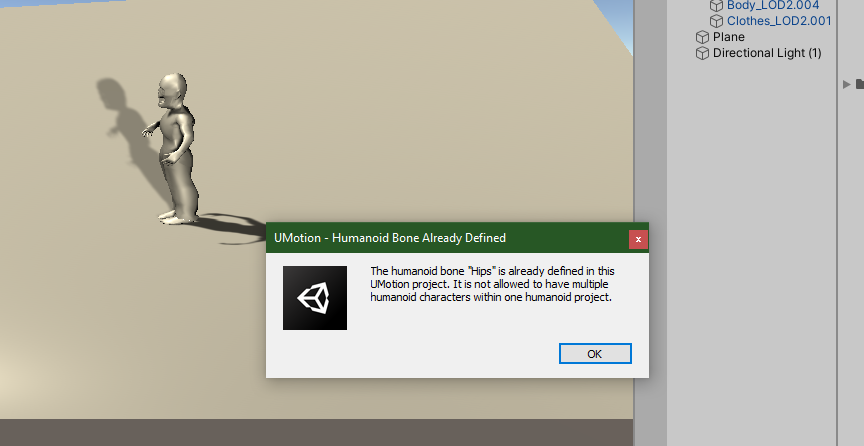
Due to the fact that I can't set it for my project I cant export my animation. I tried creating a new project and dragging the old project into the new one through the "Import animation window" - it says the projects are incompatible.
All bones have the very same names. Both humanoid skeletons are configured exactly the same.
Hi,
thank you very much for your support request.
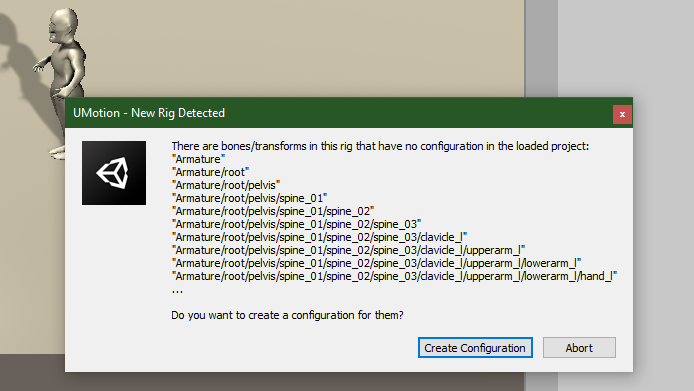
When you re-skinned your model, it looks like you also changed the bone hierarchy (that's what the message box in the first screenshot is saying). This of course makes the new version of the character incompatible with your initial character's hierarchy stored in the UMotion project.
So to fix this, try to re-store the original bone hierarchy for your model (go through the transforms shown one by one and compare the names). The transforms stored in the UMotion project are shown in the clip editor window. I also highly recommend the use of a version control system like GIT or SVN, so that you can always re-store previous versions of your assets.
Please let me know in case you need any further assistance.
Best regards,
Peter
Hotkey to Toggle Bones On/Off
Bone often get in the way of seeing how things are looking , having to go to display -> bones is a tiny bit time consuming when you do it after every little change, is there a hotkey for this toggle option?
If not I'd like to suggest it.
Hi,
thank you very much for your support request.
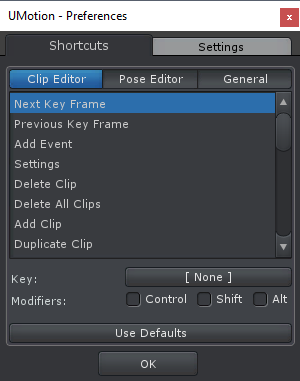
Yes there is a default shortcut ("B") assigned to the bone visibility toggle switch. You can see which shortcut is assigned to which UI control element by hovering the mouse over it:

You can change shortcut assignments by clicking on Edit --> Preferences in the clip editor:
Please let me know in case you have any follow-up questions.
Best regards,
Peter

Character foetal position.
This isn't actually a UMotion bug, but I'm hoping that someone in the forum might have seen this before.
The character takes a foetal position when an Animation Controller is added, even if there's no animation in it.

Hi,
thank you very much for your support request.
This is just how Untiy's humanoid animation system behaves when you assign an empty animator controller to an animator component. Unity sets all muscle values to defaults which results in this foetal pose. Just assign a humanoid animation to your controller and it should play that instead.
Please let me know in case you have any other question.
Best regards,
Peter

 ANIMATE TWO OR MORE MODELS AT THE SAME TIME
I would like to ask you to create a way to animate two or more characters at once.
We are a family owned and operated business.
I need to make one character hold the hand of another and help him climb on something and for this to work well when playing a scene I would have to animate both characters at the same time to simulate interaction with each other.
Test the Akeytsu program and import two characters there and animate them at the same time so that they understand what I'm asking for. If you make this possibility, UMOTION will certainly be irreplaceable.
Hi,
thank you very much for your support request.
In order for two separate animations to interact correctly with each other, you need to ensure that they both start at the correct initial position/rotation in-game (otherwise they are going to be offset to each other) and precisely at the same time. Instead of using 2 separate animations it's usually easier to control both characters with one animation (see method 1 below). If you use two separate animations, Unity timeline is Unity's tool to correctly sequence multiple animations.
There are 2 ways how you can animate character-character interactions with UMotion:
- Instantiate your two characters in the scene and remove there animator component. Make both a child of an uber empty game object that has an animator component assigned (both characters now have the same parent game object). Create a new UMotion project of type generic and assign the "uber" game object to the pose editor. You can now create animations that control both characters at the same time. This also solves the issue with the offset (mentioned above) that you have with 2 separate animations.
- Using UMotion's "Sync" feature, you can synchronize UMotion with Unity's animation window or Unity timeline. That way you can animate one character using UMotion and simultaneously preview the animation on one or multiple other characters (the frame cursors are synced). More information can be found in the UMotion manual's chapter "Unity Timeline Integration" and in this video:
Please let me know in case you have any follow-up questions.
Best regards,
Peter
Customer support service by UserEcho
