
 Key conflict with script execution order
There is a dictionary conflict with the + button at the bottom of the script execution order screen and a umotion key. This means I can't add new scripts to the script execution order manifest while I have uMotion installed.
ArgumentException: An item with the same key has already been added. Key: Assets/Plugins/UMotionEditor/Plugins/Application/UMotionApplication.dll.meta
System.Collections.Generic.Dictionary`2[TKey,TValue].TryInsert (TKey key, TValue value, System.Collections.Generic.InsertionBehavior behavior) (at <9577ac7a62ef43179789031239ba8798>:0)
System.Collections.Generic.Dictionary`2[TKey,TValue].Add (TKey key, TValue value) (at <9577ac7a62ef43179789031239ba8798>:0)
UnityEditor.ScriptExecutionOrderInspector.ShowScriptPopup (UnityEngine.Rect r) (at :0)

Hi Kev,
thank you very much for reporting.
This seems to be a Unity bug in older releases of Unity 2020.2. Please update to the latest Unity 2020.2 release (I just verified that this issue does not appear in Unity 2020.2.6f1).
Please let me know in case you need any further assistance.
Best regards,
Peter
All keys lost after changing properties
I just upgraded uMotion to the latest version (from 1.22p11 to 1.24p01).
I changed some properties in my rig (I disabled the scale property in setup for some transforms). I set all keys for all properties, then went back into config to re-enable the scale properties (I wanted to see if it just hides the property or outright disables it). It disabled the property as the transform had keys for position and rotation but not scale. Satisfied I went back into config and disabled scale again.
When I returned to config mode, all my animation keys were gone. So I loaded another clip and that too was wiped. So I checked the others and every clip is blank.
I tried mashing undo, which was able to re-enable the scale properties, but it could not get my animation keys back. I did not edit the other clips, yet they are also blank.
I tried recovering to a backup. An old copy wouldn't load (wrong uMotion version), but a more recent backup had a timestamp from before I started working so I loaded it. Still blank.
I might be able to recover some data by importing my exported clips, but most of my data is now gone.
Is there any way to recover my lost animation work?
Can't update from 1.22p11 to 1.24p01
I've tried twice. Unity package manager says I've got 1.24 with no option to update (latest is supposed to be 1.24p01.
I tried deleting the uMotion folder from my project, then installing the update. It thinks I've got 1.22p11 installed.
I tried closing all uMotion windows, then deleting both the uMotion folder and the uMotion examples folder, then installing the latest again from package manager. Still says I have 1.22p11. Package manager says I've got 1.24 downloaded.
Are there other folders I need to clean out manually in Windows explorer before updating?
Hi,
thank you very much for your support request.
This is a common issue of the asset store/package manager (doesn't really relate to a specific asset). What you can do is to delete the affected asset (in this case UMotion) from the cache folder of the package manager: https://docs.unity3d.com/Manual/upm-cache.html
Then re-download the asset again, remove the existing "UMotionEditor" folder from your project and then install it again.
Let me know if you need any further assistance.
Best regards,
Peter
Crash in Unity 2018.4
Hello I noticed That Your asset totally crash unity 2018.4.30 . The only way to turn on project again, was removing Umotion folder
Motion Paths
Hello,
Is there a feature like Motion Paths in Blender or Trajectories in 3DSMax?
This feature is very useful. I really hope UMotion has it.
Hi,
thank you very much for your support request.
Unfortunately UMotion does not support motion paths. I've took a note on my "ideas for the future" list but can't promise anything as of right now.
Please let me know in case you have any follow-up questions.
Best regards,
Peter

picking up items
Hi, I'm trying to create a point n click adventure with objects to take and interact with and also interaction with other characters with objects. I would like to have a hint how to create the interactions. The questions are:
- How to pick up items - If a glass is on table, should I have a connected but pinned glass object or instantiate a new one in the hand when taking takes place or parent the one on table with the hand?
- Putting the object away - I already have an animation where the character puts object in the back pocket (no matter how big the object is) and I wish to use it - should I have the objects parented to an empty back pocket object and turn then visible and parent them to hand when picked or have them parented in the hand and turn them on after picking them or instantiate them when picking up and parenting to hand?
- Giving object to another - When giving (or giving like throwing a knife) an object, should I have both characters have the similar object hidden waiting for the exchange or swap the parent of the object to another when interacting? (I assume here the Timeline sync is needed.)
Or do you have some other great idea how to approach my needs?
regs
eetu
Hi,
thank you very much for reaching out.
All methods that you described are feasible, it's probably more a thing you can decide based on your person preferences (and how it fits into the other systems you use in your game). A few things to consider:
- Re-parenting is usually faster than Instantiating/Destroying and also allocates less memory garbage. But as you're doing it at a very slow interval (only when the user clicks something), you won't notice the performance benefits.
- If your objects store some internal states/variables, re-parenting might be easier (as all states are kept). If you switch between new instances, you might have to copy those states.
- If the offset between the player and the object you want to interact with can be different due to player input, you might need a runtime IK solution to adjust your pre-made animation to reach the target object correctly. UMotion's IK is baked into the animation, so it can't serve you in this situation.
- Make sure your animation is not directly referencing a picked up object that you are then removing (either because it is re-parented or because it is destroyed). This makes the animation point to a transform that doesn't exist anymore. You can instead use an empty GameObject as "anchor" transform that always exists. Parent picked-up objects to this anchor. Move the anchor in your animations, instead of the picked-up object.
Please let me know if there is anything else you want to know.
Best regards,
Peter

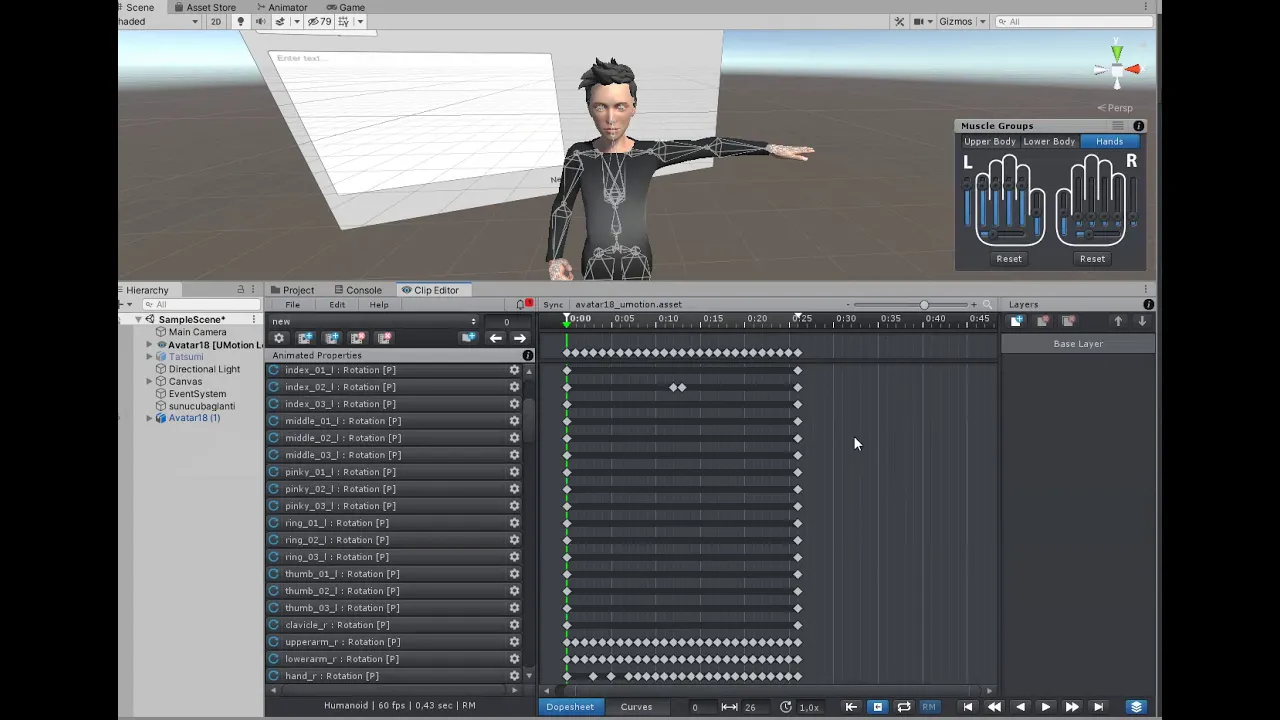
Adding Extra Keys on Import Anim Files
Hello, we have an humanoid character. We have a problem, seen on the video.
We dont want to see other keys, after importing the anim files. how can we solve this.
Thank you for your support.
Hi Murat,
thank you very much for your support request.
Humanoid is an intermediate file format that stores the animation in "muscle space" which is a normalized space that can be applied to any other humanoid character (i.e. animation re-targeting). When UMotion exports your animation to humanoid, it needs to re-sample the animation to convert it into said muscle space. When importing the humanoid animation back into UMotion, the animation is then again re-sampled from muscle space into the authoring friendly local space of your character.
Re-sampling means that as the curves can't be translated 1:1, their shape has to be rebuilt by creating those additional key frames you see here.
So instead of importing back and forth, try to stay in regular local space and once you've finished your work, export once as humanoid. You can also export your animation as FBX (for humanoid, set "Write Mode" to "Update Existing File" and your character's FBX file as destination file!) and then in the FBX's inspector you can play with the animation compression settings to get the humanoid animation within the memory size budget you require (if build size is your concern).
Please let me know in case you have any follow-up questions.
Best regards,
Peter
 Key muscle groups directly
The muscle groups are a great feature, and it would be even better if the could be keyed directly.
Since multiple muscles affect the same bones, the way I'm picturing this working is that keying a muscle group would create 'virtual keys' in the timeline of the affected bones. These keys would not be editable, and their values would be continually calculated by combining the effects of all the muscles driving them.
For example, a bend of the torso accompanied by a back-and-forth twist would comprise:
- two keyframes for the bend (on the 'torso bend' muscle curve)
- four keyframes for the twist (on the 'torso twist' muscle curve)
- six virtual keyframes on the affected bones, the values of each reflecting the cumulative effect of the keyed bones
At any point the user could 'bake' any individual virtual key to create directly editable normal keys (a one-way process).
The advantage to the user is that different muscles in the same group could be keyed and edited at different points on the timeline, making it possible to (as in the example above) superimpose a back-and-forth twist on a bend, and then go back and separately tweak the bending or twisting element of the motion without having to adjust the keyframes of the other.
I fully expect to be told this is actually possible already, but I really, really did look quite hard this time first before asking XD
Hi,
thank you very much for sharing your idea. I really appreciate that.
You are right, this is currently not possible. I've added this to my ideas for the future list, but due to the great amount of changes this would require, I only gave it a medium priority and currently can't promise if and when this feature is going to be implemented.
Please let me know in case you have any follow-up questions.
Best regards,
Peter

Mirror Generic Animation
I have a Generic animation file with an animation where the 'left leg' is the leading leg. I would like to mirror it and make the 'right leg' the leading leg. I tried the 'Copy to Other Side' option for each keyframe (which is a very tedious process) however, the results are not perfect as I am noticing some extra rotations.
Will be great if you could let me know how the mirroring can be achieved using UMotion Pro.
Hi,
thank you very much for your support request.
Unfortunately, UMotion currently does not have a functionality to mirror a whole generic animation. Mirror to other side is currently the only available functionality. I have a generic mirror on my to-do list but due to the complexity of this feature I currently can not estimate when such a feature is going to be available.
Please let me know in case you have any follow-up questions.
Best regards,
Peter
Can't create smooth motion involving multiple axes
I can only assume I'm missing something, because it seems impossible to create smooth motion in which several axes of a bone or muscle group are keyed independently.
The clip I'm trying to create is a 'struggle' animation for a character being wrapped up in a web. Muscle groups should make this easy - and with Unity's own animation editor it is: I can key (for example) chest forward/backward and chest twist movements on different keyframes, creating a reasonably convincing 'writhe' effect. But with UMotion that seems impossible. If I key the chest open/close on frames 20 and 40, and upper body twist on frame 30 and 50, I would expect the twist and the curl to proceed together, just out of phase. Instead, the character acts like a robot, curling forward fully and only then starting to twist, then uncurling and then untwisting. I don't understand the curve view at all: it only shows one curve when several axes are involved and the keys can't be edited other than dragged along the timeline.
I can't believe this is how it's supposed to be; where am I going wrong?
Hi,
thank you very much for your support request.
The default rotation mode is "Progressive Quaternion". Switching to "euler mode" gives you all 3 curves. Please check out this video tutorial, it explains everything in detail:
If you have any questions, let me know.
Best regards,
Peter
Customer support service by UserEcho
