
 A -/+360 feature or Euler Filter fix?
Is there a way to edit/subtract/add a value (360) on a keyframe position?

Fixed in UMotion V1.25. Arriving soon on the asset store. Thanks again for reporting.
Best regards,
Peter
 Automatic Euler Conversion on Import, and a few other suggestions
The title says it, this is the main feature that would definitely speed up my workflow :)
Among this one I have a few others (some I came up with myself) that are pretty self-explanatory.
But I will Elaborate:
- An automatic "Loop Pose" button (choose start or end frame to be copy/pasted over to other end of clip)
- A "Pin For Whole Clip" button (Automatic pin start/end keyframe and removal of everything inbetween)
- A "Preview Transition" feature (choose the clip you want to transition to, max 2 for start and end of the main clip)
- A "Camera Tracking" feature (Not only Focus but also the Shift + F feature that allows you to follow a GO, would be incredibly handy with checking out the Root Motion cause my character always runs away from me :( )
- A "Motion Intensity" feature (allows us to increase/decrease the up/down scale of multiple channels and curves; ie. a character's breathing animation is too exaggerated, by scaling down the curves vertically we can decrease the motion intensity, this is perfect for control over the exaggeration principle in animation)
- Pivot placement (for trajectories and COG control) (Blender's 3D cursor is a very popular feature and prime example)
- Trajectory Visualization (A line that shows the object's positional data of the whole clip in 3D view)
- Of course, last but not least, onion skinning (ghosting)
These would all be features that would make any animator go wild.
Thank you again Peter :)
Best,
Dave
Hi,
thank you very much for all your ideas.
I've took notes of all of ideas (some of them have already been requested by other users in the past). I can't promise when and which features are going to make it to a release, but be ensured that your ideas help me a lot in prioritizing where to spend my development resources on.
Best regards,
Peter

 U-Motions with Unity Timeline problem
I'm using u-motion Pro with Unity3D Timeline and I have a problem,
I need that the u-motion animations at Timeline to have the "Paylable Asset" options as in the originals animations I had.
The animations I export from U-motion doesn't have that "Paylable Asset" options.
Could you please let me know how can I export the U-animations for having the "Paylable Asset".
Thanks.
Hi, How do I key All except for the constraint? with a shortcut preferably?
I'm fond of using the S key...
Also this is very upsetting:
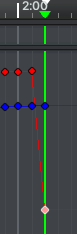
These are the curves before hitting "S"
This is after hitting "S". As you can see it has also keyed the frame behind the slider :S I've never seen this in my life
Can anyone please help me clear up this confusion? I'd just like to hit "S" and key all channels on the selected object.
I am but a humble animator and Unity dev who is loving this software, I love that I'm not dependent anymore on programs outside the engine.
Thank you,
David
Okay so I just figured that the extra frame that gets keyed is for the constraint to stay in position; as is explained in this tutorial video that I missed:
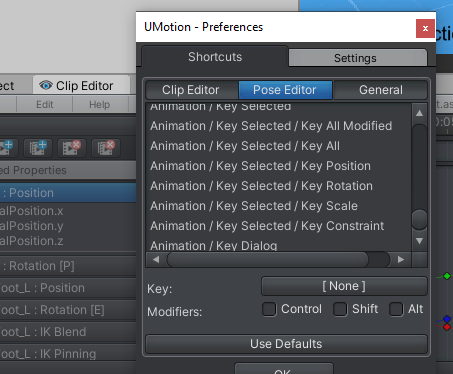
I also figured that coming from Maya originally and Blender (heavily customizable) for some time as well, I've always felt comfortable with the "S" key to be the main keyframe key for all channels, we key'd constraints seperately though. So the solution for me was to switch the functionality of the "S" (Key All) and "M" (Key Modified) keys in Edit > Preferences > Pose Editor
Figured it out myself.. :)
Nonetheless, this gives me a great oppertunity to say thank you to Peter and everyone else for making this beautiful asset.
So, Thank you :) I can finally say goodbye to Maya & Blender Animation wise.
Best regards,
David
ps: check out cascadeur :p
Facial rigs?
Hi, I tried using this on a generic avatar with a face rig. I only got controls for humanoid features. Any way to make this work? Also I want to mix FBX animations with umotion animations (blend then together with layers/masks, etc) is there any guide for this?
Hi,
thank you very much for your support request.
There are 2 ways facial animations are typically realized. Your model either has bones for controlling the face, eyes, mouths etc. or it has blend-shapes. Both are supported by UMotion. In case it's just bones, you should be able to see them and edit them to your needs using the regular move/rotate/scale tool (like you would do with any other bone). For blend shapes, UMotion asks you at the beginning (when you assign a character that has blend shapes to the pose editor for the first time) if UMotion should add controls for the blend shapes. Depending on your selection, the blend shapes are either attached to the head bone or to a new custom transform. Select it and you see the controls in the channels view.
I only got controls for humanoid features
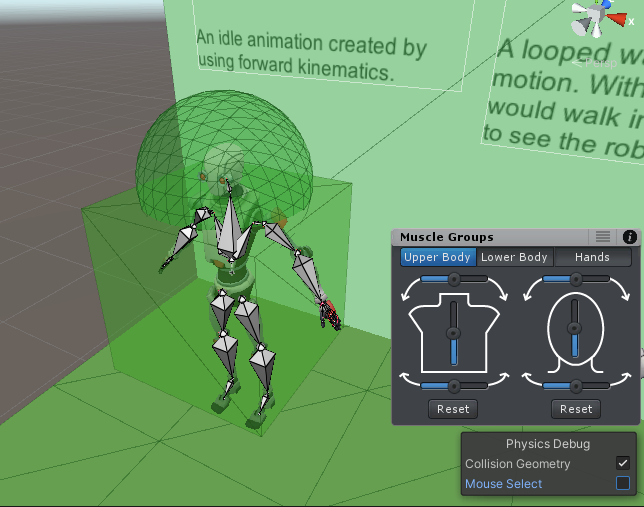
The "muscle" control panel shown in the scene view is humanoid exclusive (as only the humanoid file format has pre-defined muscles). Something like this is not possible for generic as a generic model can be anything.
Also I want to mix FBX animations with umotion animations (blend then together with layers/masks, etc) is there any guide for this?
Import both animations you want to mix. Create a new layer in one of the animations and then copy only the keys for the bones you want to mix to the new layer (no need for "masking"). There are 2 types of layers, additive and override. Override is replacing what's underneath and additive adds changes on top of the existing animation (useful for manually offsetting parts of an animation, not useful when mixing two existing animations). More information on layers can be found in the manual at "Clip Editor/Layers".
Here is a video tutorial that uses animation layers to correct existing animations: UMotion - Editing Existing Animations
A nice overview of all video tutorials can be found in the "Video Tutorial" chapter of the UMotion manual.
Let me know in case you have any follow-up questions.
Best regards,
Peter

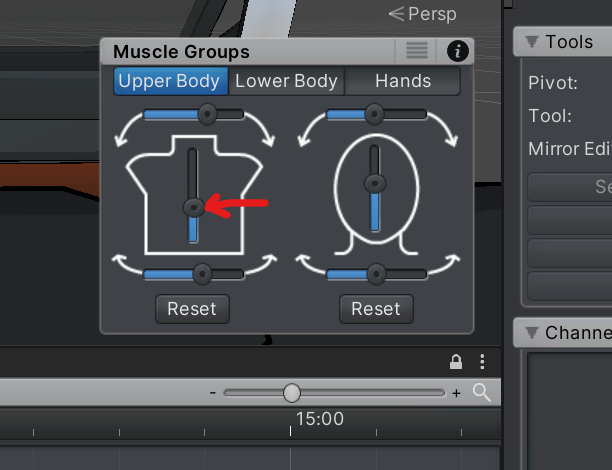
Muscle Groups slider precision
Hello,
Is it possible to adjust it more precisely, like very little? didn't read manual shame on me, but watched youtube moves, probably i can hack it with animation curves?
Hi Karoly,
thank you very much for your support request.
Unfortunately the slider's precision can't be increased. But you can further fine-tune the pose by selecting the bones and adjust them with the rotation tool directly in the scene view.
If you want to bend multiple bones at the same time (like the slider you've marked in the screenshot does), you can also do that directly in the scene view: Select all the bones that should be affected (hold CTRL to add to the selection). The rotation applied with the rotation tool is then automatically equally distributed to all selected bones. Take a look at the following gif, all bones of the tale are bending at once:
Let me know if you have any follow-up questions.
Best regards,
Peter
2 IK Questions: IK Handle Sizes & IK Animation Y Coordinates In Timeline
Firstly…
- Is there a UMotion setting for changing the size of all IK handle selectors at once?
- Is there a default setting that sets the IK handle selectors according to user’s preferences at startup?
Secondly…
I have an IK animation related question:
I wish to use UMotion IK animations to create an animation of a character walking from Position A to Position B while crouching at the halfway point.
In UMotion, the character’s feet remain on the ground throughout the animation. Looks great! But in Timeline, the character’s feet rise up off of the ground to meet the character’s hips instead? Looks bad because he floats in the air at the half way point.
What am I doing incorrectly, here are my steps:
IN UMOTION:
- I run the IK setup wizard.
- I then import an animation clip and convert it from FK to IK.
- I add IK Pinning to the character’s feet.
- I create a new layer and set it to additive.
- In the new additive layer, I lower the character’s hips at the halfway point of his animation.
- It now looks like my character starts the animation from a walking position, crouches half way through, and then stands up again. Perfect! His feet always remain at ground level and I am very happy.
THEN I SWITCH TO TIMELINE
- I drag the character to Timeline as an Animation Track.
- I add an Override Track to the Animation Track and set keyframes for the character’s Position A in world space.
- I move forward on Timeline and create keyframes for the character’s Position B in world space.
- On the character’s main animation track I add the walking animation I created in UMotion.
- The character’s feet rise up off of the ground to meet the character’s hips. Looks bad because he floats in the air at the half way point.
- The only way I can ‘fix’ this is to add Timeline keyframes for the character’s Y coordinates to offset what is happening?
Something is wrong with my workflow, but I don’t know what it is. Can you assist?
Hi,
thank you very much for your support request.
Is there a UMotion setting for changing the size of all IK handle selectors at once?Is there a default setting that sets the IK handle selectors according to user’s preferences at startup
When creating the IK handles with the IK Setup Wizard, you can adjust the size directly in the IK Setup Wizard. You can also save your current settings as a preset which you can then load in other projects.
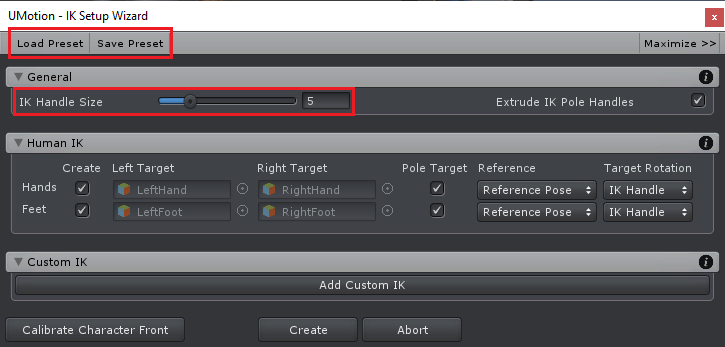
If you've already created the IK handles, you can adjust their size by going into "Config Mode", select all the handles you want to adjust and then under the "Properties" tab you can adjust the size parameter to your liking.
In the "Options" tab shown in the pose editor (accessible from pose mode and from config mode) you can adjust the overall size of all the visual representations.
Secondly…
I have an IK animation related question:
Does your exported (*.anim) animation look correct when previewed in the inspector window (compare the animation previewed on the default avatar vs. previewed on your model, with and without IK)?
If the preview already shows this issue, try adjusting the Y axis related root motion settings shown in the inspector window. Enabling "Bake Into Pose" and setting "Based Upon" to "Original" usually helps.
If the animation is previewing correctly, then the issue is somehow related to your timeline workflow.
Best regards,
Peter

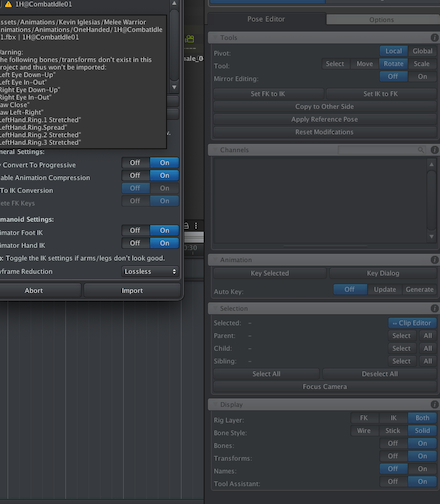
import error with muscle groups
Hi there. Having an issue with Muscle groups, upon importing an animation, it doesn't seem to recognize the groups from the avatar I guess...? It worked fine until I recently noticed the hands in the Umotion exported Animations were acting like penguin flippers, wings? Whatever you get the point :) Attempted multiple models and multiple animations to no avail.
Hi,
thank you very much for your support request.
Looking at the error message in your screenshot, it just looks like the humanoid avatar of your imported animation does not have bones setup for the eyes, the jaw and the left ring finger bones. You can check this by selecting the animation's *.fbx file in Unity's project window. Then in the inspector, open the "Rig" tab and click on "Configure".
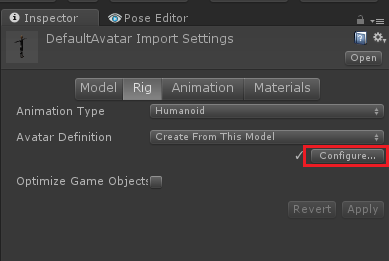
This is going to show you the avatar definition and if you check the slots for eyes, jaw and left ring finger you should see that they are empty. If you need theses bones (eyes and jaw are usually not needed), assign the corresponding bones there.
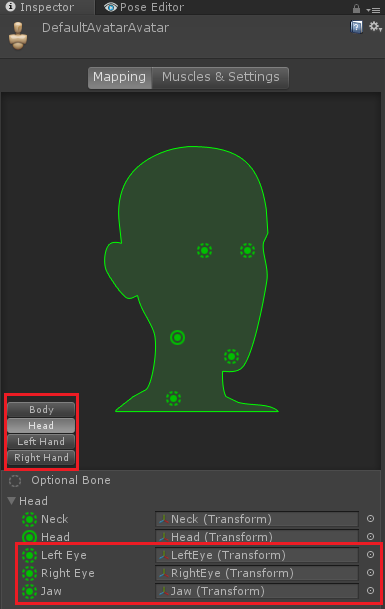
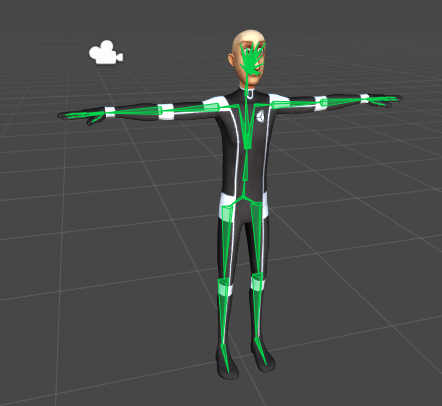
If you have problems with your humanoid animation not playing correctly, it's also most likely an issue with an invalid humanoid avatar setup. Make sure that the humanoid avatar (shown in the avatar config editor that we've accessed above) of your character and the animation you want to import is in a perfect T-Stance and that all bones are displayed in green.
After adjusting the avatar of your character, you need to re-export your animation from UMotion for the changes to be applied. If you've changed the avatar of the animation you want to import, you need to re-import it into UMotion for the changes to take affect.
Please let me know in case you have any follow-up questions.
Best regards,
Peter

Preview collider with custom property constrain
I'm modifying collider's properties through Custom Properties. It's there a way to preview the collider gizmos while the property is being edited?
Hi José,
thank you very much for your support request.
The traditional visualization of the colliders is only drawn when the GameObject is select (which UMotion doesn't let you).
But there is a different way to show the colliders:
In Unity's main window, click on "Window --> Analysis --> Physics Debugger" to open the physics debugger. In the scene view's lower right corner, there is now a small floating window named "Physics Debug" (UMotion's tool assistant window might overlap this window by default, make sure to drag it away). Make sure to set the check mark for "Collision geometry". This is going to show all colliders in your scene even when not selected.
If you have "Preview" enabled in the "Custom Property" constraint, you can now see your collider changing live.
Please let me know in case you have any follow-up questions.
Best regards,
Peter

Mirror right hand to replace left hand in mocap clip
I have a motion capture where the left hand capture ( hand and fingers ) is jerky and at times frozen. I want to recover the clip by copying and mirroring the right hand and fingers to the left.
Can this be done with UMotion Pro and if so how? Thank you!
Hi David,
thank you very much for your support request.
Yes this can be done but is a semi automatic process. The following video covers exactly your use case (the copy to other side part starts at 10:13 but you might want to watch it as a whole as it is also showing how to fix mocap animations):
Please let me know in case you have any follow-up questions.
Best regards,
Peter
Customer support service by UserEcho
