
 Export Animations to Packages, limited to Assets folder
Hi there,
We've been loving using UMotion, but running into issues while evaluating it. I was wondering, is there a reason why exports are limited to the Assets folder?
Our team uses a workflow using local packages to share assets across projects. This is necessary so we can control levels of access to our code base where our outside collaborators (external contractors) can contribute animation assets to our projects without having access to the entire project due to various reasons. The issue though is that our animation assets lives in a valid Unity project location like:
/ProjectRoot/Packages/com.company.sharedassets/Runtime/
instead of the more common:
/ProjectRoot/Assets/
I realise this is a newer area of Unity development, but it's a really stifling our ability to use UMotion. We need to store our fbx's and animations in a local package. Is there any chance the warnings and blocking checks that prevent exports outside of Assets could be turned off with an option? or instead that you could add the Packages folder to the list of valid locations alongside the Assets folder?
I'm guessing you have some kind of api requirement using AssetDatabase.LoadAsset or hard coded paths that expect to be working with assets that live inside of the Assets folder, if not then hopefully the request is a simpler one, if you do though hopefully the code can be improved to expand to support working with assets within the Packages folder.
Our lead artist has also mentioned that it's not just exports, but also where UMotion project files can be stored that are limited to the Assets folder. We also need these project files to live in Packages so that our various contractors can access them.
Thanks,
Jason

Thanks for providing all the details, that helped me a lot to quickly dive into this topic.
A fix for not being able to export into to embedded packages is already implemented and is going to be released with the upcoming UMotion patch release (V1.26p01) that is going to be available via the asset store next week.
Best regards,
Peter

Freely Position-able Target Point (Inside Humanoid)
Hello!
I would like to, as part of my humanoid animations, sometimes create and 'animate' the position of an invisible game object.
Description:
I am working right now on an animation, where my character jumps up, hangs for a moment, and hoists himself to his feet on a ledge about 3 meters up. I would like to have two freely movable, pinnable game objects to track through the animation where the static 'ledge' edge is, and also the current general position of the hands. However, I am having trouble accomplishing this.
The 'Target1'/'Target2' transforms of the GameObjects will be referenced inside a C# script, which will update the player's physical location frame-by-frame as the animation unfolds.
Problem 1:
When I add two game objects, named 'Target1' and 'Target2' to my character's 'root' transform, UMotion tells me that I am not allowed to 'animate' a game object unless it has a humanoid-bone parent.
Problem 2:
I tried adding 'Target1' and 'Target2' with 'hips' as the parent. Although I can now animate the position of the game objects, there is no way for me to 'pin' the targets; they inherit the motion of the hips, and they move and rotate along with them.
Problem 3:
I tried adding multiple parents to the 'Target1' and 'Target2' points - pretending that they have 'legs'. I added thigh, knee, and calf game objects for both Targets, and set up a 'Custom IK' for both. This was the closest I have come so far to a working solution. However, there are limitations to this setup - for instance, the distance the game objects can successfully be pinned is limited by these imaginary legs. Furthermore, I'm just not really a fan of this setup.
Any advice?
Thanks!
Zach.
Hi Zach,
thank you very much for your support request.
You can assign the child-of constraint to your GameObjects. Then (in pose mode), select the GameObject and set the root GameObject as parent (in the channels view). There should be no need for creating an IK chain (like in problem 3).
All the details about the child-of constraint can be found in this video tutorial:
Another solution would be to change your character to generic as it gives you full flexibility because you can animate any GameObject in it. If you do not need the animation re-targeting of the humanoid animation system, generic is often the better choice.
Please let me know if that works for you.
Best regards,
Peter

Blendshape Animation Multiplies in Size
Hello,
I'm editing an animation in Umotion but since the animation contains blendshapes I can't save it as an fbx. The alternative .anim export is uncompressed, resulting in increased file size. Do you have any suggestions that would resolve this issue?
Hi,
thank you very much for your support request.
Unfortunately only the FBX export can make use of Unity's animation compression pipeline. One thing you could do would be to export your animation twice (once as *.anim and once as *.fbx). Then you can copy the compressed animation data from the fbx into the *.anim that also contains the blend shape data. You can copy and paste the keys using Unity's animation window. Unfortunately there isn't a more comfortable way I'm aware of.
Please let me know in case you have any follow-up questions.
Best regards,
Peter

Recreating an animation not refreshing
First of all this product is fantastic. I am moving forward at an incredible rate in my creation.
But here is where I am having trouble.
I have the Umotion project where I create animations for my character.
I then export current clip.
Then drag that anim to the folder of the secondary project, which is also open. This works!
But when I modify the Umotion anim and copying it to the secondary project folder I press preview and the new animation doesn't take effect. I got this working at one time but now I can not find what I need to do so the animation in the Unity anim timeline performs the changes I made.
The timestamp on the modifed anim in file explorer shows the latest too.
Any ideas? Thank you in advance.
Hi,
thank you very much for your support request.
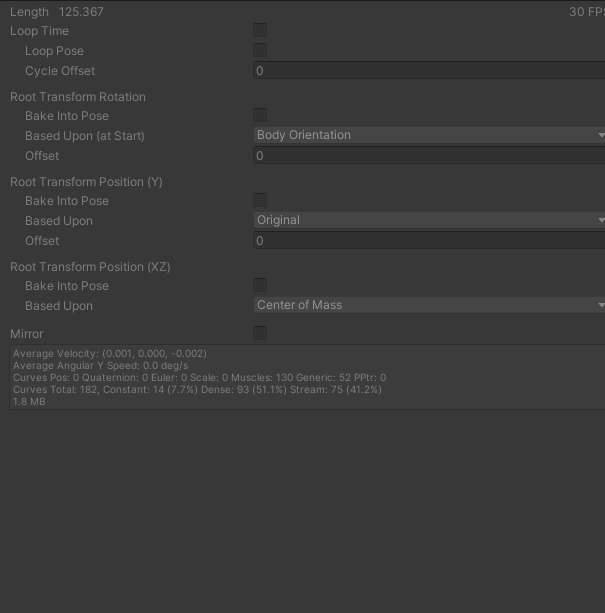
I found the discrepancy. The model jumps to position 0,0,0 when the Unity animation preview button is pressed. When game play is pressed the model stays in its position and the animation takes place at that new relative position of the model placement instead of snapping to 0,0,0.
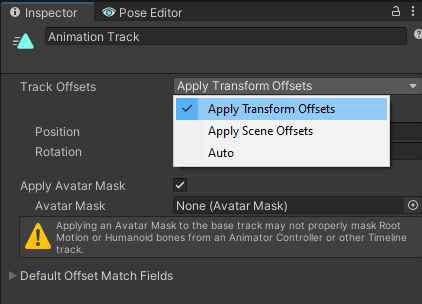
You mentioned that you're using the animation in Unity Timeline. There are dedicated settings in Timeline that define how the start offset should be handled. If you select the animation track, you get this choices shown in the inspector:
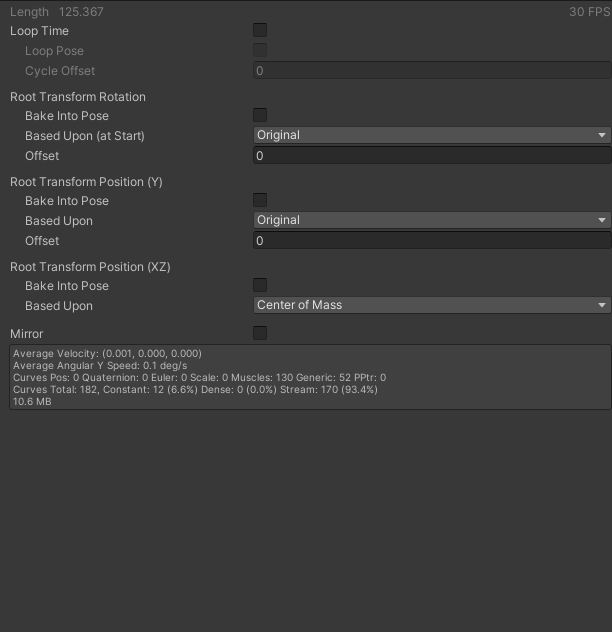
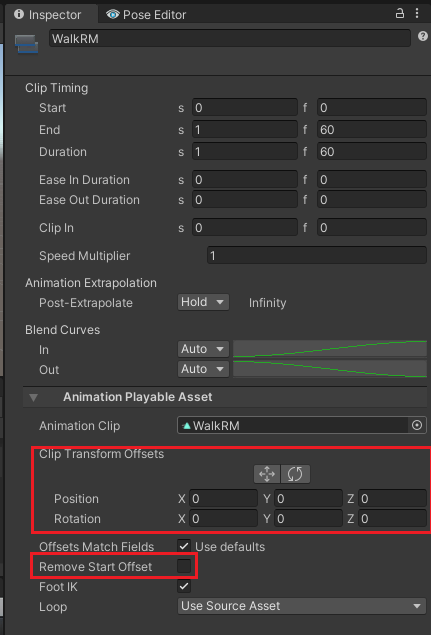
And if you select the animation clip (in Timeline), you have this settings:
Hope this helps. If there is still something unclear, let me know.
Best regards,
Peter

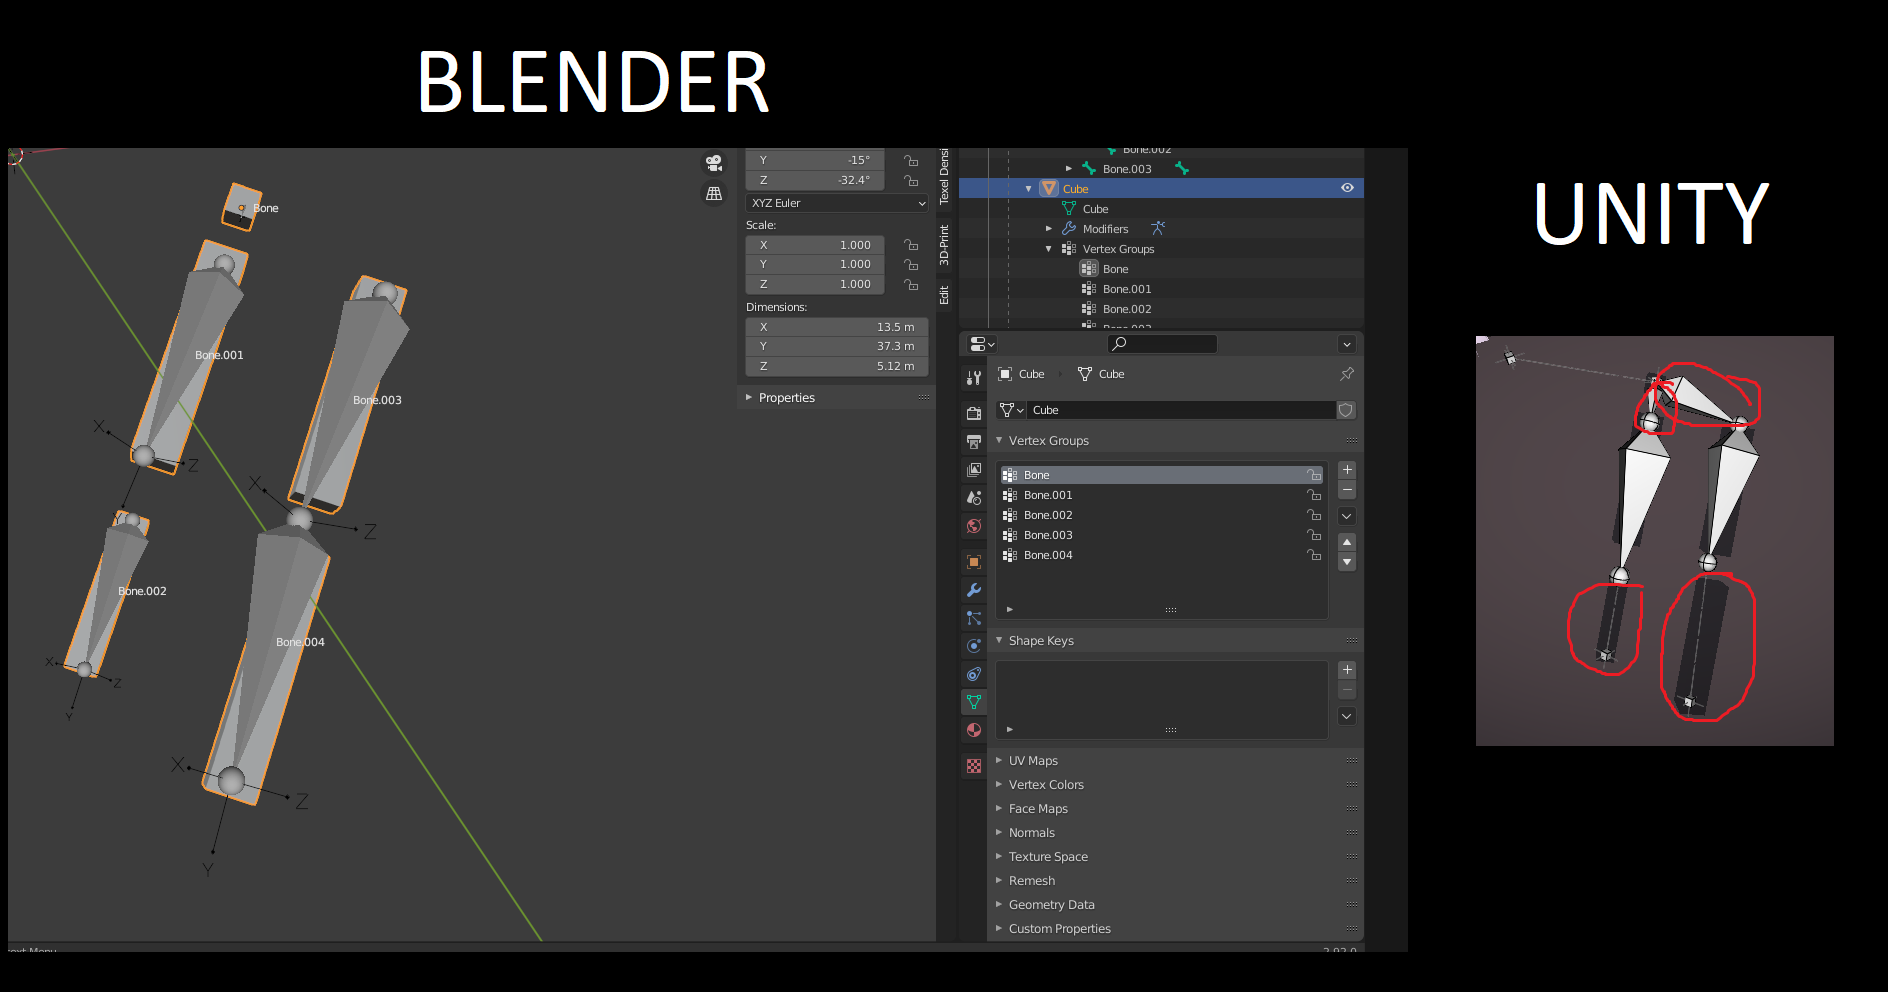
Blender Armature not same in unity
Hi, I am not sure what exactly am I missing here. As you can see the armature in Umotion differs from the one I made in blender.
1: Why does it automatically connect the two child top bones to the main one ? ("bone" to "Bone.001" and "Bone.002")
2: Why are the end bones not there?("Bone.002" and "Bone.004") If I move the down edges of "Bone.001" and "Bone.003" then "Bone.002" or "Bone.004" are moving.
I exported the mesh as FBX from Blender and the rig in unity is set to generic.
Hi,
thank you very much for your support request.
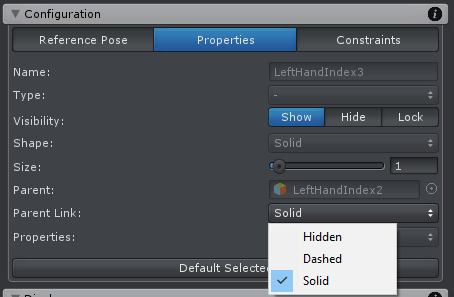
1: Why does it automatically connect the two child top bones to the main one ? ("bone" to "Bone.001" and "Bone.002")
Because the FBX file does not store any information about which bones should be visualized as "connected" and which bones should not. You can change such visualization things in UMotion's config mode. If you want to hide the connection of a joint to it's parent, set the "Parent Link" property to "Hidden":
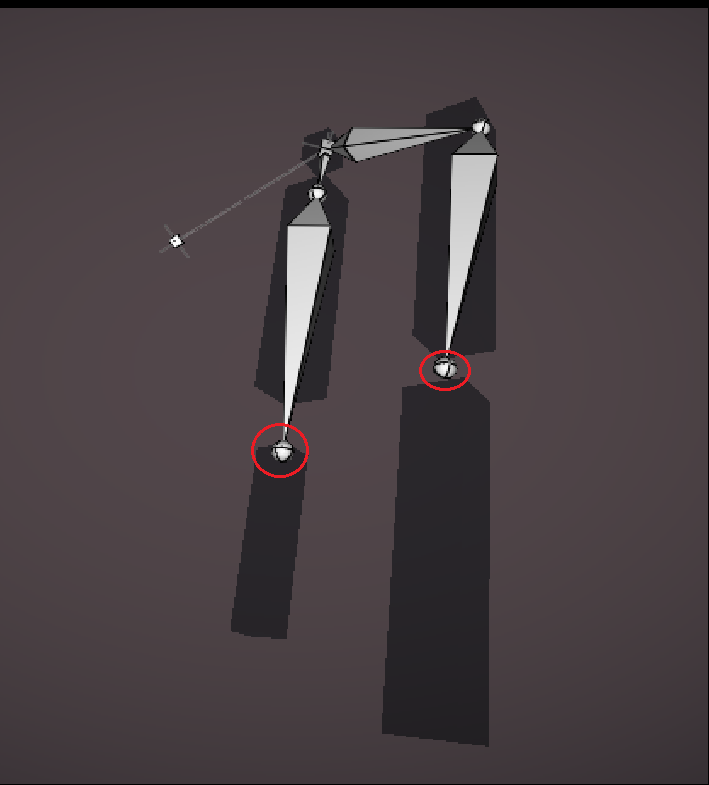
The only thing left now is to figure out why are the end bones disappearing in Umotion
In your first picture, you can see that the end joints have been imported by Unity (the cubes) but the end joints are not bound to the mesh (thus not displayed as bones but as regular transforms). If you want them to be imported correctly, you need to make sure that the end joints are also skinned.
In your second picture the end joints are completely gone (due to changed export settings in Blender?). 90% of the time, this is how a model is imported into Unity. So this is a common situation. There are two ways you can deal with this:
1) You can select this joint whenever you want to rotate the last bone:
2) Or if you really want the last bone to appear, you can also create custom joints for the end joints inside UMotion. This is covered in this video tutorial:
Please let me know in case you have any follow-up questions.
Best regards,
Peter
Animation not playable in Umotion clip editor but plays in Unity's player?
Oops. My bad. I did not have this gameobject in the Pose editor. Possibly leave this here for others to find?
No play button option and when skipping to next frame model does not move like the keyframe points show in clip editor.
This clip was exported to another project and works fine over there on a like character. But motion is not in that project.
Hi,
thanks for your support request.
Op answered his question by himself:
Oops. My bad. I did not have this gameobject in the Pose editor.
Best regards,
Peter

 Timeline Sync Position/Rotation Offset
Hello,
when I syncronize a clip from the timeline, the position and rotation offset from the timeline clip are not adopted (AnimationPlayable Asset Settings). Is there a way to fix this? Since I want to adjust the animation to interact with other objects in the timeline, I need the exact position
What is the workflow for copying animations from project to another?
I have the same mesh in two projects. I work in umotion project to create animations then I have same mesh in game project.
I export clip from umotion project and copy animation file to game project. When I load into animator in game project the animation property lines display incorrect items from Unity's humanoid rigging.
Is it possible to use one project anims in another? Do I need to run the umotion clip editor in destination game project?
Hi,
thank you very much for your support request.
Yes the way you described it should work. As soon as you exported to *.anim (or *.fbx) from UMotion, the animation is a regular animation (like any other). You need to make sure that the character in both projects is also configured the same way (e.g. configured as humanoid in both projects). You can't use a "generic" animation on a "humanoid" character for example.
Please let me know in case you have any follow-up questions.
Best regards,
Peter
Locking hand rotation to forearm
In your hand Ik demo when you pull the hand it stays in line with the forearm. When I use that IK transform the hand does not. It always points to it own original target line. How do I get the hand to stay in line with the fore arm when moving the hand in Ik?
Hi,
thank you very much for your support request.
By default, the rotation of the last joint in your IK chain is driven by the IK handle's rotation. You can change this to use the local FK rotation of the joint itself in the IK constraint settings:
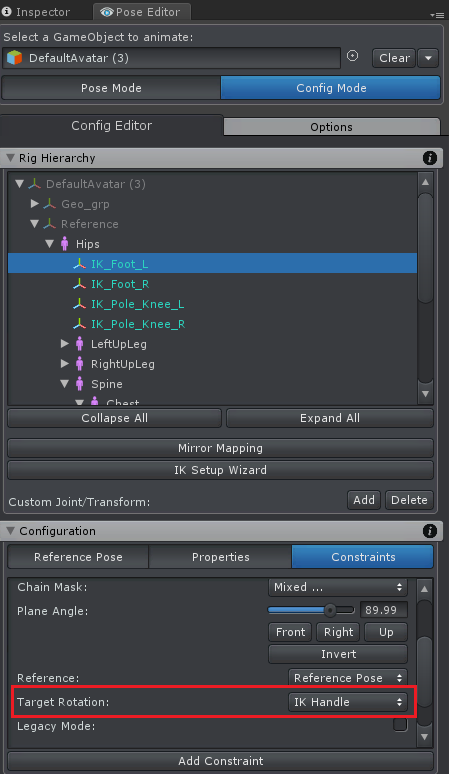
This setting is also available via the IK setup wizard:

If I recall correctly, the default value was changed in the past that's why it might be different in the video tutorial.
Please let me know in case you have any follow-up questions.
Best regards,
Peter
third person
good evening, any advice on how to start up a TPS animation using umotion pro?
Hi,
thank you very much for your support request.
I would start with the general quick start video tutorial (and the following in-depth tutorials) to learn the basics of UMotion. Check out the "Video Tutorials" chapter in the UMotion manual. It gives you a nice overview of all the video tutorials available.
There is also a dedicated video tutorial on how to animate first person arms + a gun. The same principle would apply no matter if it's only just arms you're animating or if you're character has a complete body.
For doing stuff like walking animations etc. I recommend starting with an existing animation (e.g. from the asset store) and try to adjust it to your needs. Using animation layers / masks in your Unity animator controller, you would then mix e.g. the walking animation (affecting the whole body) with the gun related animation (only affecting the arms and the weapon).
Please let me know in case you have any follow-up questions.
Best regards,
Peter
Customer support service by UserEcho
