 Fingers bend backwards
When using the finger assistant, the fingers bend backwards.
Is there a way to reverse this?

It was fixed.
I checked "Bake Axis Conversion" in the model import settings and it was fixed.
Trying to animate custom bone like scarf get this error/warning not all bones/transformation in this project is available in the game object?
Hi dev,would love to animate with humanoid my scarf with custom bones from the main armature.But the above warning come up and in the config mode there are error/warning"the are rig configuration where the appropriate joint/transform cannot be found.
Can i get a step by step on how to use custom bones in humanoid rig?Thanks

Finger rotations not importing correctly for humanoid project
Hi, I've been using UMotion Pro a lot and love the asset, but this is the first time I've had issues with fingers not animating properly.
I'm using a Humanoid project because my end goal is to convert generic animations I've created and convert them to humanoid animations. My usual workflow is:
1. Import FBX of model + animation into Unity
2. Change Rig structure of model from Generic --> Humanoid
3. Create a new UMotion Humanoid project
4. Set the humanoid model in the pose editor
5. Import the generic clip from the FBX
6. Export the clip (which now saves as a humanoid clip)
However this time, the fingers aren't animating at all when I import the clip (step 5) in my humanoid project:
The fingers animate fine if I test against a generic UMotion project (not converting to humanoid) though:

I inspected the humanoid avatar, and it looks like the fingers are bending correctly for a humanoid rig:
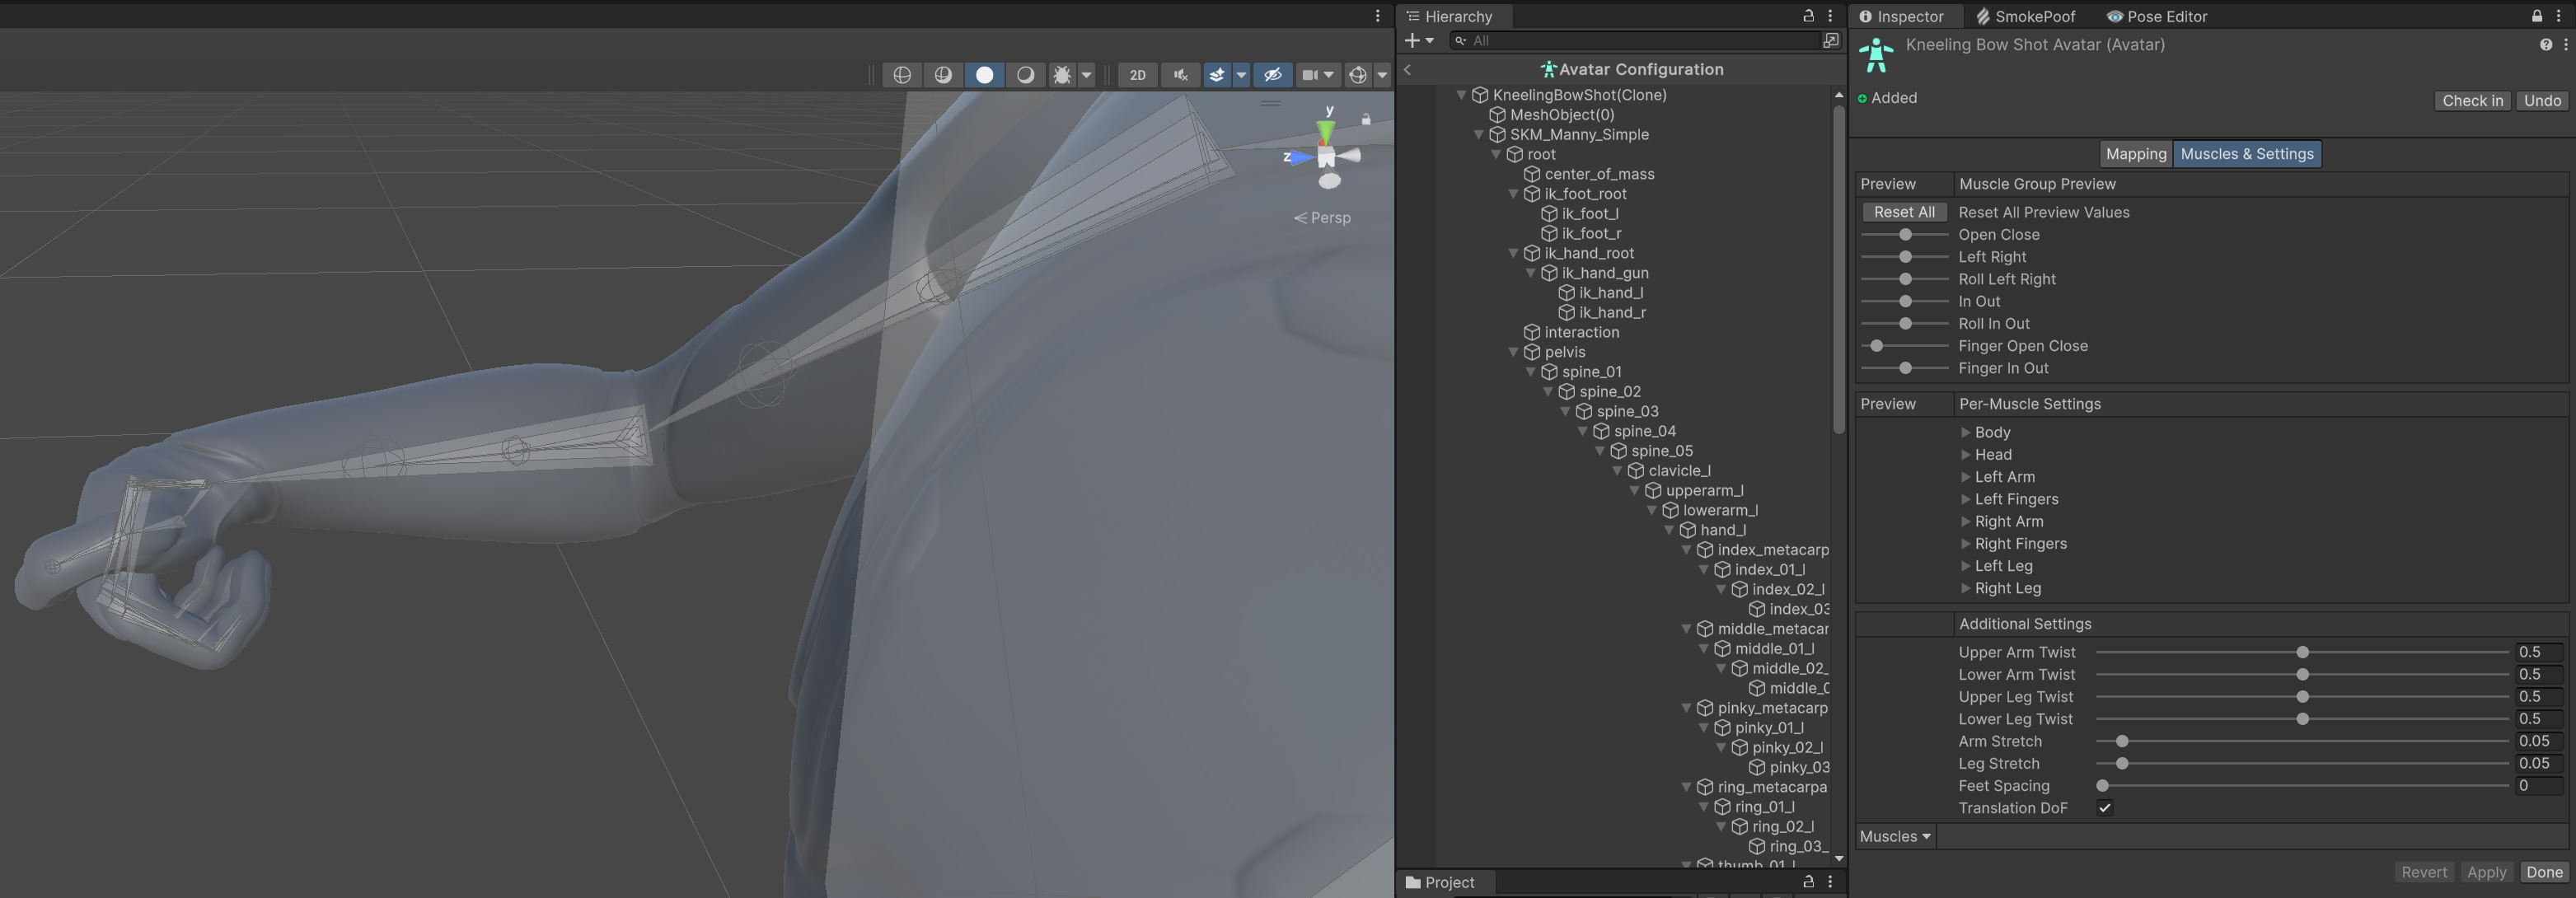
Can you help me fix the fingers not curling in my UMotion humanoid project please?
Much appreciated
Dat

Hi Dat,
thank you very much for your support request and for the late reply. I somehow wasn't notified about your post.
The problem could be in the avatar setup of your animation (FBX) file or in the avatar of the humanoid character you use in UMotion. I would try the following:
- Ensure that the animation plays correctly on your character outside of UMotion (i.e. assign the animation to your character in the scene and see if it is played correctly).
- Create a fresh UMotion project for the character.
- Assign the character to UMotion
- Import the animation into the UMotion project
If an animation plays correctly on the character in Unity, it will also import correctly in UMotion.
Please let me know in case you need any further assistance.
Best regards,
Peter
 Auto-Select all doesn't work in position window
What I do is this: I click on a keyframe, then on "Position". I get the small "Move Tool" window. I click into the X value area, and the entire value is selected. Perfect; I press 3.14 (or whatever) and done. Now I click into the Z value area, and ... Nope. Nothing selected. I need to clear out the value by hand. which is problematic since the left/right keys don't work; they move the scene view (which also wasn't the case for the X field).
Note!!!!!! If I first click in Z, everything gets selected, but then X doesn't work. Seems to only affect the second and later field I click in. Strange.

z axis is swapped for y in curves mode
I was making a walking animation, so i followed a former question here on how to set all key frames of the z axis to 0 so it walks in place.
I noticed that in curves the z front axis is being used as the y axis as blender.
Is there an option that changes it to unity default layout or is how the plugin has been set?
If it is how it has been set will there be a fix for this, its counter intuitive.
Loop animations changes rotation or position over time
I have a walk animation that walks forward, the problem is when loop is enabled after a few seconds like 10 to 20 seconds it starts changing rotation or position over time.
The first and last key frames match on either transforms.
Plays ok for those first seconds then starts moving up or rotating at either axis x, y or z. Seams random the course it takes.
How could i prevent that
Hi thanks for the quick reply, there is no layers for this animation yet, i've redone it all again, copied the first and pasted on the last again and now its working.
Thanks anyway, you can delete this post if you'd like, it's not giving the option to do so myself.

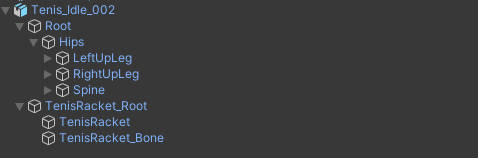
Importing humanoid Mocap with object
Hi there,
I have a humanoid Mocap animation that I'd like to edit in Umotion but I'm not sure of the correct way to configure the character. The animation contains a traditional humanoid skeleton as well as a seperate object (in my case the object is a tennis racket)
The animation is an FBX file and has a heirachy:
What do I need to do to get this working in Umotion, and to save the editded animation so that it can be played back on other humanoid characters?
Hi Adrian,
thank you very much for your support request. Here is a quick step by step guide:
- Drag and drop the fbx file (from Unity's Project window) into a Unity scene.
- Open UMotion's Clip Editor and Pose Editor
- In the UMotion Clip Editor, click on File --> New Project --> Humanoid
- Drag and drop the character from Unity's Hierarchy window into the UMotion Pose Editor's top most field
- Import the animations you want to edit by clicking on File --> Import Clips in the Clip Editor
- When done animating, click on "Export Clip". If you want to export directly into the FBX file, make sure to adjust the Export Settings accordingly.
Follow-up information:
- https://www.soxware.com/umotion-manual/QuickStart.html
- https://www.soxware.com/umotion-manual/InPractice2.html
- https://www.soxware.com/umotion-manual/GettingStarted.html
Please let me know in case you have any follow-up questions.
Best regards,
Peter

A way to export the animation at a specific frame to Maya/Blender?
Hello,
I'm wondering if there's a way to somehow bake a humanoid character's bone transform at let's say frame 25 and export that result to maya or blender (including the mesh). i don't need it to be animated just the pose itself, since in unity humanoid rig i'm not getting the exact match and will be very useful to actually see in maya how my character is posed after the unity humanoid setup.
Best Regards!
Hi skinwalker,
thank you very much for your support request.
You can just export the animation into the FBX file of your character using the "Update Existing File" mode. This preserves the mesh. If you only want to export frame 25, you can delete all other frames from the animation (or just select frame 25 in Maya).
Another possible way would be to have frame 25 selected in UMotion. Then click on the arrow next to the "Clear" button in the pose editor and select "Clear - Keep scene pose". The character is then going to keep the current pose. Then use Unity's FBX Exporter package (from the package manager) to export the character as it currently is.
Please let me know in case you have any follow-up questions.
Best regards,
Peter

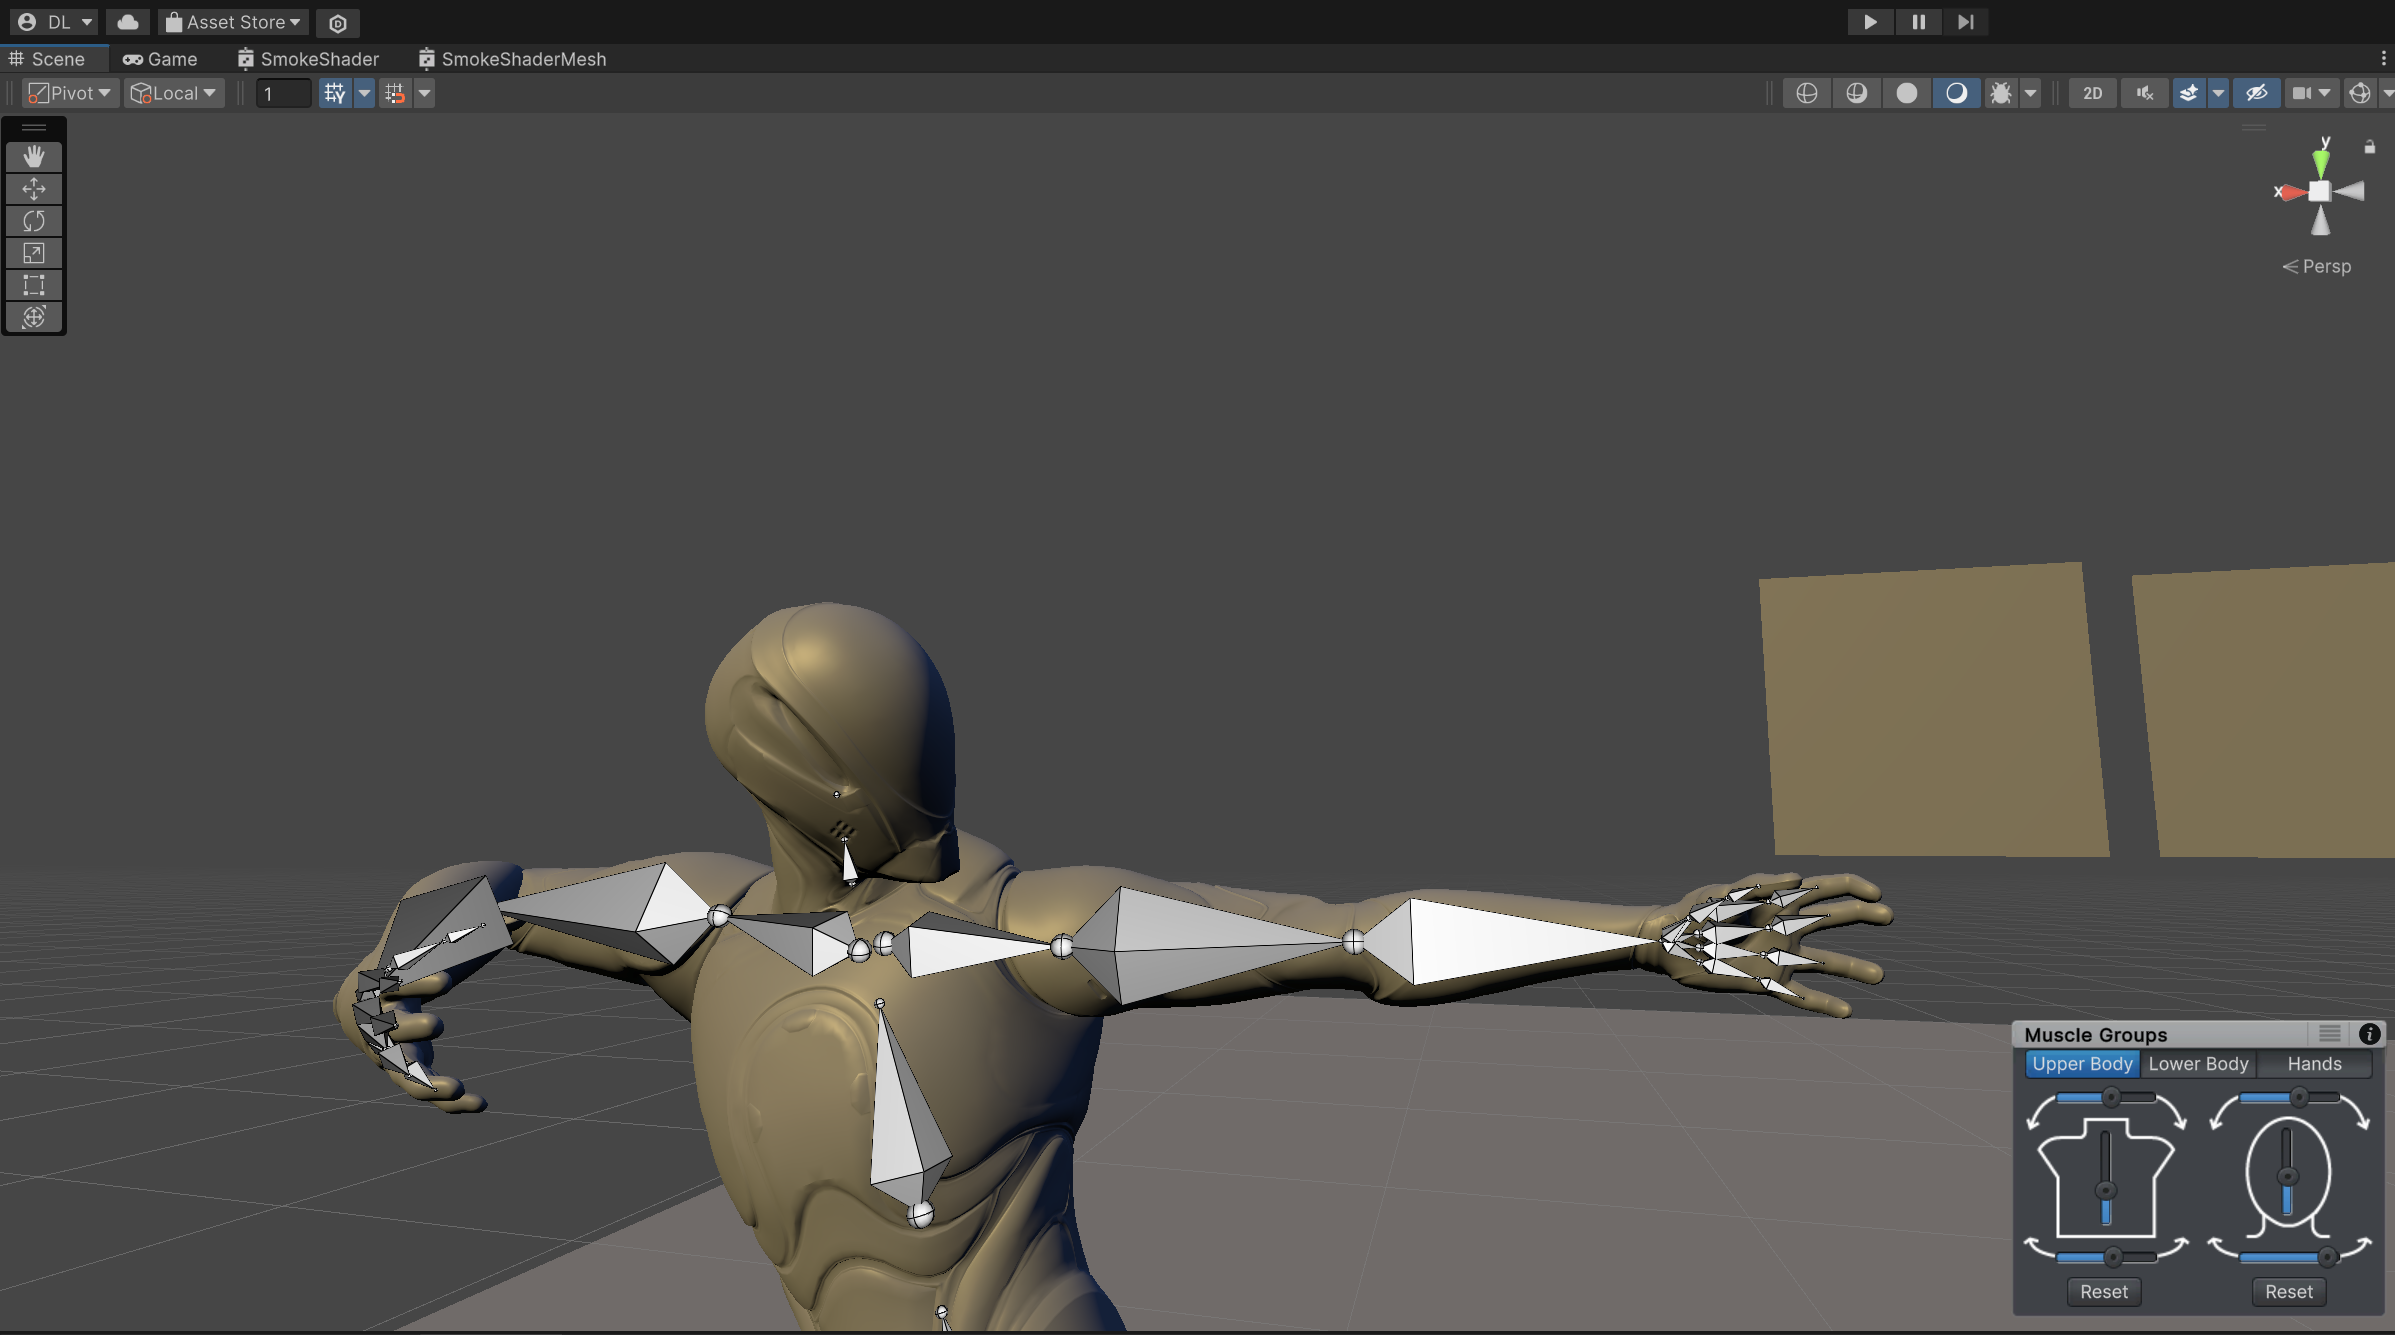
Custom IK setup for a snake-like character issues
Hello Peter,
Following your IK setup tutorial, I've set up the IK chain for my snake-like character (a part of it, its tail) like that:
My model is actually a collection of models united into one. So like a toy thing, with many segments.
So the handle is on the last bone in the tail. But when I move the handle in the pose mode, I come across two issues:
1. The last segment of the tail seems very rigid, stuck to the previous segment, and they move together as one. You can see it here, there's no curve, no bending between segments in the tip of the tail:
And in Blender you can see the borders of these segments and how they are arranged when I move the last bone:
Why is it not like that in Unity?
2. Another issue is, I can't rotate the bones via IK handle. I mean, when I choose Rotate tool and rotate the handle, the handle rotates, but this doesn't translate to the bones, to the mesh.
3. And last one, when I move the handle, the whole chain is kinda broken in the way it's bent, like that:
So it has this very hard bending point after the first bone, and then other bones, though connected to the chain, behave very differently.
I mean, what I would love to achieve is the smooth bending of the whole chain, you know. So that the whole chain would curve like a snake's body, without such a sudden break in the chain like there is now.
Could you give me recommendations on how to achieve that? What do I do wrong?
Hi,
thank you very much for your support request. Sorry for the late reply, I somehow haven't received a notification regarding your post.
Using IK for things like tails isn't going to generate natural "smooth" looking results (due to the nature of how the IK algorithm works). You also loose a lot of artistic control over it. Do this instead:
- Hold Shift while selecting the first (top most) bone of the tail. This automatically selects all child bones too.
- Then use the rotation tool to apply a rotation in the direction you want the tail to move. Notice how the rotation is smoothly distributed between all bones of your tail:
Please let me know in case you have any follow-up questions.
Best regards,
Peter
Cannot set rotation offset

All i want to be able to do is type 270 in X in Rotation Offset. It is grayed out? Everything else would fall into place if i could just change that.
Customer support service by UserEcho
