
 Snapping doesn't use the increments set in the Unity editor
Hi,
I noticed that no matter what snapping increments are set in Unity, UMotion uses 1 meter and 15 degrees for snapping. Those numbers are really big and make snapping pretty useless for me, so I've just avoided snapping so far even though having it would be really convenient. I haven't found anywhere else to set it so far, so I think this is by design, but is there any chance that snapping could use the same increments as set in the editor?
Thanks

Hi Leo,
thank you very much for your support request. What are you animating, that snapping is relevant?
Currently snapping invervals are fixed in Umotion.
Best regards,
Peter

Exporting animations do not match Editor animations
I've been trying to export some simple animation clips.
Two of the four exported animations do not match the ones in the editor.
I have tried both generic and humanoid animations and the both have the exact same problem
The arms in the animations in question begin in the T-pose. Which isn't even close to the animations in the editor.
I know humanoid retargeting isn't perfect, which is why I also tried generic animations and they didn't work either.
I've tried exporting to FBX and Anim file and it happens either way.
Again, two of the four animations have this issue while the other two work just fine.
I have no idea what is going on. I've spend hours trying to figure this out. I'm lost.
The IK Blending value was messing with things.
Since there was no FK animation it was in the T Pose when the IK Blend value was set to zero.
Makes sense now. Not sure how I missed it for so long.

is there a way to adjust the all frames at once
im trying to edit an animation but i need the arm rotated like 5 degrees so it doesn't clip.. is there a way to add that 5 degree rotation to all the frames on top of the current clip
Hi eris,
thank you very much for your support request.
Yes, this is possible: In UMotion, create a new animation layer of type additive. Than on frame 0, rotate the arm for the 5 degrees you've mentioned and save the change (only for the arm) as a key frame. The change is now added on top of the underlaying animation.
More information: https://www.soxware.com/umotion-manual/Layers.html
This video tutorial also uses an additive animation layer: https://www.soxware.com/umotion-manual/InPractice3.html
Best regards,
Peter

Viewport doesn't respond to mouse clicks
Hello Peter,
So sometimes (very often) after some manipulation, like rotation of the bone, viewport becomes inactive for mouse clicks. I mean, I click the right button to rotate the camera, for example, and nothing happens. I click the middle mouse too, to pan the view, but it doesn't work as well.
I have to select the hand tool to pan the view, and after that it becomes responsive again.
Can you figure out what is the cause of such behaviour and how to fix it?
Hi bartolomey_wong,
thanks for reaching out. This could be a Unity bug (do you get an error message in the console after clicking on the "hand tool" and thus re-storing the clicking functionality)?
Best regards,
Peter
Missing bones error
Hello Peter,
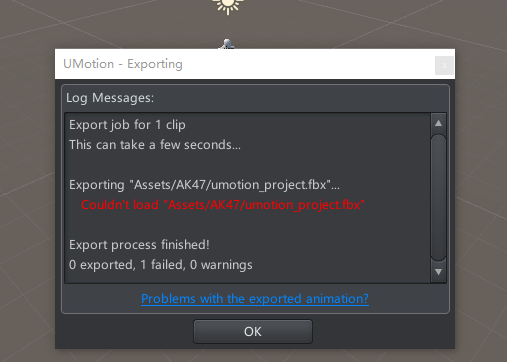
I've exported rigged FBX from Blender into Unity, added it in UMotion into the slot for gameobject, and I got this error:
https://take.ms/khkqF
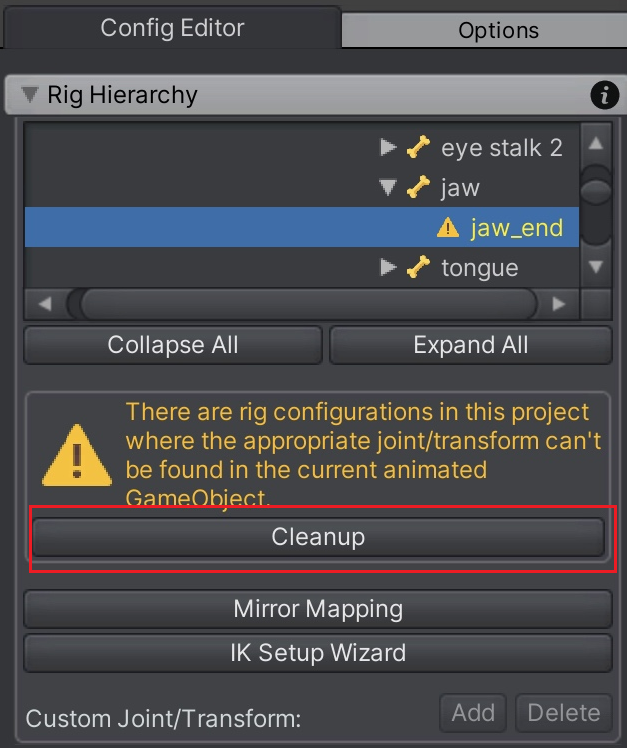
The rig then looks like this, with the bones missing on every chain's end: https://take.ms/bXk3z
Compare it to Blender: https://take.ms/6Oir4
What can be a problem and how to fix it?
Thank you.
Hi bartolomey_wong,
every time you assing a new character (or a new version of your character) to the same UMotion project, it will add references to all bones/transforms to the project. It will also give you a warning if it doesn't find the old bones/references. You could either press "Clean Up" in Config Mode to get rid of those old references or you could create a new UMotion project file.
Please always use one UMotion Project file per character.
Best regards,
Peter
Turn off the UI elements for some scene views?
Hello Peter,
I've created a layout with several scene views, to easily view the scene from different angles while animating.
Screenshot: https://take.ms/asyTH
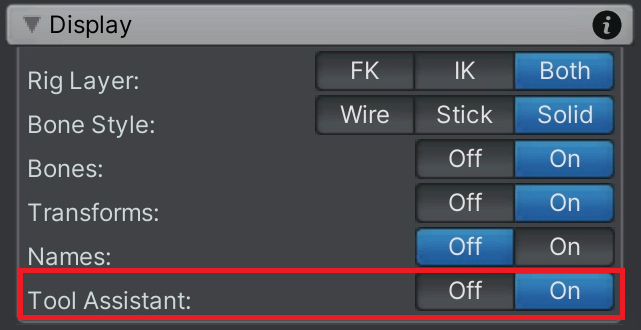
But as you can see, the UMotion in-scene panel is too large in those smaller views. Is it possible to turn it off just for some views but keep it on for the main view?
Thank you.
Hi bartolomey_wong,
thank you very much for your support request.
Unfortunately it's only possible to globally enable/disable that scene view "tool assistant" windows:
Please let me know if you have any further questions.
Best regards,
Peter
Is it possible to use UMotion not for animation, but for creating poses for assets?
Hello Peter,
So for example, I have a rigged character for a prop (a corpse). And I want to create several prefabs with this one model, having different postures for different environment.
Is it possible with UMotion to pose this model for several prefabs like that? Meaning no animation needed, I need to only have the ability to work with bones, move them around to create the pose, and then save the result as a prefab?
If it's not possible with UMotion, perhaps you have some recommendations for me as to how I am to achieve this?
Thanks in advance.
Hi bartolomey_wong,
thank you very much for your support request.
Yes, this is possible. Create a new UMotion project file for your character and assign your character to the pose editor. Pose your character (by moving the bones around). Once done, you can optionally save the pose to the UMotion project file (if you later want to come back and refine it) by created key frames for it.
Now here's the trick, instead of clicking on "Clear" in the Pose Editor to finish editing your character, click the arrow next to "Clear" and select "Clear - Keep scene pose".

Now the character keeps the pose even when not controlled by UMotion anymore and you can make a prefab out of it (by dragging and dropping the character from Unity's hierarchy window into Unity's project window).
Please let me know in case you have any follow-up questions.
Best regards,
Peter
Can I animate transformations with UMotion?
Hello,
I would like to create simple animations for environmental objects, like pulsating, meaning scaling up and down a bit in a loop. Or moving up and down, for things like grass or something.
So if I understand correctly, I would need to animate the scale and position for these cases, respectively.
Could you give me a hint on how to do that with UMotion? Cause I've followed your tutorial for a character rig, and I only know about animating with bones at this stage.
Thank you in advance.
Hi bartolomey_wong,
thank you very much for your support request.
That's easy. Make sure your object has an "animator" component assigned. Then create a new UMotion project of type generic. Assign your object to the pose editor and start animating as usual. You can animate the position, rotation and scale.
Please let me know in case you have any follow-up questions.
Best regards,
Peter
Can I animate characters in this style without a rig?
Hello,
I have this style of animation in mind:

Is it possible to do without the rig or not?
Thank you.
Hi bartolomey_wong,
thank you very much for your support request.
If the parts of the character are separate transforms (i.e. if they are seperate parts in the hierarchy window) then the answer is yes. Make sure to create a UMotion project file of type generic in this case.
Please let me know in case you have any follow-up questions.
Best regards,
Peter
Customer support service by UserEcho
