
 Synty Models No Face Bones?
I've been editing mixamo animations (and creating new ones) on Synty avatars. While it recognises everything else fine, the face bones (eyebrows, eyeballs) do not appear on the rig, which is limiting. What can I do? Thanks

Hi Edward,
thank you very much for reaching out.
If you have your character's configured as "humanoid", only a limited number of face bones is supported by the humanoid system itself:
- Jaw
- Left Eye
- Right Eye
You can assign bones to this role in the humanoid avatar editor:
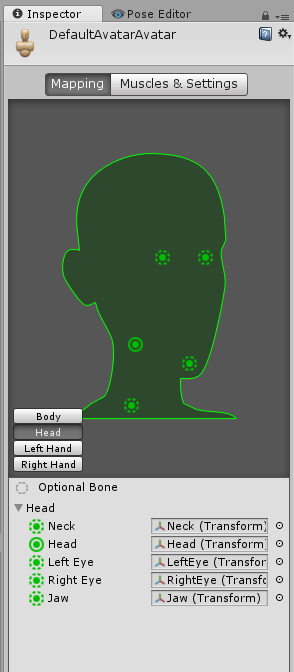
To access the avatar editor, select your model's source file (e.g. fbx), then open the "rig" tab and click on the "Configure..." button. When changing the avatar, you need to create a new UMotion project file for your character for the changes to take affect.
It is also possible to animate any other generic face bone, but those bone's won't be re-targeted by the humanoid animation system. That means that when the animation is played on a different humanoid character (with a different rig), the face bones not defined in the humanoid avatar will be ignored.
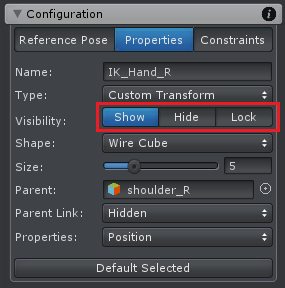
To animate any other generic (facial) bone in UMotion, you simply need to enable them: Go into config mode, select the bone you want to enable from the rig-hierarchy. Then open the properties tab and set "Visbility" to "Show".
Please let me know in case you have any follow-up questions.
Best regards,
Peter
 I want to use the animations I created with other avatars.
I often change the avatar I use, but since Umotion does not allow multiple avatars in one project, I export the animation and import it.
Is there any other way to do this, since this does not preserve the key pose and curve data?
My English is not very good, so I apologize if I am wrong.

Hi,
thank you very much for your support request.
So technically speaking, an animation made for character A never works directly on character B. That's why Unity introduced the "humanoid animation system" which is a so-called "animation re-targeting system". In other words, humanoid takes an animation A as input, and converts it into an abstracted/normalize format that humanoid then tries to play as similar as possible on any other character configured as humanoid. This does come with quality losses though (if you think about it, it really has to loose quality as characters often have different body proportions etc. so this can't be a 1:1 transition).
Very interesting article how this re-targeting works under the hood: https://blog.unity.com/technology/mecanim-humanoids
So in other words, without export your animation to humanoid first and then re-import it for your other character (in UMotion) you won't be able to edit the animation on that other character. But be warned that every export/import step might introduce some loss of quality due to the animation re-targeting.
So usually, you would only create the animation using a single character, export the animation as humanoid and then use it on any other humanoid character.
Please let me know in case you have any follow-up questions.
Best regards,
Peter

 Basic QoL features missing for keyframes
this is basic stuff that's missing, making umotion more like a beautiful chair missing a leg or a titanium hammer with a splintered handle.
what's missing:
- Option to isolate selected animated properties
- add selection and deselection of keyframes to undo stack
- deselect multiple keyframes shortcut
extremely basic stuff that's missing, have confirmed that other packages have this (blender, maya etc.)
UMotion has advanced humanoid features for the spine, legs and hands/fingers (muscle group) which separates it from industry standard 3d packages. You can animate inside of your game, even in playmode. Missing vital things like this is a tragedy.

Hi Dave,
thank you very much for sharing your ideas.
- deselect multiple keyframes shortcut
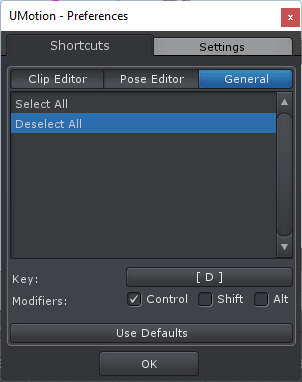
That's already possible: CTRL + D
You can change the shortcut under "Edit --> Preferences --> General" in the Clip Editor:
- Option to isolate selected animated properties
- add selection and deselection of keyframes to undo stack
Yes these are valid points and I already have them on my to-do list. Both require some bigger internal changes so they won't land in the next update (V1.29) which is scheduled to be released in the next 1-2 days. But on the positive side, some of your previous ideas are going to be included in V1.29 so stay tuned :-)
Please let me know in case you have any follow-up questions.
Best regards,
Peter
 Text to Speech
Hello Everyone:
Can UMotion do Text-To-Speech for a character at play time? And
play the sound files with the facial animation?
Thank you,
Geoffrey

Hi,
thank you very much for your support request.
If you animate the facial expressions manually, then yes:
1) Create a Unity timeline sequence with the sound file and your animation
2) Sync UMotion to Unity timeline to edit the animation file
3) Make sure that in Unity timeline you have audio preview enabled (to actually hear the sound file while playback)
There is no automated way to do this in UMotion.
Please let me know in case you have any follow-up questions.
Best regards,
Peter
 Mesh is deformed after exporting animation
I have an FBX, animation type is humanoid and avatar definition is "Create from this model"
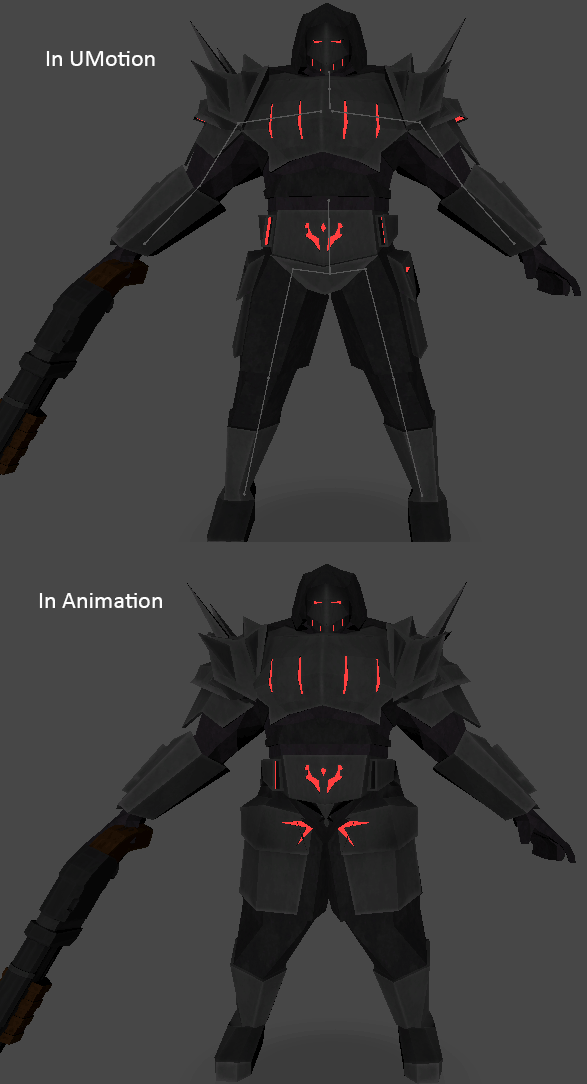
I Create a UMotion project -> Drag that model -> Create an animation that does nothing (TPose) -> Export the animation -> When I exit UMotion and play the "animation" in unity, the model is deformed, the exported animation's result doesnt look like when I'm in the UMotion editor.
Below you can see how the model looks in UMotion and how the model looks in the exported animation

Hi,
thank you very much for your support request.
What export settings do you exactly use? I would recommend using the "update existing file" mode and have your character's FBX file selected as destination file.
Another thing to consider, humanoid gives you less degrees of freedom in animating than generic. Looks like you've applied a tilt on your upper leg bones in UMotion which is something real-life humans are not capable of doing. UMotion let's you correctly preview your animation but once your animation is exported to FBX and then imported as humanoid by Unity, it discards that rotation.
If you want 100% artistic control over your character in your animation, use generic instead of humanoid.
The only reason to choose humanoid over generic is when you have lots of characters that should all use the same animation. If that is not the case, generic is recommended. More information on what humanoid actually is, can be found in this blog post: https://blog.unity.com/technology/mecanim-humanoids
Please let me know in case you have any follow-up questions.
Best regards,
Peter

 Custom handles for custom properties
Hey there! I'm trying out UMotion and it looks just about perfect for me, but I've run into some questions while trying to get it to work with a system of mine.
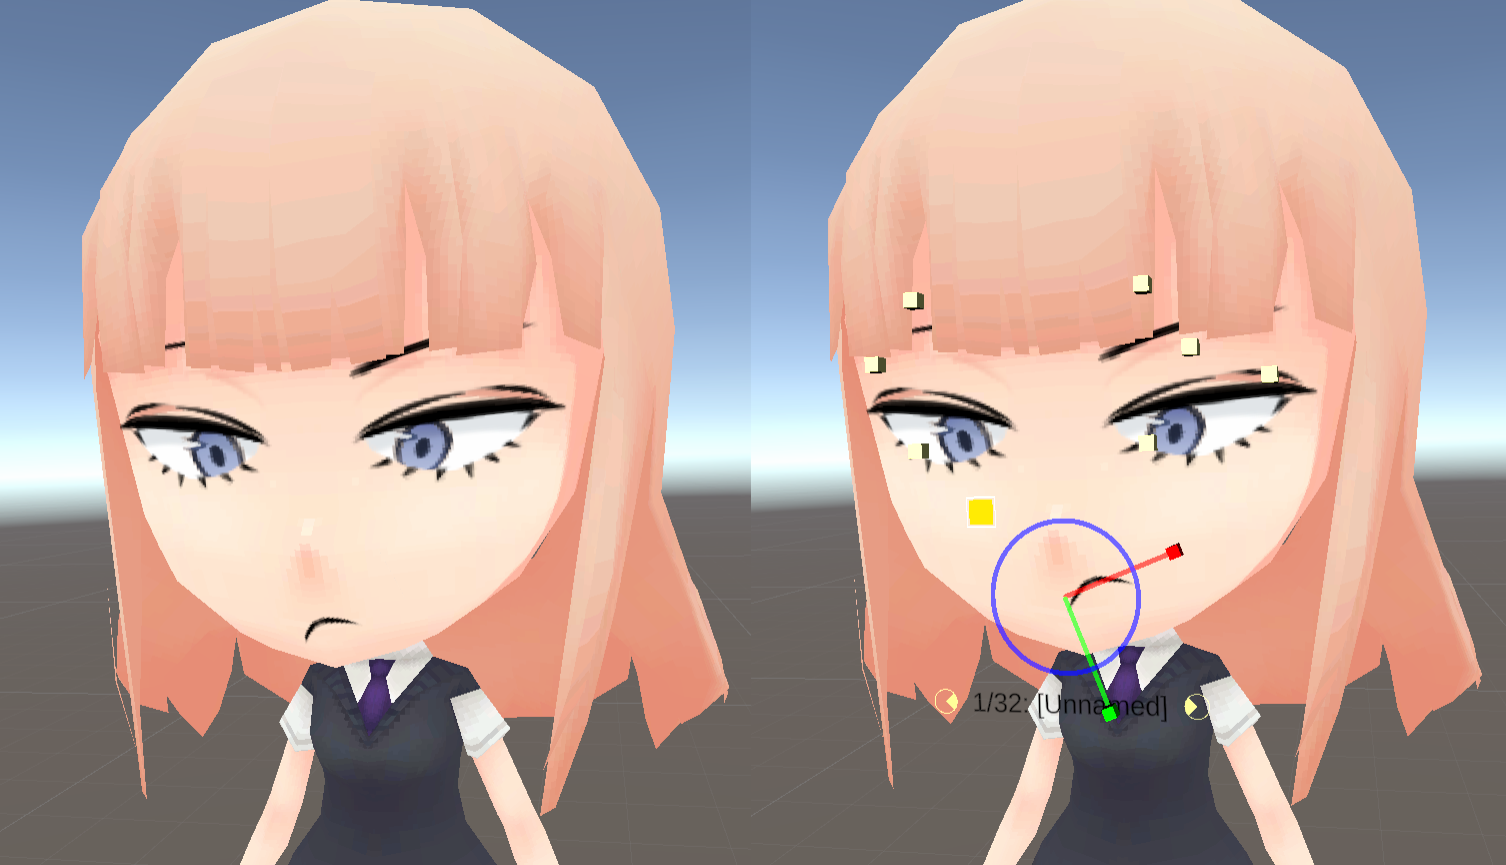
This system basically allows you to move/scale/rotate 2D textures on a 3D character's face, so you can do facial animation with 2D art. I've gotten it to work fine with UMotion through custom properties, but the problem is that I can't find a way to manipulate those properties in a user friendly way. Changing the numbers directly is too cumbersome, and the custom handle I made doesn't do anything while UMotion is locking the object.
So, the question: Is there a way to change the value of a custom property through code, or otherwise set up a custom handle/gizmo for it? I looked at the API and didn't see anything like that but I may have missed it. I'm open to alternate solutions too.
Other than this sticking point it seems like UMotion is exactly what I was looking for! Being able to work on face and body animations at the same time would be perfect.
Edit: After looking at the API again this might actually be a feature request: Would it be possible to get a TrySetComponentProperty to go along with TrySetFkLocalPosition/etc.? With that making the transform handle work with UMotion would be no problem at all.

Hi,
thank you very much for your support request.
After looking at the API again this might actually be a feature request: Would it be possible to get a TrySetComponentProperty to go along with TrySetFkLocalPosition/etc.? With that making the transform handle work with UMotion would be no problem at all.
I'm currently working on a new UMotion version that comes with an updated/extended UMotion API. I've already implemented your requested method today. The new version should be available in a few days.
Please let me know in case you have any follow-up questions.
Best regards,
Peter
 Too large file sizes
I have just noticed my animation files have quite high file sizes. Do you have any idea why, and how can I reduce it ?
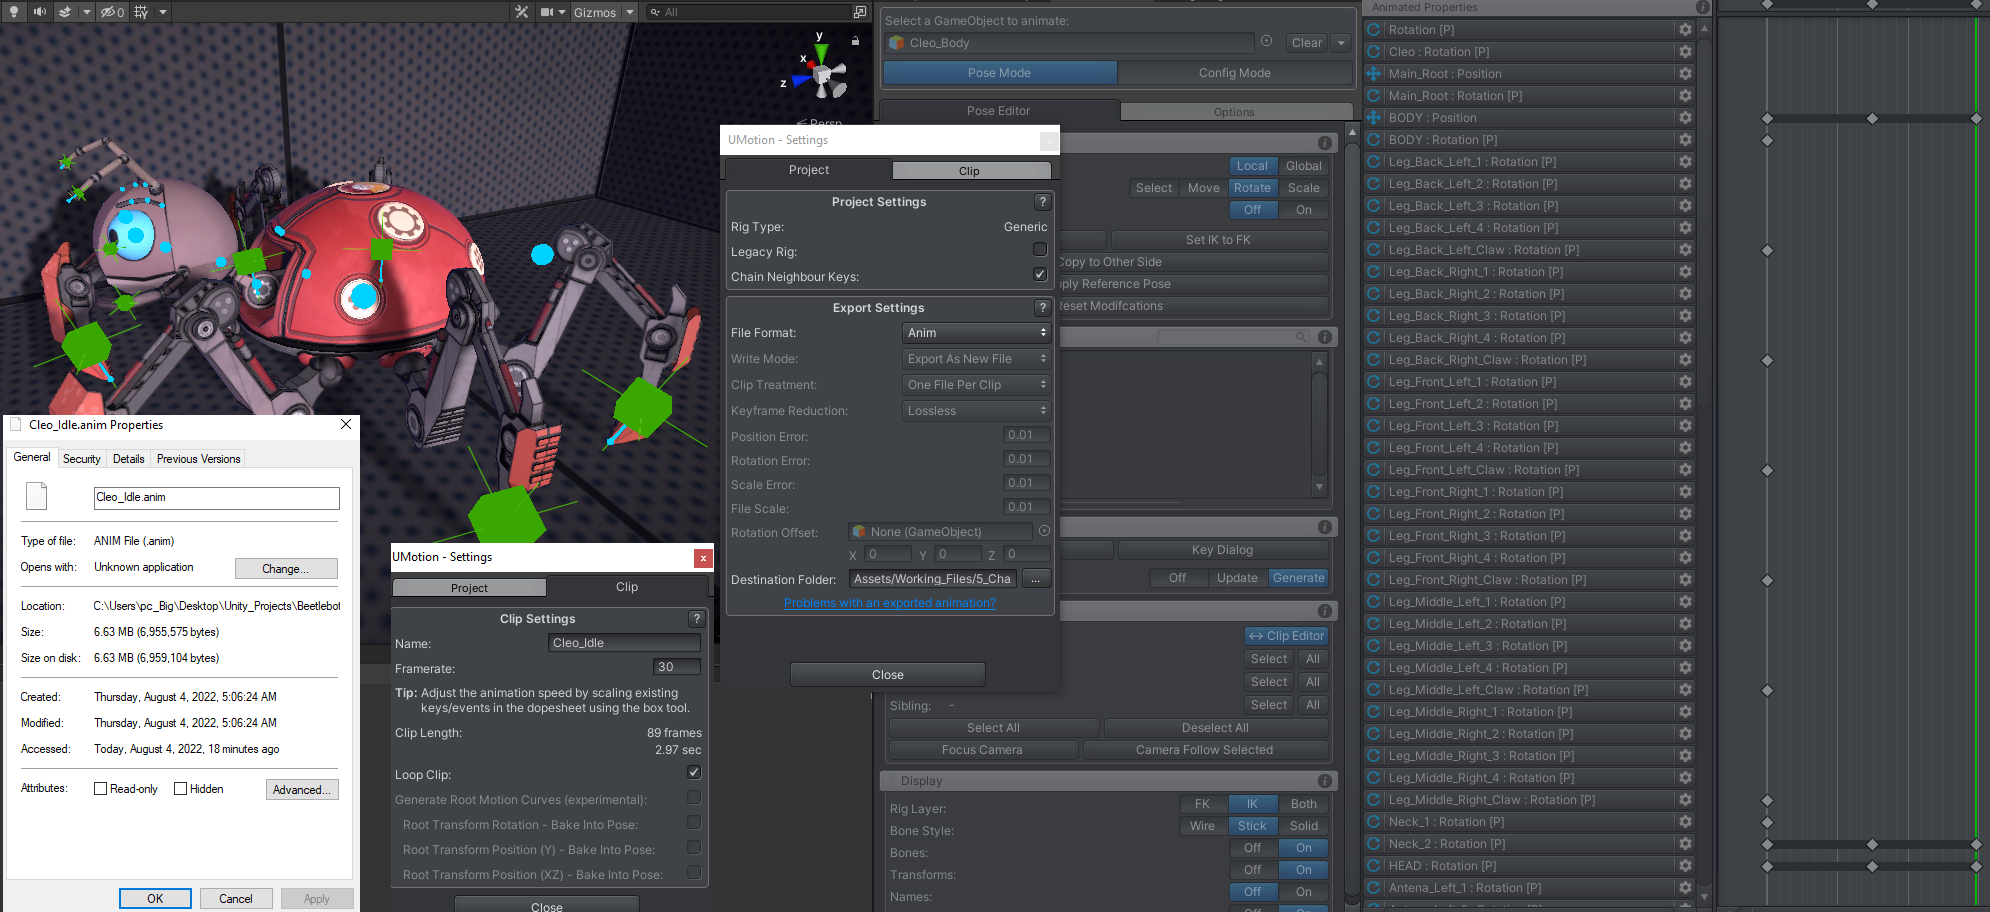
Small files with 30 fps and 2-3 sec length are 6-7 mb + and larger ones with 50 + seconds can get 300 mb or more.
I have sort of complex model with lots of Ik handles. I have hidden almost all of the bones since I need only the IK handles. Anyway you can see on the picture. I have added few more settings too.
Also changing to 60 and 30 fps back and forth doesnt seem to do anything whatsoever...

Hi,
thanks for your support request.
1- the size on windows is not the same as the size in unity. Size in unity is around 200kb while in windows explorer its 8 mb
This is the correct answer. More details here: https://support.soxware.com/en/communities/1/topics/350-umotion-multiplies-x9-my-animation-size-what-can-i-do#comment-397
Please let me know in case you have any follow-up questions.
Best regards,
Peter
 Auto Key mode for both Update and Generate
I can choose Update or Generate from Auto Key,
but would like a new mode.
If there is no Key, it will be Generate.
If there is a Key, it goes to Update.
This will make it easier to add/update keys.
 Export humanoid animations as multiple FBX and combine clips additively
Hello,
First, I want to say how great and enjoyable using UMotion has been so far. I finally took the time today to really dig into when I ran intoo some basic retargetting issues (clipping is my biggest pet peeve), and I must say I am impressed and really glad I purchased this. Definitely wish I started sooner!
Onto my questions though, I have 2 that I tried searching for but wasn't able to find anything specific.
1. Can we export humanoid animations into multiple single clip FBX? For organization purposes, I much prefer if each animation is a separate FBX (I also use the FBX curves and masks, so not being a clip makes this much easier) but attempting to do so gives a warning that it's not recommended for Humanoid Animations, and if you do so anyways, attempting to copy the avatar leads to errors about conflicting bones even though it should be the same model and rig.
I was able to export and update the existing FBX, but beyond just exporting a single clip at a time and constantly duplicating the FBX, I'm not sure ift this is possible?
2. This is just a brainstorming thing, are we able to take a clip using it as a base layer, and then apply another clip ontop of it additively? For example, something I was thinking about is how Mixamo usually has a male and female run animation, and what I'd like to do is take one of those as a base, but then apply all of the keyframes of the other and use the resulting animation. The idea is for to help easily create a more unique animation.
I am currently using UMotion Pro 1.28p04 if that matters to the above.
Thanks!
Will

Hi,
thank you very much for your support request. I'm glad to hear that you are enjoying working with UMotion so far.
1. Can we export humanoid animations into multiple single clip FBX? For organization purposes, I much prefer if each animation is a separate FBX (I also use the FBX curves and masks, so not being a clip makes this much easier) but attempting to do so gives a warning that it's not recommended for Humanoid Animations, and if you do so anyways, attempting to copy the avatar leads to errors about conflicting bones even though it should be the same model and rig.
Exporting into a separate FBX is going to add the bones exactly as they are in your UMotion project to the FBX. If you get errors regarding conflicting bones when copying the avatar, then there might be differences between the rig that's in your original character's FBX and the prefab you have assigned to the pose editor (reason can be that Unity modified the imported FBX or that something was added/removed in the prefab). I would recommend that you use a 3D modelling application to compare the original and the exported FBX files to further debug this.
I was able to export and update the existing FBX, but beyond just exporting a single clip at a time and constantly duplicating the FBX, I'm not sure ift this is possible?
There is currently no built in way to do this, but you can use the UMotion API to write your custom export procedure (if you know a bit of C# coding in Unity). Here is the link to the documentation: https://www.soxware.com/umotion-manual/UMotionAPI.html
Your custom script could automatically duplicate the original FBX file etc.
2. This is just a brainstorming thing, are we able to take a clip using it as a base layer, and then apply another clip ontop of it additively? For example, something I was thinking about is how Mixamo usually has a male and female run animation, and what I'd like to do is take one of those as a base, but then apply all of the keyframes of the other and use the resulting animation. The idea is for to help easily create a more unique animation.
UMotion does support additive and override layers. Here is the link to the documentation: https://www.soxware.com/umotion-manual/Layers.html
And here is a video tutorial that uses additive layers to adjust the look and feel of an existing animation:
Please let me know in case you have any follow-up questions.
Best regards,
Peter

 Weapon Offset when parented under right shoulder
I needed a parent that would give me control over both hands, and continued to animate the gun object and its children using constraints. I ended up with the desired animation, but when exported, the gun oddly enough is offset halfway the animation.
It's another one of those things that feels like it defies all logic.
Is there a way to change the parent of the gun to the right hand and keep the animation intact?
When things are parented to the hands, I guess things work better. I did not have this problem with another reload animation and the gun was parented to the hand there.
This was a hassle but doable since I was still in the blockout phase.
Fix:
In the Scene:
1. Duplicate your character (in the hierarchy) as a backup.
2. Change the object to the hand as the parent.
3. Give the object the right start/scene- (local) position to prevent offset.
In UMotion
4. In config, select "Apply Scene Pose".
5. In config, create the same setup for all the child objects to have bones.
6. Remove all the keyframes onwhich you applied "Update Position and Rotation keys".
7. Re-add all constraints on the keyframes you previously started constraint connections on.
This fixed the offset and now results are consistent.
For now I am wary of parenting to anything but hands with humanoid animations.
Customer support service by UserEcho
